
User Manual


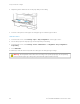


Table Of Contents
- User Guide
- Copyright (Sedona UGs and SRRDs)
- Safety information
- Learn about the printer
- Set up, Install, and Configure
- Selecting a location for the printer
- Attaching cables
- Finding the IP Address of the Printer
- Installing optional trays
- Initial Setup Wizard
- Networking
- Connecting the printer to a wired Ethernet network
- Connecting the printer to a Wi-Fi network
- Connecting the printer to a wireless network using Wi-Fi Protected Setup (WPS)
- Configuring Wi-Fi Direct
- Connecting a mobile device to the printer
- Connecting a computer to the printer
- Deactivating the Wi-Fi network
- Checking the printer connectivity
- Setting up the printer to fax
- Configuring the e-mail SMTP settings
- Using the e-mail setup wizard in the printer
- Using the Settings menu in the printer
- Using the Embedded Web Server
- Loading paper and specialty media
- Installing and updating software, drivers, and firmware
- Installing the printer software
- Adding printers to a computer
- Installing the fax driver
- Installing the Software
- Operating System Requirements
- Installing the Print Drivers for a Windows Network Printer
- Installing the Windows Print Driver .zip File
- Installing the Print Drivers for a Windows USB Printer
- Installing the Printer as a Web Service on Devices
- Installing the Drivers and Utilities for MacOS
- Installing Print Drivers and Utilities for UNIX and Linux
- Updating Firmware
- Exporting or importing a configuration file
- Adding available options in the print driver
- Printing the Menu Settings Page
- Secure the printer
- Copy
- Fax
- Scan
- Use printer menus
- Maintain the printer
- Troubleshoot a problem
- Print quality problems
- Printing problems
- Print quality is poor
- Blank or white pages
- Dark print
- Fine lines are not printed correctly
- Folded or wrinkled paper
- Gray background
- Incorrect margins
- Light print
- Mottled print and dots
- Paper curl
- Print crooked or skewed
- Solid black pages
- Text or images cut off
- Toner easily rubs off
- Horizontal light bands
- Vertical light bands
- Vertical white lines
- Vertical dark bands
- Vertical dark lines or streaks
- Vertical dark streaks with print missing
- Repeating defects
- Print jobs do not print
- Slow printing
- Job prints from the wrong tray or on the wrong paper
- Confidential and other held documents do not print
- Print quality is poor
- The printer is not responding
- Unable to read flash drive
- Enabling the USB port
- Network connection problems
- Issues with supplies
- Clearing jams
- Paper feed problems
- E-mailing problems
- Faxing problems
- Scanning problems
- Cannot scan to a computer
- Cannot scan to a network folder
- Partial copies of document or photo
- Scan job was not successful
- Poor copy quality
- Vertical dark streaks on output when scanning from the ADF
- Scanner does not close
- Scanning takes too long or freezes the computer
- Scanner does not respond
- Adjusting scanner registration
- Adjusting ADF registration
- Contacting customer support
- A Regulatory Information
- Basic Regulations
- Noise Emission Levels
- Static Sensitivity Notice
- ENERGY STAR
- Temperature Information
- Información de la energía de México
- Laser Notice
- Power
- Telecommunication Regulatory Notices
- Regulatory Notices for Wireless Products
- Federal Communications Commission (FCC) Compliance Information Statement
- Innovation, Science and Economic Development Canada Compliance Statement
- Germany
- Turkey RoHS Regulation
- Ukraine RoHS Compliance
- Copy Regulations
- Material Safety Data Sheets
- Basic Regulations
- B Recycling and Disposal

Installing and updating software, drivers, and firmware
INSTALLING THE PRINTER SOFTWARE
• The print driver is included in the software installer package.
• For Macintosh computers with macOS version 10.7 or later, you do not need to install the driver to print on an
AirPrint-certified printer. If you want custom printing features, then download the print driver.
1. Obtain a copy of the software installer package.
• From the software CD that came with your printer.
• Go to www.xerox.com/drivers.
2. Run the installer, and then follow the instructions on the computer screen.
ADDING PRINTERS TO A COMPUTER
Before you begin, do one of the following:
• Connect the printer and the computer to the same network. For more information on connecting the printer to
a network, see Connecting the printer to a Wi-Fi network.
• Connect the computer to the printer. For more information, see Connecting a computer to the printer.
• Connect the printer to the computer using a USB cable. For more information, see Attaching cables.
Note: The USB cable is sold separately.
For Windows users
1. From a computer, install the print driver.
Note: For more information, see Installing the printer software.
2. Open PPrriinntteerrss && ssccaannnneerrss, and then click AAdddd aa pprriinntteerr oorr ssccaannnneerr.
3. Depending on your printer connection, do one of the following:
• Select a printer from the list, and then click AAdddd ddeevviiccee.
• Click SShhooww WWii--FFii DDiirreecctt pprriinntteerrss, select a printer, and then click AAdddd ddeevviiccee.
Xerox
®
B305/B315 Multifunction Printer User Guide 67
Set up, Install, and Configure