Copyright Information Copyright © 2006 by Oki Data. All Rights Reserved Document Information ________________________________ B2500 MFP User’s Guide P/N 59389201, Revision 1.0 November, 2006 Disclaimer__________________________________________ Every effort has been made to ensure that the information in this document is complete, accurate, and up-to-date. The manufacturer assumes no responsibility for the results of errors beyond its control.
Safety Warning Repairs/maintenance: Repairs and maintenance should only be carried out by a qualified technician. There are no user serviceable parts inside the machine. To reduce the risk of electrical shock, you must not carry out these operations yourself. Opening or removing the covers exposes you to two hazards: - The laser beam can cause irreversible eye damage. - Contact with electrical components can lead to electrical shock.
Dear customer For your security and comfort, we urge you to carefully read the Safety/Warranty/Regulatory booklet before any use. By buying this multifunction machine, you have opted for a quality product. Your device satisfies the different specifications of a modern office automation tool. This machine allows you to scan in color and black and white, to print and copy in black and white. You can connect the multifunction device to your PC (Microsoft Windows 98SE/ME/2000SP3/XP).
B2500 Contents Dear customer . . . . . . . . . . . . . . . . . . . . . 4 Consumables . . . . . . . . . . . . . . . . . . . . . 4 Installation . . . . . . . . . . . . . . . . . . . . . . . . 7 Location conditions . . . . . . . . . . . . . . . . . 7 Cautions of use . . . . . . . . . . . . . . . . . . 7 Terminal description . . . . . . . . . . . . . . . . 9 Front side . . . . . . . . . . . . . . . . . . . . . . 9 Back side . . . . . . . . . . . . . . . . . . . . . 10 Command panel . . . . . . . . . . . . . .
B2500 Specifications . . . . . . . . . . . . . . . . . . . . . Physical specifications . . . . . . . . . . . . Electrical specifications. . . . . . . . . . . . Environmental specifications . . . . . . . . Peripheral specifications . . . . . . . . . . . Safety . . . . . . . . . . . . . . . . . . . . . . . . . . . Consumables . . . . . . . . . . . . . . . . . . . . . Service . . . . . . . . . . . . . . . . . . . . . . . . . . .
Installation Location conditions By choosing an appropriate location, you preserve the longevity of the machine. Check that the selected location has the following characteristics: - Choose a well ventilated location. - Make sure not to obstruct the ventilation grids located on the left and right sides of the device. During the installation, make sure to place the machine thirty centimeters away from the surrounding objects so all the lids can be easily opened.
1 - Installation B2500 - Never try to modify the machine. This could cause a fire hazard or an electric shock hazard. - Always make sure that paper clips, staples or other small metallic items do not get inside the machine via the ventilation ports or other ports. Such items create fire hazards or electric shock hazards. - Prevent water and any other liquid from spilling on the machine or near to it. Any contact of the machine with water or liquid can cause a fire hazard or an electric shock hazard.
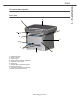
1 - Installation B2500 Terminal description Front side 2 1 3 10 9 4 8 7 6 1 Commands panel 2 Scanner Cover 3 Paper output 4 Master USB connection (USB key) 5 Cartridge access cover 6 Paper tray 7 Manual paper feed setup guides 8 Manual Input Tray 9 Fold-down stop for paper delivery 10 Smart card insertion point B2500 MFP User’s Guide 9 5
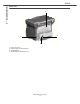
1 - Installation B2500 Back side 1 2 4 3 1 2 3 4 Paper jam cover Power supply cord connection On/Off switch Slave USB connection (for PC) B2500 MFP User’s Guide 10
1 - Installation B2500 Command panel 1. Screen 2. Digital keypad 3. SCAN Button: document scan to the PC 4. COPY Button: local copy 5. STOP PRINT Button: stops the current printing 6. Button: validation 7. OK Button: confirms the displayed selection 8. Button: menu access and navigation down the menus 9. C Button: back to the previous menu and input correction 10. Button: navigation up the menus 11. Button: stop the current operation 12. ECO Button: sets up the activation delay 13.
1 - Installation B2500 Packaging contents The packaging contains the items listed below: Multifunction device 1 toner cartridge 1 installation guide, 1 PC installation/user guide CD ROM 1 power cord 1 booklet (safety and warranty)) B2500 MFP User’s Guide 12
device installation 1 2 3 4 Unpack the device. Install the device respecting the security notices stated at the beginning of this booklet. Remove all stickers from the machine. Remove the plastic protection film from the display screen. Loading paper Loading paper in the main unit tray and supplementary paper feed (1) Paper to be used must be inserted with the face down, and abutting the side and back guides. Not abutting the paper may cause feed failure, skewing, and paper jams.
1 - Installation B2500 1 Remove the paper feed cassette completely. 2 Push the lower panel down until it clicks. 3 Setup the back feed cassette stop by pushing the "PUSH" lever (A). Then adjust the lateral paper guides to the paper format by pushing lever (B) located on the left guide. Adjust the length paper guide to the paper format by pushing lever (C). 4 Take a paper stack, pull the top sheet off and align it on a flat surface.
Paper delivery stop Adjust the paper delivery stop, depending on the format of the document to be printed. Do not forget to raise the flap to prevent the sheets from falling down. Paper insertion in the manual input tray The manual input tray allows you to use various paper formats with heavier weights than the one used in the paper feed cassette. Only one sheet or envelope can be fed at a time. You can use paper, which weights between 11 and 35 lbs (52 and 160 g/m²).
1 - Installation B2500 • Set envelope by pressing the folding line of four edges properly after releasing air inside. • Set envelope in a proper position after aligning in case it is bent or warped. Toner Cartridge installation 1 Stand in front of the machine. 2 Push the left and right sides of the cover and pull it at the same time towards you. 3 Unpack the cartridge and hold it by its handle.
Starting your device Device connection Before plugging the power cord, it is imperative to refer to the Safety/ Warranty/Regulatory booklet. 1 Connect the power cord to the device. 2 Make sure that the On/Off switch is on Off (O position). Plug the power cord to outlet on the wall. The outlet should be located close to the device and be easy to access. 3 Press the On/Off button to turn on the device (I position). 4 The following message appears: HAVE YOU CHANGED THE TONER? Press OK.
2 - Copy B2500 Copy 8 Adjust the desired zoom level, from 25% TO Your machine can make one or more copies. You can also setup several special copy parameters. Simple copy In this case, the default parameters are applied. 1 Place the document to be copied face down on the glass, respecting the indications around the glass. 2 Press the button twice. The copy is made using the default parameters. Special copying Special copying allows you to do custom setups for the current copy.
Zoom setup button. 3 Quit this menu by pressing the 842 - ADVANCED FCT/COPY/ ZOOMING Paper type setup The ZOOM parameter allows you to shrink or enlarge an area of a document by choosing the origin and the zoom level to be applied to this document from 25 to 400 %. Enter the desired zoom level with the digital keyboard, confirm your choice by pressing the OK button. Scan origin setup If you want, you can change the origin of the scanner. END OF SHEET BEGIN.
3 - Parameters/Setup B2500 Parameters/ Setup You can setup your machine as you like depending on the functions you need. This chapter describes the functions. You can print the functions guide and the available setup of your multifunction machine. Read the counters You can view the activity counters for your machine at any time. This function shows you the number of scanned pages. ▼ 823 - ADVANCED FCT/COUNTERS/ SCANNED PAGE 1 Press on ▼, enter 823 with the keyboard.
You can choose with the setup WITHOUT, DELAY 5 MIN, DELAY 15 MIN, DELAY 30 MIN. ▼ 29 - SETUP/TECHNICALS 1 Press on ▼, press on OK. 2 Select TECHNICALS with the ▼ or ▲ buttons and confirm with OK. 3 Select 08 with the ▼ or ▲ buttons and confirm with OK. 4 Quit this menu by pressing the button. Save your toner cartridge This function allows you to increase the lifetime of your toner cartridge. ▼ 29 - SETUP/TECHNICALS 1 Press on ▼, press on OK.
4 - WLAN network B2500 WLAN network You can connect your machine to a PC using a USB cable or make a wireless connection (via radio) with a PC or network. across the whole radio network is as fast as the weakest connection in the network. The speed of communication is also dependent on spatial distance between transmitter and receiver, as well as the number of barriers, such as walls or ceilings.
Connect your WLAN adaptor Your machine belongs to a new generation of terminals that you can incorporate into a WLAN network using a WLAN USB key. Your machine’s network radio adaptor transmits data using the radio protocol IEEE 802.11g; it can also be incorporated into an existing IEEE 802.11b network. When connecting to your machine, only use the approved adaptor. Other transmitting or receiving adaptors may damage your device.
4 - WLAN network B2500 Referring to or changing your network parameters Each of the parameters of your network may be changed as your network develops. ▼ 2822 - SETUP/WLAN/PARAMETERS/ IP ADDRESS 1 Type in ▼, select the menu SETUP using the keys ▼ or ▲ and confirm with OK. 2 Select WLAN using the keys ▼ or ▲ and confirm with OK. 3 Select PARAMETERS using the keys ▼ or ▲ and confirm with OK. 4 Select IP ADDRESS using the keys ▼ or ▲ and confirm with OK.
You may also enter the password using the hexadecimal system. If this is the case: - For a 64 bit security configuration, the password must contain exactly 10 hexadecimal characters. - For a 128 bit security configuration, the password must contain exactly 26 hexadecimal characters. 6 Exit this menu by pressing the key. ▼ 2828 - SETUP/WLAN/PARAMETERS/ HOSTNAME The machine name allows you to identify your machine on the network via a PC (for example with the name "PRINT-NETWORK-1").
4 - WLAN network B2500 Setting up the PC For this section, refer to the instructions supplied by the manufacturer of your server to help you to find and join the "house" network. 1 Plug WLAN USB key into a USB port on the PC. 2 Use the server software to detect the network. 3 Join the network "house" once this has been detected. 4 Now set up the WLAN network connection of your PC. To do this, you must configure the element Protocol Internet (TCP/IP) for the WLAN connection that has been created.
USB memory key You can connect a USB memory Key on the front side of your machine. The files stored in TXT, TIFF and JPEG formats will be analyzed and you will be able to use the following actions: -print the stored files contained in your USB memory key, -delete the files contained in your USB memory key, -run an analysis on the contents of the inserted USB memory key, -digitize a document on your USB memory key.
5 - USB memory key B2500 USB memory key. Select ALL with the ▼ or ▲ buttons and confirm with OK. You come back to the previous menu. - SERIES, to delete several files located in the USB memory key. Select SERIES with the ▼ or ▲ buttons and confirm with OK. FIRST FILE and the first indexed file appears on the screen, select with the ▼ or ▲ buttons the file to delete and confirm with OK. A star (❅) appears on the left of the file.
PC Features Installation Install the software on your PC Introduction Turn your PC on. Open an ADMINISTRATOR session unless working in 98SE and ME environments. 1 Insert the CD-ROM into your CD-ROM drive. It is recommended to install the Companion Suite Pro software first and then to connect the USB cable to your machine. The Companion Suite Pro software allows the connection of a personal computer with a compatible multifunction machine. The CD will autorun. If it doesn’t, click Start>Run>Browse.
6 - PC Features B2500 screen appears. progress. 7 Click on the NEXT button to launch the installation of the COMPANION SUITE PRO kit on your PC. 8 Before the files are copied on your hard drive, you need to accept the proposed license agreement, use the scroll bar to read the agreement entirely. 13The Companion Suite Pro software is installed on your PC. 14Click on the CONTINUE button to copy the 9 Click on the YES button. 10The final installation is ready to be executed.
Connections Test the driver installation. Make sure that your multifunction machine is powered off. USB Connection The connection between the PC and the machine requires a USB 2.0 shielded cable no more than 3 meters long. If USB cable is Installed Before Software You can connect the USB cable before installing the Companion Suite Pro software on Windows 2000 and XP. To test the USB and printer driver installation, print a test page: 1 Click START >SETTINGS >PRINTERS & FAXES.
6 - PC Features B2500 list. Click on the NEXT button. Wireless connection 5 The next window lists the different features of the printer that are about to be installed. Click on the NEXT button. The Companion Suite Pro LL software must be installed to perform this operation. 1 Run the MF Director application by clicking on the icon located on your desktop or from the menu START >PROGRAMS >COMPANION SUITE >COMPANION SUITE PRO LL > ADD PRINTER.
Multifunction Terminal's Supervision LL program removal. 4 A preparation screen appears. You can cancel the removal by clicking on CANCEL.
6 - PC Features B2500 Utilities and applications activation The COMPANION SUITE PRO graphical interface allows you to run the following utilities and software: - get HELP from the current documentation, - run the PaperPort software (Doc Manager). - SCAN TO: Scan Mode and Resolution parameters setup, these parameters will be taken into account when clicking on the SCAN button from the machine.
Companion Suite Pro LL functions Analysis from a TWAIN compatible software If the PaperPort software is not installed on your hard drive, the scanned picture will appear on your desktop in TIFF format. Document analysis The document analysis can be carried out in two ways: • either by the SCAN TO function (application accessible from the MF Director window or from the SCAN button from the machine), • or directly from a TWAIN standard compatible application.
7 - Maintenance B2500 Maintenance motion, as indicated in the picture below. Service General information For your safety, it is imperative to refer to the security directives presented in the Safety, Warranty, and Regulatory Information booklet. To ensure that your machine is kept in the best condition, it is recommended that you periodically clean the inner parts. Please respect the following rules while using this machine: - Do not leave the scanner cover open. - Do not try to lubricate the device.
display: PLEASE WAIT then, UNKNOWN CARD REMOVE CARD If the C button is pressed while the smart card is being read, the machine displays: ACTION CANCELLED REMOVE CARD Cleaning Message Action REPLACE PAPER Add paper in tray. HEATING Message displayed when starting the machine. CLOSE COVER PRINTER The printer front cover is open, close it. TONER EMPTY REPLACE Replace the toner cartridge. PAPER JAM REMOVE TONER A sheet of paper is jammed in the machine.
7 - Maintenance B2500 Open and close the consumable cover. The printer starts again automatically. The fusion unit can reach a very high temperature during the operation. To prevent any harm, do not touch this area. In case of paper jam. The following message appears: PAPER JAM REMOVE TONER Do the following: 1 Remove the toner cartridge and check if a sheet is jammed. Remove the sheet of paper which causes the paper jam. Put the toner cartridge in the machine.
Specifications Physical specifications Dimensions: Weight: 17.6 x 15.2 x 13.5 inches (447 x 386 x 344 mm) 25.5 lb (11.6 kg) Electrical specifications Power supply: Electric consumption: 110 - 120 V - 50/60 Hz 10 W typical in powersave 13 W typical in standby 340 W average during printing Environmental specifications Operating temperature: Acceptable humidity level: In operation: 50°F. to 90°F.
9 - Safety B2500 SAFETY SAFETY WARNING Before powering on your unit, make sure the power outlet it is connected to meets the requirements printed on the warning label on your unit, or on the separate power supply (depending on the model). This unit must not be installed on the floor. If your unit works with a separate Power Supply, use only the one delivered with your unit; never use another power supply.
CONSUMABLES Toner Cartridge Part Number :56120401 Toner cartridge characteristics: The standard toner cartridge can produce up to 4,000 pages (when printing on Letter paper with a 5% max. black and white ratio). The initial toner cartridge can produce up to 1,500 pages (when printing on Letter paper with a 5% max. black-and-white ratio). The service life of the toner cartridge mainly depends on the type of printed document and the average number of pages per print operation).
B2500 SERVICE AND SUPPORT First... Consult the store where you purchased your printer. Additional OKI Resources •Available 24 hours a day, 7 days a week •Visit our multilingual web site: www.OKIPRINTINGSOLUTIONS.COM •Visit MY.OKIDATA.COM •Call 1-800-654-3282 (U.S. and Canada only) OKI is a registered trademark of Oki Electric Industry Company, Ltd. AmEx is a registered trademark of American Express Co. Avery is a registered trademark of Avery Dennison Corporation.