
User's Manual


Table Of Contents
- Safety
- Getting Started
- Installation and Setup
- Using the Services
- Printing
- Paper and Media
- Maintenance
- Troubleshooting
- Troubleshooting Overview
- General Troubleshooting
- Restarting the Printer
- Printer Fails to Power On
- Printer Resets or Powers Off Frequently
- Document Prints from the Wrong Tray
- Automatic 2-Sided Printing Problems
- Paper Tray Fails to Close
- Printing Takes Too Long
- Print Job Fails to Print
- Printer Makes Unusual Noises
- Condensation has Formed Inside the Printer
- Paper Curl
- Paper Jams
- Printing Problems
- Print-Quality Problems
- Copy and Scan Problems
- Fax Problems
- Getting Help
- Security
- Xerox® CentreWare® Internet Services
- Setting Access Rights
- Setting Print Permissions
- Device User Database
- Secure HTTP
- IP Filtering
- IPSec
- Security Certificates
- Concealing or Showing Job Names
- 802.1x
- Displaying or Hiding Network Settings
- System Timeout
- USB Port Security
- Restricting Access to the Web User Interface
- Software Verification Test
- Specifications
- Regulatory Information
- Recycling and Disposal
Setting Up the Services
Xerox
®
B215 Multifunction Printer
User Guide
103
Configuring Fax Incoming/Outgoing Policies
1. In Xerox
®
CentreWare
®
Internet Services, click Properties Services
2. Click Fax.
3. For Incoming/Outgoing Policies, to edit a setting, click the Pencil icon.
4. To print a transmission receive report automatically, click On.
5. For Incoming Policies, select the settings required:
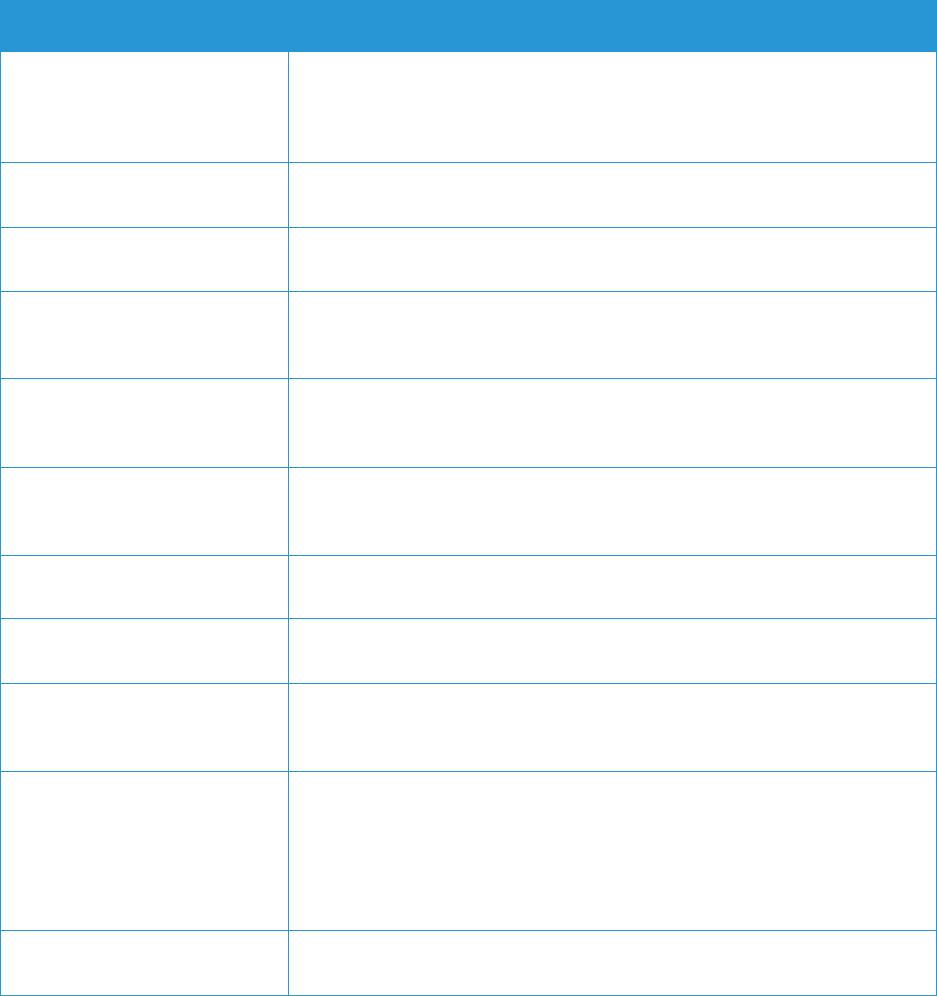
Feature Description
Receive Mode Use this option to select for the device to answer the fax call immediately,
or to wait for a user to answer the call manually. Select Fax for the device to
answer immediately or Tel. for a user to answer the call. This option is useful
if you have a shared telephone line for calls and faxes.
Ringer Volume Use this option to adjust the volume of the ringer. Set the volume to Off,
Low, Medium or High.
Ring to Answer This option determines the number of times the calling fax rings before the
printer answers. Set the number between 1 and 7.
Redial Term If the number you have dialed is busy or there is no answer, the printer
automatically redials the number. Set the interval time between each redial
attempt from 1 to 15 minutes.
Redial Count If the number you have dialed is busy or there is no answer, the printer
automatically redials the number. Set the number of redial attempts the
printer makes before cancelling the job between 0 and 13.
Discard Size Select to automatically crop large documents received to fit on the paper
size supported by the printer. Enter the amount of margin the printer crops
between 0 and 30 mm.
Fax Duplex Select to enable printing of two-sided faxes at your printer. Select Off or
Long Edge.
Rx Reduction Select to automatically reduce large documents received to fit on the paper
size supported by the printer.
Stamp Receiver Name Check the Stamp Receive Name check box to enable the printer to print a
page number and the date and time of receipt on the bottom of each page
of a received fax.
Secure Receive You may need to prevent your received faxes from being accessed by
unauthorized people. In secure receive mode, all incoming faxes go into
memory until they are accessed and released for printing. A 4-digit pincode
can be set to prevent faxes being printed by unauthorized users. If Secure
Receive mode is deactivated, any faxes stored in memory are automatically
printed.
Secure Receive Passcode Use this option to enter a passcode which is then used to release received
faxes at the printer. Enter a numeric passcode from 1–6 characters.