
User's Manual
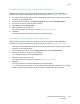


Table Of Contents
- Safety
- Getting Started
- Installation and Setup
- Using the Services
- Printing
- Paper and Media
- Maintenance
- Troubleshooting
- Security
- Specifications
- Regulatory Information
- Recycling and Disposal
Address Book
Xerox
®
B205 Multifunction Printer
User Guide
126
• Password: Enter your computer login password.
• Retype Password: Enter your login password again.
7. To save the new password, click Select to save new password.
8. To add another contact, click Add Another Contact After Saving.
9. Click Save.
Adding Groups in the Address Book Using Xerox
®
CentreWare
®
Internet
Services
1. At your computer, open a Web browser, and in the address field, type the IP address of the printer,
then press Enter or Return.
2. Click Address Book.
3. Click Groups.
4. Click the Add Group button.
5. In the Group Name field, type the group name.
6. To add contacts to the group:
• To add individual members to the group, click each contact required. Each contact selected is
added to the Group Members list.
• To add all contacts to the group, click Add All.
7. To remove contacts from the group:
• To remove individual members from the group, click each contact requiring removal. Each
contact selected is removed from the Group Members list.
• To remove all contacts from the group, click Remove All.
8. Click Save.
Editing or Deleting Contacts in the Address Book Using Xerox
®
CentreWare
®
Internet Services
1. At your computer, open a Web browser, and in the address field, type the IP address of the printer,
then press Enter or Return.
2. Click Address Book.
3. Select the contact requiring editing or deleting.
4. Edit or delete the contact:
• To edit the selected contact name or contact information, click Edit. Edit the information as
needed. To save the changes, click Save.
• To delete the selected contact from the Address Book, click Delete. At the prompt, click OK.