
User guide


Faxing from a PC
ColorQube™ 9301/9302/9303
Fax from PC
116
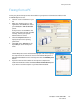
6. If you require a Cover Sheet to be sent with your fax document, select
Print a Cover Sheet in the Cover Sheet tab. The Cover Sheet options
window will display automatically, allowing you to customize the page
to your requirements.
When you have selected all the options you require, select OK.
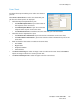
7. Select the Options tab to choose:
• With or without a Confirmation Sheet.
•The Send Speed, either Super G3 (33.6 Kbps), Forced 4800 bps
or G3 (14.4Kbps).
•The Resolution of the fax, either Standard, Fine or Superfine.
•The Send Time if you want to delay the transmission of your fax.
• Dialing options for a number prefix or credit card billing systems.
When you have selected all the options you require, select OK.
8. Select OK on the print driver screen and OK on the Print screen. The
Fax Confirmation screen will appear with the list of recipients you have
chosen.
9. If you wish to make any changes, edit the details by selecting the
button with a pencil icon. If the details are correct, select the OK button and your fax will be
submitted to the device job list ready to be transmitted.
10. Select the
Job Status button on the control panel to display the job list.Your job will be displayed in
the list. If there are no other jobs in the list your job may have already been processed. Refer to the
Machine and Job Status guide for more information.