Xerox Wide Format 721P Printer Operator Manual 701P39415 April 2003
TABLE of CONTENTS Table of contents Safety Notes ............................................................................................................................................................. v EMC Notices ............................................................................................................................................... vii Australia/New Zealand.........................................................................................................................
TABLE of CONTENTS 7. User Modes................................................................................................................................................49 User Mode 1 (Test Print) “U1” ..............................................................................................................49 User Mode 2 (Date and Time setting) “U2”...........................................................................................51 User Mode 3 (Low Power Saver Mode) “U3” ...............
TABLE of CONTENTS Safety Notes Your Xerox Wide Format 721P Engineering Printer has been designed and tested to meet strict safety requirements. These include safety agency examination and approval and compliance to established environmental standards. Please read the following instructions carefully before operating the Xerox Wide Format 721P Engineering Printer and refer to them as needed to ensure the continued safe operation of the product.
INTRODUCTION Never remove any covers or guards that require a tool for removal. There are no operator serviceable areas within these covers. Never attempt any maintenance function that is not specified in this operator manual. Never defeat interlock switches. Machines are designed to prevent operator access to unsafe areas. Covers, guards, and interlock switches are provided to ensure that the system will not operate with the covers opened.
INTRODUCTION EMC Notices Australia/New Zealand Changes or modifications to this equipment not specifically approved by Fuji XEROX Australia PTA. Limited may void the user’s authority to operate this equipment. Shielded cables must be used with this equipment to maintain compliance with the Radio communications Act 1992. European Union WARNING This is a Class A product. In a domestic environment this product may cause radio interference in which case the user may be required to take adequate measures.
INTRODUCTION Japan This is a Class A product based on the standard of the Voluntary Control Council for Interference by Information Technology Equipment (VCCI). If this equipment is used in a domestic environment, radio disturbance may arise. When such trouble occurs, the user may be required to take corrective actions. Changes or modifications to this equipment not specifically approved by Fuji XEROX Limited may void the user’s authority to operate this equipment.
Introduction 1. Introduction Congratulations on acquiring your new XEROX Wide Format 721P Engineering Printer. Team XEROX looks forward to supporting and helping you to increase your organizational productivity. The integrated features, ease of operation, and reliability of the XEROX Wide Format 721P Engineering Printer will allow you to concentrate on your business and leave the printing to your XEROX Wide Format 721P Engineering Printer.
INTRODUCTION Organization And Content Of This Manual The XEROX Wide Format 721P OPERATOR MANUAL provides the information you need to become familiar with the components, features, operation, and specifications of your printer. It contains the following chapters: Chapter 1 Introduction This chapter shows the organization of this manual as well as the contents, terminology, and conventions used in this manual.
INTRODUCTION Conventions Used In This Manual This manual uses the following conventions: Bold Boldface characters in the middle of a text string refer to selections on the control panel (for example, "press the Enter key"). WARNING: A WARNING indicates an operation, maintenance procedure, practice, condition or statement that, if not strictly followed, could result in personal injury. When included within a procedure, warnings always precede the step to which they refer.
INTRODUCTION This page is intentionally blank.
2. Specification This chapter provides the product and media specifications for the XEROX Wide Format 721P Engineering Printer. It also provides the space requirements for normal operation after product installation. Product Specifications Process speed 240mm per second Resolution 400 dpi Environmental requirements Minimum: 50° F (10° C) at 20% relative humidity Maximum: 90.5° F (32.5° C) at 82.5% relative humidity Maximum elevation: 6,667 feet ( 2000 meters) Weight 880 lbs.
SPECIFICATION Media Specifications 6 Media type Recommended media types: Bond – 20 lb. (90 gsm) Vellum/Tracing – 20 lb. (90 gsm) Film – 4 mil thickness Media size Roll feed: Width – 11 to 36 inches ( 279 to 914 mm) Length – 500 ft ( 175 M) Roll Diameter– 175mm maximum Core diameter – 3 inches (76 mm) Manual Bypass Feed: Maximum Width – 36 in. (E SEF) 914mm (A0) Minimum Width - 11 in. (A LEF) 279mm (A4) Print size Minimum – 11 in. x 8.5 in. (A LEF) (A4) Maximum – 36 in. x 48 in.
SPECIFICATION Room Space Requirements The illustration below shows the space requirements for normal operation of the printer after installation. Room Space Requirements Height – 96 in. (2438 mm) (minimum) Width – 157 in. (3988 mm) Depth – 153.5 in. (3894 mm) 66 in. (1676 mm) 57.1 in. (1450 mm) 35 in. (914 mm) 39.4 in. 721p (1000 mm) 153.5 in. (3895 mm) 65 in. (1651 mm) Room Air Change Requirements (for Ozone Dissipation) Air should be cycled 5 times per hour (minimum) 48 in. (1220 mm) 157 in.
SPECIFICATION This page is intentionally blank.
3. Printer Overview This chapter shows the orientation of the printer. It also illustrates and describes its main components, as well as the elements of the operator panel. Printer Orientation The illustration below shows the printer orientation. You must be familiar with this orientation when following the messages in the message display and the instructions in this guide.
PRINTER OVERVIEW Main Components Front Side View 10 1 P APER WIRE- 9 11 DEC K CE AN L E XP-C L EAN 1 2 F M 3 4 1 D CU T SE LE CT EXIT 2 D F P 3 D D4 C OPY S ITY D EN ME NU © ¨ * ER E NT RESET 2 3 8 4 5 6 7 1. Power On/Off Switch Press to switch the printer on and off. 2. Media Guide Adjust to size of cut sheet media in manual bypass mode. 3. Top Drawer (Roll 1) Open to load media roll and clear media jams. 4. Middle Drawer (Roll 2) Open to load media roll and clear media jams.
PRINTER OVERVIEW Rear Side View 1 2 3 4 FOLDER CONT. (IEEE1394) 11 DIAG. IF-VIII (CH-B) COM1 IF-VIII (CH-A) 10 9 8 7 POWER 6 5 1. Top Rear Cover Pull the handle and open to clear media jams. 2. Connect the cable from scanner here. I/F Connector for Scanner (IEEE1394) 3. Exit Cover Open to clear media jams. 4. Power Cord Connect to a suitable power outlet. 5. Power (220 VAC) Connect the power cable from the controller here. 6.
PRINTER OVERVIEW Right Side View 1 4 5 3 6 2 7 12 1. Toner Cartridge Replace when Status Display indicates that the cartridge is empty. 2. Media Cutter Turn to cut media during jam clearance. 3. Cutter Home Indicator As the cutter knob is rotated, the cutout color will change from RED to GREEN when the home position is reached. (DO NOT rotate counter-clockwise) 4. Meter A - Billing Square Counter for billing purposes. 5. Meter B - Service Linear Counter for service purposes. 6.
PRINTER OVERVIEW Operator Panel & Status Display The operator panel is located on top of the front side of the printer. It consists of a graphic display, a message display and several function keys. 1 2 3 4 15 5 Paper Deck 1 Wire-Clean Exp-Clean 2 3 4 Cut Select D1 7 8 9 PF D2 D3 6 Exit MF 10 Copy Density Menu Enter Online D4 11 12 13 14 1. Ready Indicator Flashes when the printer is warming up, and remains on steady when the printer is ready to operate. 2.
PRINTER OVERVIEW Media and Toner Status Panel The Media and Toner Panel is located on the front right face of the printer. It displays the size of the media, the type of the media, the media in use, and how much media and toner is remaining.
PRINTER OVERVIEW Online/Offline To take the printer Offline: 1. Press the Online Key to take the printer Offline. The green LED light will go off, the page in process will finish and the printer will enter the Offline Mode. Print jobs are still accepted to the job queue. 2. To return the printer to the Online Mode, press the Online Key. The green LED will light and the printer will return to the Online Mode.
PRINTER OVERVIEW Job Cancel To cancel the job currently printing: Paper Deck 1 Wire-Clean Exp-Clean 2 3 4 Select Cut 1. Press the Online Key to take the printer Offline. 2. Press and hold the Enter key until the green LED light above the Online Key flashes three times and three beeps sound. 3. The printer will complete the page in process and the printer will stop printing. The current job will be canceled. 4. When returned Online, the next job in the job queue will begin. 5.
4. Media This chapter provides the following information: · The procedure for loading roll media into the media drawers · The procedure for bypassing the media drawers and manually feeding pre-cut sheets into the printer · An explanation of the dehumidifier feature. For information about the media sizes and types that the printer can accommodate, refer to the "Specification" chapter of this manual.
MEDIA Loading The Roll Media (Roll 1, 2 & 3) 1. Pull the handle and open the desired drawer. 2. Rewind the media remaining on the roll. NOTE: Even if it is not necessary to rewind the roll media, rotate the spindle in the rewind direction. Failure to perform this may cause the gear at the left end of the spindle to be broken. 3. Hold the roll at both ends and lift the roll out of the drawer. The spindle must remain parallel when removed.
MEDIA 10. Insert the lead edge of the media between the upper and lower feed rollers. 11. Rotate the lower roller by hand in order to feed an inch (25 mm) of media between the rollers. Roll 3 only: 12. Rotate the lower feed roller until the lead edge is visible in the center of the viewing hole. 13. Set the switches for the series and type of media you have loaded, from rear to front: 841 Plain paper Tracing paper Film Belt · Arch. (12”, 18”, 24”, 30”, 36”, rolls) or Ansi.
MEDIA Loading The Roll Media (Roll 4) 1. Pull the handle and open drawer 3/4. Rewind the media remaining on the roll. NOTE: Even if it is not necessary to rewind the roll media, rotate the spindle in the rewind direction. Failure to perform this may cause the gear at the left end of the spindle to be broken. 2. Hold the roll at both ends and lift the roll out of the drawer. The spindle must remain parallel when removed.
MEDIA 9. Insert the lead edge of the media between the upper and lower feed rollers. 10. Rotate the green knob in order to feed an inch (25 mm) of media between the feed rollers. Knob 11. Set the switches for the series and type of media you have loaded, from rear to front: · Arch. (12”, 18”, 24”, 30”, 36”, rolls) or Ansi. (11”, 17”, 22”, 34" rolls) (Rear) · Plain Media · Vellum · Film 841 Plain paper Tracing paper Film Belt (Front) NOTE: 12.
MEDIA Loading The Roll Media When Printing Rolls 1, 3 and 4 may be loaded when the printer is operating. Roll 2 can NOT be loaded when the printer is operating. First, ensure that the roll is NOT currently being used by observing that the “In Use” indicator is OFF for the roll to be loaded and the message display does not indicate that the roll is in use (“-dx-“, x being the roll number). Next, follow the Loading Roll Media instructions as normal.
MEDIA Dehumidifier The printer is equipped with media heaters, which, when enabled, maintain the media at a constant temperature. The heaters operate at night and in high-humidity conditions in order to avoid moisture-related problems with the media such as wrinkling and deletions in the print. XEROX Service can enable the heaters to operate in one of three modes: 1. Off all the time 2. Off when printer is switched on.
MEDIA Using Manual Bypass Feed When the desired media is not loaded in the printer, you can bypass the media drawers and manually load cut sheet media into the printer. To manually feed cut sheets into the printer: 1. Select the appropriate cut sheet for the print job. NOTE: The printer will accept any media type, regardless of the media type specified. Ensure that the media type is correct or the toner image may rub off of the print as the printer uses media type to determine fusing temperature.
5. Care The printer requires minimum operator maintenance. You will need to replace the toner cartridge when the cartridge empties. You also will need to clean the outside surface of the printer when necessary. This chapter provides the procedures for performing the required tasks and for ordering supplies. When The Toner Cartridge Needs Replacement When the toner cartridge is empty, the “Toner Empty” indicator on the Operation Panel flashes.
CARE Replacing The Toner Cartridge Toner cartridges are supplied as part of a kit, which contains eight toner cartridges. Store the remaining toner cartridges in a cool, dry place until they are required. The Toner Cartridge can be replaced when the printer is operating. CAUTION The Xerox Wide Format 721P printer has a unique toner supply system.
CARE 4. Shake the new cartridge several times in order to prepare the contents for use and remove the foam band from the cartridge. DO NOT apply pressure to the center of the cartridge. Toner will spill from the ends of the cartridge. 5. Install the cartridge into the toner supply mechanism while keeping the sealed opening on the upper side of the cartridge. 6. Close the toner supply mechanism. Sealed opening 7.
CARE Cleaning The Charge Scorotron Wire Periodic cleaning of the Charge Scorotron Wire will reduce print quality problems such as light prints or deletions in the print caused by accumulation of toner inside the printer. NOTE: The Wire Cleaning is performed automatically when the printer is switched on.
CARE Cleaning The LED Print Head Periodic cleaning of the LED Print Head will reduce print quality problems such as light prints or deletions in the print caused by the accumulation of toner inside the printer. NOTE: The LED Print Head Cleaning is performed automatically when the printer is switched on.
CARE Cleaning The Printer Surface As needed, clean the outside surfaces of the printer. Use a clean cloth dampened with mild soap and water. Do not pour or spray liquid directly on any part of the printer.
CARE Ordering supplies This section provides information for obtaining supplies for your printer. Supply order list The XEROX Wide Format 721P uses the following supplies: · Toner cartridge The printer is shipped with eight toner cartridges. When ordering, use the following part number: 6R1141 Xerox also offers bond paper, vellum/tracing paper, and film in various sizes, weights, and grades to meet your printing needs.
CARE This page is intentionally blank.
6. Problem Solving This chapter provides information for resolving various problems that can occur during the operation of the printer. It contains instructions for clearing media jams and also includes the error code list. If you are unable to resolve the problem, follow the procedure for calling for service at the end of this chapter. Media Jams When the printer experiences a media jam, the following occur: Paper Deck 1 Exp-Clean The Media Jam Indicator flashes.
PROBLEM SOLVING Clearing Media Jam (J-01 & J-02) When a jam J-01 occurs, the media jams while feeding from Roll 1 in the top drawer. Exit MF D1 PF D2 D3 Copy Density Menu Enter Online D4 When a jam J-02 occurs, the media jams while feeding from Roll 2 in the middle drawer. Exit MF D1 PF D2 D3 Copy Density Menu Enter Online D4 1. Open the drawer indicated by the jam code. 2. Open the Right Side Door and turn the Inner Transport Assembly handle to release the transport.
PROBLEM SOLVING 8. Insert the lead edge of the media between the upper and lower feed rollers. 9. Rotate the lower feed roller by hand in order to feed an inch of media between the feed rollers. 10. Press the [Online] Key to take the printer Offline (LED Off). 11. Push in the drawer until it is closed and latched. 12. If the leading edge is not sufficiently square, perform the automatic Initial Cut by pressing the [Select] key to select the appropriate drawer, and then pressing [Cut] key. Approximately 9.
PROBLEM SOLVING Clearing Media Jam (J-03) When a jam J-03 occurs, the media jams while feeding from Roll 3 in the bottom drawer. Exit MF D1 PF D2 D3 Copy Density Menu Enter Online D4 1. Open the bottom drawer. 2. Open the Right Side Door and turn the Inner Transport Assembly handle to release the transport. Lower and lock the transport by engaging the Down Lock. Fuser Handle 3.
PROBLEM SOLVING 8. Insert the lead edge of the media between the upper and lower feed rollers. 9. Rotate the lower feed roller by hand until the lead edge of the media is visible in the center of the viewing hole. 10. Press the [Online] Key to take the printer Offline (LED Off). 11. Push in the drawer until it is closed and latched. 12.
PROBLEM SOLVING Clearing Media Jam (J-04) When a jam J-04 occurs, the media jams while feeding from Roll 4 in the bottom drawer. Exit MF D1 PF D2 D3 Copy Density Menu Enter Online D4 1. Open the bottom drawer. 2. Open the Right Side Door and turn the Inner Transport Assembly handle to release the transport. Lower and lock the transport by engaging the Down Lock. Fuser Handle 3.
PROBLEM SOLVING 8. Insert the lead edge of the media between the upper and lower feed rollers. 9. Rotate the green knob in the clockwise direction in order to feed an inch of media between the feed rollers. 10. Press the [Online] Key to take the printer Offline (LED Off). Green Knob 11. Push in the drawer until it is closed and latched.
PROBLEM SOLVING Clearing Media Jam (J-05) When a jam J-05 occurs, the media jams while feeding from the Manual Bypass Shelf. Exit MF D1 PF D2 D3 Copy Density Menu Enter Online D4 1. Open the Right Side Door and turn the Inner Transport Assembly handle to release the transport. Lower and lock the transport by engaging the Down Lock. Fuser Handle 2. If the media is not cut and the leading edge of the media has reached the Drum or beyond the Drum, rotate the Cutter handle to cut the media.
PROBLEM SOLVING Clearing Media Jam (J-11 & J-12) When a jam J-11 occurs, the media jams on the Inner Transport Assembly. Exit MF D1 PF D2 Copy Density D3 Menu Enter Online D4 When a jam J-12 occurs, the media jams underneath the Drum. Exit MF D1 PF D2 Copy Density D3 Menu Enter Online D4 1. Open the Right Side Door and turn the Inner Transport Assembly handle to release the transport. Lower and lock the transport by engaging the Down Lock. Fuser Handle 2.
PROBLEM SOLVING Slit 7. Trim the lead edge of the roll square to remove any torn or wrinkled media by using the “Slit” if necessary. Cutter 8. Insert the lead edge of the media between the upper and lower feed rollers and feed an inch of media between the feed rollers. 9. Roll 3 only: Rotate the lower feed roller by hand until the lead edge is visible in the center of the viewing hole. 10. Push in the drawer until it is closed and latched. 11.
PROBLEM SOLVING Clearing Media Jam (J-13 & J-14) When a jam J-13 or J-14 occurs, the media jams in the Fuser Section. Exit MF D1 PF D2 D3 Copy Density Menu Enter Online Copy Density Menu Enter Online D4 Exit MF D1 PF D2 D3 D4 1. Open the Right Side Door and turn the Inner Transport Assembly handle to release the transport. Lower and lock the transport by engaging the Down Lock. Fuser Handle 2.
PROBLEM SOLVING 8. Trim the lead edge of the roll square to remove any torn or wrinkled media by using the “Slit” if necessary. Slit Cutter 9. Insert the lead edge of the media between the upper and lower feed rollers and feed an inch of media between the feed rollers. 10. Roll 3 only: Rotate the lower feed roller by hand until the lead edge is visible in the center of the viewing hole. 11. Press the [Online] Key to take the printer Offline (LED Off). 12.
PROBLEM SOLVING Error Codes Printer Errors (E-XX) When a printer error “E-XX” occurs, follow the instructions below and check the entire paper path for jams. If the problem cannot be solved, follow the “Calling For Service” instructions located at the end of this chapter. Error Code Exit MF D1 PF D2 Copy Density D3 Error Code Menu Enter Online D4 Cause Treatment E-01 There is a problem with the fuser temperature. Press power off, then on. If problem still exists, call for service.
PROBLEM SOLVING Door Open Errors (U-XX) When the printer experiences a door open error, the following occurs: · The Door Open Indicator flashes orange. · An error code “U-XX” flashes. · For codes U-04 or U-14, the location of the open door is also shown by PF or EXIT. Door Open Indicator Paper Deck 1 Wire-Clean Exp-Clean Error ErrorCode Cord PF and Exit 2 3 4 Select Cut Exit MF D1 PF D2 Copy Density D3 Error Code Menu Enter Online D4 Cause Treatment U-01 The Upper Drawer is open.
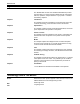
PROBLEM SOLVING Image Quality Problem Solving Use the chart below as an aid to identifying and solving a variety of image quality problems.
PROBLEM SOLVING This page is intentionally blank 48 XEROX WIDE FORMAT 721P PRINTER OPERATOR MANUAL
7. User Modes This chapter provides information for the 11 User Modes available on the Xerox Wide Format 721P Printer.
USER MODES Menu Menu Enter 3. Press the [Enter] Key when “000” on the Status Display is on steady. The test print begins and “000” on the Status Display flashes. Online Online Enter When the printer finishes the test print, “000” on the Status Display stops flashing. Menu Enter Online 4. Press the [Online] Key to exit the User Mode.
USER MODES User Mode 2 (Date and Time setting) “U2” Enter User Mode 2 to set the correct date and time. Note: Although there will be no performance problems if the date and time are incorrect, the printer automatically records the date and time errors occur. This information can be critical for service problem solving. It is recommended the date and time be set correctly. 1. To enter User Mode 2: Menu Enter Online Press the [Menu] Key twice when the printer is in the Standby (idle) Mode.
USER MODES Menu Enter Online 6. 3) Press the [ <-- ] Key again to view and correct the next location, C5 – minute. Repeat the process to change the minutes if required 7. To change the minutes, press [Enter]. The minutes begin to flash. 8. To change the value, press the [ --> ] Key to increase the value and [ <-- ] Key to decrease the value. 9. Press [Enter] to store the value.
USER MODES User Mode 3 (Low Power Saver Mode) “U3” If the Low Power Saver Mode is enabled, the printer reduces power to the Printer Fuser Assembly from 178°C to 100°C after a predetermined period of inactivity. If the printer does not receive a print job or copy job for the time selected in this mode the printer will enter the Low Power Saver Mode to save power consumption.
USER MODES Menu Enter Online Menu Enter Online 4. After you enter the desired time interval, press the [Online] Key to exit the User Mode. NOTE: After 30 minutes of no use, the printer will reset the developer motor and enter an idle state. A loud “thump” noise will be heard as the motor resets. This is normal.
USER MODES User Mode 4 (High Power Saver Mode) “U4” When the High Power Saver Mode is enabled, the printer switches off power to the Printer Fuser Assembly after a predetermined time of inactivity. If the printer does not receive a print job or a copy job for the time selected in this mode, the printer will enter the High Power Saver Mode to save power consumption. The High Power Saver Mode saves more power than the Low Power Saver Mode and the recovery time is longer.
USER MODES 3. After you enter the desired time interval, press the [Online] Key to exit the User Mode. Menu Enter Menu Enter Online Online NOTE: After 30 minutes of no use, the printer will reset the developer motor and enter an idle state. A loud “thump” noise will be heard as the motor resets. This is normal.
USER MODES User Mode 5 (Media Cut At Power ON) “U5” You can enable an Initial Media Cut at Printer Power On. If this feature is enabled, the printer will feed and cut 240mm of all roll media when you switch on the machine. Menu Enter Online 1. Press the [Menu] Key 5 times when the printer is in the Standby mode. Press [Menu] 5 times Menu Menu Enter Enter Online Online The [Menu] Key lights green and the Status Display indicates “U5” flashing in the left side of the display.
USER MODES User Mode 6 (Detack Lamp Control Mode) “U6” If the print quality of prints made on Film media lack sharpness or have a light overall appearance, a Detack Lamp in the print process can be switched OFF using Mode 6. This action increases the amount of Toner transferred to the print. NOTE: If a higher than normal jam rate is experienced, the Detack Lamp may have to be switched on again. 1. Menu Enter With the printer in the Standby (idle) condition, press the [Menu] Key 6 times to enter Mode 6.
USER MODES User Mode 7 (Attention Beeper Enable Mode) “U7” This mode controls a beeper sound whenever the printer needs attention, for example out of paper or out of toner. The beeper will switch off when the situation is corrected. The beeper can also be temporarily switched off by pressing the * key. The beeper will sound during an automatic media roll switch. This is normal. 1. With the printer in the Standby (idle) condition, press the [Menu] Key 7 times to enter Mode 7.
USER MODES User Mode 8 (Custom Setting Plain Paper) “U8” This mode switches between the standard setting for plain paper and the custom setting for plain paper. This feature enables the Service Representative to custom set the printer for a brand of media that has different handling characteristics. NOTE: The custom setting parameters (Fuser Temperature, Fuser Motor Speed, Lead Edge Registration etc) must first be set by the Service Representative in order to be effective.
USER MODES User Mode 9 (Custom Setting Vellum/Tracing Paper) “U9” This mode switches between the standard setting for vellum/tracing paper and the custom setting for tracing paper. This feature enables the Service Representative to custom set the printer for a brand of vellum/tracing paper that has different handling characteristics.
USER MODES User Mode A (Custom Setting Film) “UA” This mode switches between the standard setting for film and the custom setting for film. This feature enables the Service Representative to custom set the printer for a brand of film that has different handling characteristics. NOTE: The custom setting parameters (Fuser Temperature, Fuser Motor Speed, Lead Edge Registration etc) must first be set by the Service Representative in order to be effective.
USER MODES User Mode b (Image Enhancement) “Ub” The Image Enhancement Mode is used to improve reproduction of gray scale. Increasing the setting of this feature increases the density of single pixels. There can be, however, a noticeable overall degradation in gray scale images as the setting is increased. Experimentation will be required to achieve the correct balance. Menu Enter Online 1) With the printer in the Standby (idle) condition, press the [Menu] Key 11 times to enter Mode b.
USER MODES Prepared by: Xerox Corporation Global Knowledge & Language Services 800 Phillips Road Building 845-17S Webster, New York 14580-9791 USA ©Xerox Corporation 2003. All rights reserved. Printed in the United States of America XEROX®, Xerox Wide Format 721P Engineering Printer, AccXES, and acronym, XEROX, are trademarks of XEROX CORPORATION.