
User's Manual
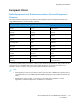

Table Of Contents
- User Guide
- 1 Safety
- 2 Features
- Parts of the Printer
- Power Saver
- Information Pages
- Administrative Features
- More Information
- 3 Installation and Setup
- Installation and Setup Overview
- Selecting a Location for the Printer
- Connecting the Printer
- Selecting a Connection Method
- Connecting to a Computer Using USB
- Connecting to a Wired Network
- Connecting to a Wireless Network
- Configuring the Printer for a Wireless Network
- Installing the Wireless Network Adapter
- Removing the Wireless Network Adapter
- Resetting Wireless Settings
- Connecting to a Network with a Wi-Fi Protected Setup
- Connecting to a Wireless Network Manually
- Configuring the Primary Network at the Control Panel
- Configuring the Primary Network From the Embedded Web Server
- Connecting to Wi-Fi Direct
- Connecting to a Telephone Line
- Powering the Printer On and Off
- Configuring Network Settings
- Configuring AirPrint
- Configuring Google Cloud Print
- Configuring General Setup Using the Control Panel
- Configuring Fax Defaults and Settings
- Installing the Software
- 4 Paper and Media
- 5 Printing
- Printing Overview
- Selecting Printing Options
- Printing From a USB Flash Drive
- Printing Features
- Managing Jobs
- Printing Special Job Types
- Printing on Both Sides of the Paper
- Orientation
- Selecting Paper Options for Printing
- Printing Multiple Pages to a Single Sheet
- Printing Booklets
- Print Quality
- Image Options
- Printing Watermarks
- Scaling
- Lightness
- Contrast
- Printing Mirror Images
- Selecting Job Completion Notification for Windows
- Using Special Pages
- Using Custom Paper Sizes
- @PrintByXerox
- 6 Copying
- 7 Scanning
- Scanning Overview
- Document Loading Guidelines
- Scanning to a USB Flash Drive
- Scanning to a User Home Folder
- Scanning to an Email Address
- Scan to Desktop
- Scanning to an FTP or SFTP Server
- Scanning to a Shared Folder on a Network Computer
- Scanning Images into an Application on a Connected Computer
- Scanning to a Desktop Computer Using a USB Cable Connection
- Previewing and Building Jobs
- 8 Faxing
- Fax Overview
- Fax
- Server Fax
- Previewing and Building Jobs
- Sending a Fax From Your Computer
- Printing a Secure Fax
- Editing the Address Book
- Adding or Editing Fax Contacts in the Address Book at the Control Panel
- Adding or Editing Groups in the Address Book at the Control Panel
- Adding or Editing Fax Contacts in the Address Book in the Embedded Web Server
- Adding or Editing Groups in the Address Book in the Embedded Web Server
- Creating and Managing Favorites
- 9 Maintenance
- Cleaning the Printer
- Adjustments and Maintenance Procedures
- Ordering Supplies
- Moving the Printer
- 10 Troubleshooting
- 11 System Administrator Functions
- Accessing Administration and Configuration Settings
- Connecting the Printer
- Connecting to a Wireless Network
- Wi-Fi Direct
- IP
- NFC
- Configuring General Settings Using the Embedded Web Server
- Viewing Printer Information
- Displaying the IPv4 Address on the Home Screen
- Configuring the Login Method From the Embedded Web Server
- Configuring Power Saver Using the Embedded Web Server
- Remote Control Panel
- Setting the Date and Time Using the Embedded Web Server
- Setting the Sounds Using the Embedded Web Server
- Configuring the Device Control Panel Timeout
- Configuring the Device Website Timeout
- Setting the Default Device Control Panel Screen
- Configuring Tray Settings Using the Embedded Web Server
- Cloning Printer Settings
- Enabling the Plug-in Feature
- Resetting the Printer
- Setting Up a Proxy Server
- Setting Up the Network Address Book
- Adding or Editing Contacts in the Address Book in the Embedded Web Server
- Adding or Editing Contacts in the Address Book at the Control Panel
- Configuring Alerts
- Configuring Email Alerts
- Configuring PDL Settings from the Embedded Web Server
- Configuring General Settings Using the Control Panel
- Configuring the Power Saver Modes
- Setting the Date and Time
- Setting the Measurement Units
- Setting the Display Brightness
- Setting the Sounds at the Control Panel
- Configuring Low Supplies Alert Messages
- Setting the Control Panel Timeout using the Control Panel
- Configuring Tray Settings
- Reset 802.1X and IPsec
- Reset to Factory Defaults
- Reset Fonts, Forms, and Macros
- Configuring Default Settings and Printing Policies from the Embedded Web Server
- Configuring Common Settings
- Configuring Paper Supply Settings
- Setting Printer Policies
- Configuring Jobs Policies
- Configuring PostScript® Memory
- Setting Policies for Allowed Print Job Types
- Setting Policies for When a Paper Type is Unavailable
- To Enable a Paper Type and Size Confirmation Prompt for the Bypass Tray
- Setting Print Job Policies for When an Error Occurs
- Setting Print Job Policies for When a Paper Jam Occurs
- Setting Printing Policies for Banner Pages
- Configuring Report Settings
- Setting Up Scanning
- Scanning Setup Overview
- Setting Up Scanning to a Shared Folder on Your Computer
- Setting Up Scanning to an FTP Server
- Setting Up Scanning to an SFTP Server
- Setting Up Scanning to an Email Address
- Configuring the Email App
- Setting Up Scanning to an Email Address That Uses a Third-Party Provider
- Setting Up Scanning to a Shared Windows Folder Using SMB
- Enabling WSD Scan Services
- Setting Up Faxing
- Enabling the Fax or Server Fax Apps
- Fax
- Configuring Fax Defaults and Settings
- Configuring Fax Settings from the Embedded Web Server
- Configuring Fax Reports from the Embedded Web Server
- Configuring Fax Line Settings from the Control Panel
- Configuring the Fax Settings at the Control Panel
- Modifying the Default Fax Settings
- Configuring Fax App Settings at the Control Panel
- Server Fax
- Configuring Security Settings Using the Embedded Web Server
- Logging In as the Administrator at the Control Panel
- Logging In as the Administrator at the Embedded Web Server
- Opening the Security Menu
- Accessing the Advanced Security Settings
- Configuring the Advanced Security Settings
- Configuring Secure Settings
- LDAP Server
- LDAP User Mapping
- Configuring LDAP Authentication
- Configuring the Network Authentication
- Configuring an LDAP Authentication System
- Configuring an SMB Authentication System
- Configuring a Kerberos Authentication System
- Configuring IP Address Filtering
- Configuring SSL Settings in the Embedded Web Server
- Enabling HTTPS Using the Embedded Web Server
- Configuring SMTP Domain Filtering
- USB Port Security
- Configuring Secure Settings Using the Control Panel
- Configuring User Roles and Access Permissions
- Setting the Login Method
- Managing User Accounts
- Configuring Access Permissions for a Guest User
- Configuring Password Rules
- Adding a User Account
- Adding a Photo to a User Account
- Changing Device Access Permissions for a User
- Changing Printing Permissions for a User
- Configuring Guest User Permissions for Printing from an Application
- Restoring the Home Screen and Apps to Default Settings for a User Account
- Linking a PC User Name to a User Account for Job Status Updates
- Adding an Email Address to a User Account
- Deleting a User Account
- Managing Device User Roles
- Managing Printing User Roles
- Setting Up an LDAP User Permissions Group
- Managing Certificates
- Configuring Remote Services Upload
- Updating the Printer Software
- Checking the Software Version
- Enabling Upgrades
- Installing and Configuring Software Updates Using the Embedded Web Server
- Installing and Configuring Software Updates from the Control Panel
- Installing Software after a Software Update Notification
- Installing Software Manually
- Resetting the Printer Settings
- Restarting the Printer at the Control Panel
- A Specifications
- B Regulatory Information
- C Recycling and Disposal

Fax Regulations
UUnniitteedd SSttaatteess
FFaaxx SSeenndd HHeeaaddeerr RReeqquuiirreemmeennttss
The Telephone Consumer Protection Act of 1991 makes it unlawful for any person to use a computer
or other electronic device, including a fax machine, to send any message unless such message clearly
contains in a margin at the top or bottom of each transmitted page or on the first page of the
transmission, the date and time it is sent and an identification of the business or other entity, or
other individual sending the message and the telephone number of the sending machine or such
business, other entity, or individual. The telephone number provided may not be a 900 number or any
other number for which charges exceed local or long-distance transmission charges.
For instructions on programming the Fax Send Header information, refer to the section of the System
Administrator Guide on Setting Transmission Defaults.
DDaattaa CCoouupplleerr IInnffoorrmmaattiioonn
This equipment complies with Part 68 of the FCC rules and the requirements adopted by the
Administrative Council for Terminal Attachments (ACTA). On the cover of this equipment is a label
that contains, among other information, a product identifier in the format US:AAAEQ##TXXXX. If
requested, this number must be provided to the Telephone Company.
A plug and jack used to connect this equipment to the premises wiring and telephone network must
comply with the applicable FCC Part 68 rules and requirements adopted by the ACTA. A compliant
telephone cord and modular plug is provided with this product. It connects to a compatible modular
jack that is also compliant. See installation instructions for details.
You can safely connect the printer to the following standard modular jack: USOC RJ-11C using the
compliant telephone line cord (with modular plugs) provided with the installation kit. See installation
instructions for details.
The Ringer Equivalence Number (REN) is used to determine the number of devices that can be
connected to a telephone line. Excessive RENs on a telephone line could result in the devices not
ringing in response to an incoming call. In most but not all areas, the sum of RENs should not exceed
five (5.0). To be certain of the number of devices that can be connected to a line, as determined by
the RENs, contact the local Telephone Company. For products approved after July 23, 2001, the REN
is part of the product identifier that has the format US:AAAEQ##TXXXX. The digits represented by ##
are the REN without a decimal point (for example, 03 is a REN of 0.3). For earlier products, the REN is
separately shown on the label.
To order the correct service from the local Telephone Company, you could also have to quote the
codes in the following list:
• Facility Interface Code (FIC) = 02LS2
• Service Order Code (SOC) = 9.0Y
Caution: Ask your local Telephone Company for the modular jack type installed on your line.
Connecting this machine to an unauthorized jack can damage telephone company equipment.
You, not Xerox, assume all responsibility and/or liability for any damage caused by the
connection of this machine to an unauthorized jack.
Xerox
®
WorkCentre
®
6515 Multifunction Printer
User Guide
331
Regulatory Information