
User's Manual


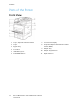
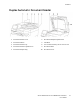
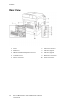
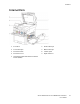

Table Of Contents
- User Guide
- 1 Safety
- 2 Features
- Parts of the Printer
- Power Saver
- Information Pages
- Administrative Features
- More Information
- 3 Installation and Setup
- Installation and Setup Overview
- Selecting a Location for the Printer
- Connecting the Printer
- Selecting a Connection Method
- Connecting to a Computer Using USB
- Connecting to a Wired Network
- Connecting to a Wireless Network
- Configuring the Printer for a Wireless Network
- Installing the Wireless Network Adapter
- Removing the Wireless Network Adapter
- Resetting Wireless Settings
- Connecting to a Network with a Wi-Fi Protected Setup
- Connecting to a Wireless Network Manually
- Configuring the Primary Network at the Control Panel
- Configuring the Primary Network From the Embedded Web Server
- Connecting to Wi-Fi Direct
- Connecting to a Telephone Line
- Powering the Printer On and Off
- Configuring Network Settings
- Configuring AirPrint
- Configuring Google Cloud Print
- Configuring General Setup Using the Control Panel
- Configuring Fax Defaults and Settings
- Installing the Software
- 4 Paper and Media
- 5 Printing
- Printing Overview
- Selecting Printing Options
- Printing From a USB Flash Drive
- Printing Features
- Managing Jobs
- Printing Special Job Types
- Printing on Both Sides of the Paper
- Orientation
- Selecting Paper Options for Printing
- Printing Multiple Pages to a Single Sheet
- Printing Booklets
- Print Quality
- Image Options
- Printing Watermarks
- Scaling
- Lightness
- Contrast
- Printing Mirror Images
- Selecting Job Completion Notification for Windows
- Using Special Pages
- Using Custom Paper Sizes
- @PrintByXerox
- 6 Copying
- 7 Scanning
- Scanning Overview
- Document Loading Guidelines
- Scanning to a USB Flash Drive
- Scanning to a User Home Folder
- Scanning to an Email Address
- Scan to Desktop
- Scanning to an FTP or SFTP Server
- Scanning to a Shared Folder on a Network Computer
- Scanning Images into an Application on a Connected Computer
- Scanning to a Desktop Computer Using a USB Cable Connection
- Previewing and Building Jobs
- 8 Faxing
- Fax Overview
- Fax
- Server Fax
- Previewing and Building Jobs
- Sending a Fax From Your Computer
- Printing a Secure Fax
- Editing the Address Book
- Adding or Editing Fax Contacts in the Address Book at the Control Panel
- Adding or Editing Groups in the Address Book at the Control Panel
- Adding or Editing Fax Contacts in the Address Book in the Embedded Web Server
- Adding or Editing Groups in the Address Book in the Embedded Web Server
- Creating and Managing Favorites
- 9 Maintenance
- Cleaning the Printer
- Adjustments and Maintenance Procedures
- Ordering Supplies
- Moving the Printer
- 10 Troubleshooting
- 11 System Administrator Functions
- Accessing Administration and Configuration Settings
- Connecting the Printer
- Connecting to a Wireless Network
- Wi-Fi Direct
- IP
- NFC
- Configuring General Settings Using the Embedded Web Server
- Viewing Printer Information
- Displaying the IPv4 Address on the Home Screen
- Configuring the Login Method From the Embedded Web Server
- Configuring Power Saver Using the Embedded Web Server
- Remote Control Panel
- Setting the Date and Time Using the Embedded Web Server
- Setting the Sounds Using the Embedded Web Server
- Configuring the Device Control Panel Timeout
- Configuring the Device Website Timeout
- Setting the Default Device Control Panel Screen
- Configuring Tray Settings Using the Embedded Web Server
- Cloning Printer Settings
- Enabling the Plug-in Feature
- Resetting the Printer
- Setting Up a Proxy Server
- Setting Up the Network Address Book
- Adding or Editing Contacts in the Address Book in the Embedded Web Server
- Adding or Editing Contacts in the Address Book at the Control Panel
- Configuring Alerts
- Configuring Email Alerts
- Configuring PDL Settings from the Embedded Web Server
- Configuring General Settings Using the Control Panel
- Configuring the Power Saver Modes
- Setting the Date and Time
- Setting the Measurement Units
- Setting the Display Brightness
- Setting the Sounds at the Control Panel
- Configuring Low Supplies Alert Messages
- Setting the Control Panel Timeout using the Control Panel
- Configuring Tray Settings
- Reset 802.1X and IPsec
- Reset to Factory Defaults
- Reset Fonts, Forms, and Macros
- Configuring Default Settings and Printing Policies from the Embedded Web Server
- Configuring Common Settings
- Configuring Paper Supply Settings
- Setting Printer Policies
- Configuring Jobs Policies
- Configuring PostScript® Memory
- Setting Policies for Allowed Print Job Types
- Setting Policies for When a Paper Type is Unavailable
- To Enable a Paper Type and Size Confirmation Prompt for the Bypass Tray
- Setting Print Job Policies for When an Error Occurs
- Setting Print Job Policies for When a Paper Jam Occurs
- Setting Printing Policies for Banner Pages
- Configuring Report Settings
- Setting Up Scanning
- Scanning Setup Overview
- Setting Up Scanning to a Shared Folder on Your Computer
- Setting Up Scanning to an FTP Server
- Setting Up Scanning to an SFTP Server
- Setting Up Scanning to an Email Address
- Configuring the Email App
- Setting Up Scanning to an Email Address That Uses a Third-Party Provider
- Setting Up Scanning to a Shared Windows Folder Using SMB
- Enabling WSD Scan Services
- Setting Up Faxing
- Enabling the Fax or Server Fax Apps
- Fax
- Configuring Fax Defaults and Settings
- Configuring Fax Settings from the Embedded Web Server
- Configuring Fax Reports from the Embedded Web Server
- Configuring Fax Line Settings from the Control Panel
- Configuring the Fax Settings at the Control Panel
- Modifying the Default Fax Settings
- Configuring Fax App Settings at the Control Panel
- Server Fax
- Configuring Security Settings Using the Embedded Web Server
- Logging In as the Administrator at the Control Panel
- Logging In as the Administrator at the Embedded Web Server
- Opening the Security Menu
- Accessing the Advanced Security Settings
- Configuring the Advanced Security Settings
- Configuring Secure Settings
- LDAP Server
- LDAP User Mapping
- Configuring LDAP Authentication
- Configuring the Network Authentication
- Configuring an LDAP Authentication System
- Configuring an SMB Authentication System
- Configuring a Kerberos Authentication System
- Configuring IP Address Filtering
- Configuring SSL Settings in the Embedded Web Server
- Enabling HTTPS Using the Embedded Web Server
- Configuring SMTP Domain Filtering
- USB Port Security
- Configuring Secure Settings Using the Control Panel
- Configuring User Roles and Access Permissions
- Setting the Login Method
- Managing User Accounts
- Configuring Access Permissions for a Guest User
- Configuring Password Rules
- Adding a User Account
- Adding a Photo to a User Account
- Changing Device Access Permissions for a User
- Changing Printing Permissions for a User
- Configuring Guest User Permissions for Printing from an Application
- Restoring the Home Screen and Apps to Default Settings for a User Account
- Linking a PC User Name to a User Account for Job Status Updates
- Adding an Email Address to a User Account
- Deleting a User Account
- Managing Device User Roles
- Managing Printing User Roles
- Setting Up an LDAP User Permissions Group
- Managing Certificates
- Configuring Remote Services Upload
- Updating the Printer Software
- Checking the Software Version
- Enabling Upgrades
- Installing and Configuring Software Updates Using the Embedded Web Server
- Installing and Configuring Software Updates from the Control Panel
- Installing Software after a Software Update Notification
- Installing Software Manually
- Resetting the Printer Settings
- Restarting the Printer at the Control Panel
- A Specifications
- B Regulatory Information
- C Recycling and Disposal

Parts of the Printer
FFrroonntt VViieeww
1. Tray 2, Optional 550-Sheet Feeder
2. Tray 1
3. Bypass Tray
4. Front Door
5. USB Memory Port
6. Power/Wake Button
7. Touch Screen Display
8. Single-Pass Duplex Automatic Document
Feeder (DADF)
9. Output Tray
10. Output Tray Extension
11. Right-Side Door
26
Xerox
®
WorkCentre
®
6515 Multifunction Printer
User Guide
Features