
User's Manual


Job ticket options
Guide to Printing Using Xerox Production Print Services 9-7
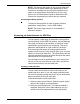
1. From the Document Type pop-up menu, select one of the
following available PDL options: PostScript, PDF, ASCII
Text, TIFF, or PCL.
2. If you select [ASCII Text], the dialog box displays
additional options that you must specify.
a. Select the font from the ASCII Font menu.
b. Enter the point size of the selected font in the [ASCII
Font Size] text box.
c. Select the font orientation from the ASCII Orientation
menu.
3. Select [Options...] to make additional selections for ASCII
and OPI selections.
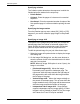
Specifying the sides imaged
The Sides Imaged pop-up menu lets you specify whether the
document is printed on one or both sides of the paper. The
following options are available:
• Printer Default
• 1-Sided: Prints the document on one side of each sheet.
• 2-Sided: Prints the document on both sides of each
sheet.
• Head-To-Toe: Prints the document in calendar format.
Both sides of the page are printed, but the images on the
front and back of each page are oriented in the opposite
direction. Head-to-toe is also known as “tumble printing.”
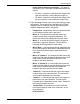
Selecting a finishing option
Select a finishing option in the finishing dialog box. The
Finishing option allows you to select a finishing option for the
printed document. The finishing options that are available
depend on the selected printer. Refer to the “Job Ticket
Features” guide for information on the finishing options that
each printer supports.
Custom finishing is available for some of the Xerox printers.
For availability, refer to the guide titled, Job ticket features
guide.” If your connected printer supports a printer capability
file, a pop up button is available. When selected, the
available custom finishing devices will display.
NOTE: When you are using a Macintosh system, turn on the
Help Balloons option by selecting Help for additional
descriptive help when selecting finishing features.