
Corporation Printer User Guide

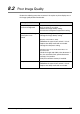
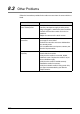

Table Of Contents
- 6030/6050/6050A Wide Format Printer User Guide
- Preface
- Safety Notes
- Regulatory Information
- Environmental Compliance
- Product Recycling and Disposal
- Illegal Copies and Printouts
- Table of Contents
- Product Overview
- 1.1 Product Configurations
- 1.2 Major Components
- 1.3 Power On/Off
- 1.4 Power Save Mode
- 1.5 Printer Control Panel Overview
- 1.6 Print Services on Web Overview (6030/ 6050)
- 1.7 Logical Printers Overview (6030/6050)
- 1.8 Loading Roll Media
- 1.9 Drawer Media Size Indicators
- 1.10 Loading Media for Manual Feeding
- 1.11 Cutting Roll Media
- Printer Overview
- Printer Setup
- 3.1 Communication Parameters
- 3.2 Communication Parameter Setup (Printer Control Panel, 6030/6050)
- 3.3 Communication Parameter Setup (Printer Control Panel, 6050A)
- 3.4 Communication Parameter Setup (Print Services on Web, 6030/6050)
- 3.5 Communication Parameter Setup (Web Printer Management Tool, 6050A)
- 3.6 System Parameter Setup (Printer Control Panel, 6030/6050)
- 3.7 System Settings Setup (Printer Control Panel, 6050A)
- 3.8 System Parameter Setup (Print Services on Web, 6030/6050)
- 3.9 System Parameter Setup (Web Printer Management Tool, 6050A)
- 3.10 Printing a Configuration List (6030/ 6050)
- 3.11 Printing a Configuration List (6050A)
- 3.12 Software Option (Print Services on Web, 6030/6050)
- 3.13 Software Option (Web Printer Management Tool, 6050A)
- 3.14 Change Password (Print Services on Web, 6030/6050)
- 3.15 Change Password (Web Printer Management Tool, 6050A)
- 3.16 Change Default Language (Print Services on Web, 6030/6050)
- 3.17 Change Default Language (Web Printer Management Tool, 6050A)
- Logical Printer Setup and Operation (6030/6050 only)
- 4.1 Creating a New Logical Printer
- 4.2 Defining the Print Settings
- 4.3 Logical Printer Print Settings
- Media Series
- Size/Media Mapping
- Media Source
- Media Type
- User-Defined Size
- Input Option
- Input Size Margin
- Plot Area
- Priority
- Title Block
- Split Drawing
- Message Option
- Printed Copy
- Output Option
- Size Recognition
- Color Option
- Transform
- Define Single Pen
- Define Multi Pen
- Pen Option
- Emulation
- PS Command
- EOP Command
- VCGL Pen Style (VCGL Define Pen)
- VCGL Pen Width
- VRF Define Pen (Define Single Pen)
- VRF Define Multi Pen
- TIFF Option
- CALS Option
- PS/PDF Option
- 4.4 Logical Printer Operations
- 4.5 Print Services on Web: Job and Log
- 4.6 Print Services on Web: Status
- 4.7 Print Services on Web: Tools
- 4.8 Manual Feed Printing
- Additional Operations from the Printer Menu
- 5.1 Introduction
- 5.2 Printer Control Panel Menu (6030/6050)
- 5.3 Printer Control Panel Menu (6050A)
- 5.4 Test Printing (6030/6050 only)
- 5.5 Managing the Job and Error Logs (6030/6050 only)
- 5.6 Reprinting (6030/6050 only)
- 5.7 Billing Meter Confirmation (6030/6050)
- 5.8 Billing Meter Confirmation (6050A)
- 5.9 Print Setup Menu
- 5.10 Automatic Cut Using the Printer Control Panel
- Ethernet Print Service (for UNIX)
- Maintenance
- Problem Solving
- Specifications
- Appendixes
257
8.2 Poor Image Quality
8.2
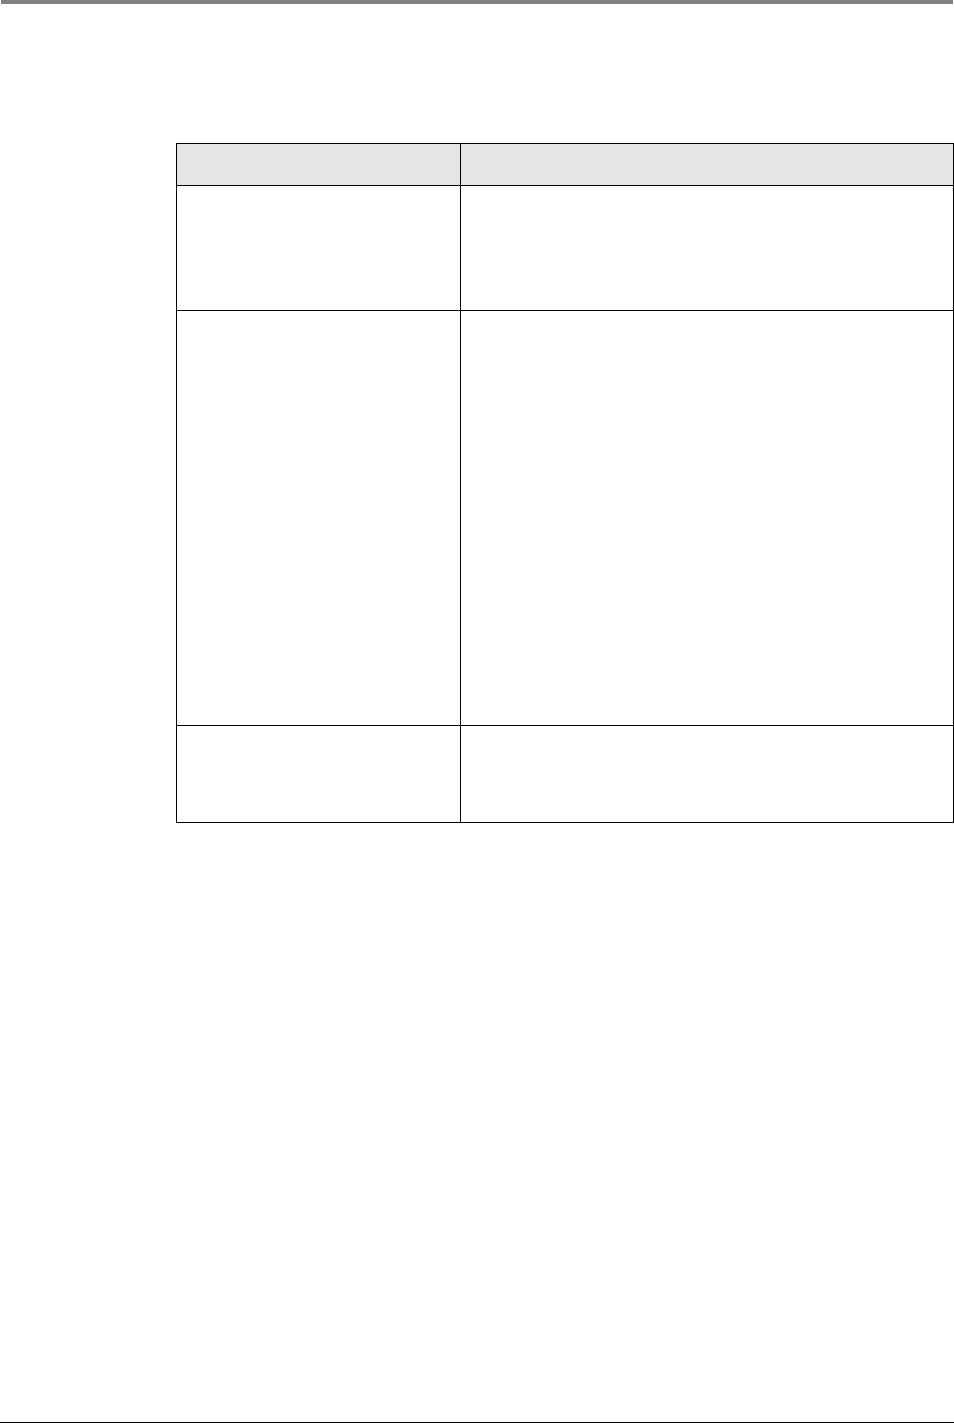
Poor Image Quality
Perform the following corrective measures if the copies or prints display one of
the image quality defects listed below.
Image Quality Defect Corrective Measure
The print displays
excessive background
Verify that the image density setting is correct.
Check the quality of the original.
• Reduce the image density setting.
• Increase the background suppression setting.
Some parts of the image
did not print or are
blurred
Verify that the image density setting is correct.
• Change the image density setting.
Determine if the media is damp.
• Switch on the paper heater switch, if it is off.
• Replace the damp media with new media.
• Change the sharpness setting.
Confirm that the size of the document does not
exceed the limit.
• Check the length and width of the document. If
the size exceed the limit, split the document
and copy it in sections.
• Verify that sufficient memory is installed.
The print is wrinkled
Determine if the media is damp.
• Switch on the paper heater switch, if it is off.
• Replace the damp media with new media.