
Corporation Printer User Guide
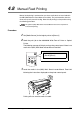


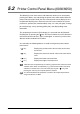
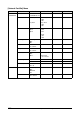
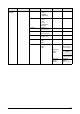
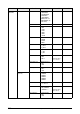

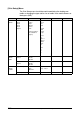
Table Of Contents
- 6030/6050/6050A Wide Format Printer User Guide
- Preface
- Safety Notes
- Regulatory Information
- Environmental Compliance
- Product Recycling and Disposal
- Illegal Copies and Printouts
- Table of Contents
- Product Overview
- 1.1 Product Configurations
- 1.2 Major Components
- 1.3 Power On/Off
- 1.4 Power Save Mode
- 1.5 Printer Control Panel Overview
- 1.6 Print Services on Web Overview (6030/ 6050)
- 1.7 Logical Printers Overview (6030/6050)
- 1.8 Loading Roll Media
- 1.9 Drawer Media Size Indicators
- 1.10 Loading Media for Manual Feeding
- 1.11 Cutting Roll Media
- Printer Overview
- Printer Setup
- 3.1 Communication Parameters
- 3.2 Communication Parameter Setup (Printer Control Panel, 6030/6050)
- 3.3 Communication Parameter Setup (Printer Control Panel, 6050A)
- 3.4 Communication Parameter Setup (Print Services on Web, 6030/6050)
- 3.5 Communication Parameter Setup (Web Printer Management Tool, 6050A)
- 3.6 System Parameter Setup (Printer Control Panel, 6030/6050)
- 3.7 System Settings Setup (Printer Control Panel, 6050A)
- 3.8 System Parameter Setup (Print Services on Web, 6030/6050)
- 3.9 System Parameter Setup (Web Printer Management Tool, 6050A)
- 3.10 Printing a Configuration List (6030/ 6050)
- 3.11 Printing a Configuration List (6050A)
- 3.12 Software Option (Print Services on Web, 6030/6050)
- 3.13 Software Option (Web Printer Management Tool, 6050A)
- 3.14 Change Password (Print Services on Web, 6030/6050)
- 3.15 Change Password (Web Printer Management Tool, 6050A)
- 3.16 Change Default Language (Print Services on Web, 6030/6050)
- 3.17 Change Default Language (Web Printer Management Tool, 6050A)
- Logical Printer Setup and Operation (6030/6050 only)
- 4.1 Creating a New Logical Printer
- 4.2 Defining the Print Settings
- 4.3 Logical Printer Print Settings
- Media Series
- Size/Media Mapping
- Media Source
- Media Type
- User-Defined Size
- Input Option
- Input Size Margin
- Plot Area
- Priority
- Title Block
- Split Drawing
- Message Option
- Printed Copy
- Output Option
- Size Recognition
- Color Option
- Transform
- Define Single Pen
- Define Multi Pen
- Pen Option
- Emulation
- PS Command
- EOP Command
- VCGL Pen Style (VCGL Define Pen)
- VCGL Pen Width
- VRF Define Pen (Define Single Pen)
- VRF Define Multi Pen
- TIFF Option
- CALS Option
- PS/PDF Option
- 4.4 Logical Printer Operations
- 4.5 Print Services on Web: Job and Log
- 4.6 Print Services on Web: Status
- 4.7 Print Services on Web: Tools
- 4.8 Manual Feed Printing
- Additional Operations from the Printer Menu
- 5.1 Introduction
- 5.2 Printer Control Panel Menu (6030/6050)
- 5.3 Printer Control Panel Menu (6050A)
- 5.4 Test Printing (6030/6050 only)
- 5.5 Managing the Job and Error Logs (6030/6050 only)
- 5.6 Reprinting (6030/6050 only)
- 5.7 Billing Meter Confirmation (6030/6050)
- 5.8 Billing Meter Confirmation (6050A)
- 5.9 Print Setup Menu
- 5.10 Automatic Cut Using the Printer Control Panel
- Ethernet Print Service (for UNIX)
- Maintenance
- Problem Solving
- Specifications
- Appendixes
197
5.2 Printer Control Panel Menu (6030/6050)
5.2
Printer Control Panel Menu (6030/6050)
The following is a list of the menus and submenus which can be accessed by
pressing the <Menu> key and placing the printer in the offline mode. When the
printer enters the offline mode, the first of two top level menus displays, that is,
the [Network Port/Set] menu. From this menu the user can define the system
parameters, perform port (communication) setup, run a test print (plot), manage
job and error logs, set up reprinting (offline plot), and display billing meter
information.
The second top level menu is [Print Setup]. It is accessed from the [Network
Port/Set] item by pressing the [
] key. This menu enables the user to define the
roll and cut sheet media sizes, types, and weights, as necessary, when new or
different media is loaded in the machine.
As a reminder, the following buttons are used to navigate the printer control
panel menus.
< > key
Displays the previous menu item or value on the same
menu level.
< > key
Displays the next menu item or value on the same menu
level.
< > key
Displays the lower level menu item.
< > key Displays the higher level menu item.
Table items that are preceded by an asterisk [*] represent the values that can be
selected. Values which are followed by a [
Ö
] mark lead to another, lower level,
submenu or selection; these are accessed by pressing the <
> key, after
pressing the <Set> key to accept the previous selection.
It is recommended that the procedures covered in this chapter be performed
using Print Services on Web.