
User guide


Server Fax
Xerox WorkCentre 5735/5740/5745/5755/5765/5775/5790
Fax
87
Original Type
Use this option to define the type of original being used for scanning. Making the correct selection
enhances the quality of your output image. The options are:
• Photo & Text is recommended for originals containing high quality photographs and halftones.
Using this setting the scanned image will contain high quality pictures though the sharpness of
text and line art is slightly reduced.
• Photo is used specifically for originals containing photos or continuous tones without any text or
line art. Produces the best quality for photos but reduced quality text and line art.
• Text produces sharper edges and is recommended for text and line art. This option requires less
communication time.
Resolution
The Resolution affects the appearance of the fax at the receiving fax terminal. A higher resolution
produces a better quality image. A lower resolution reduces communication time. The options are:
• Standard (200x100 dpi) is recommended for text documents. It requires less communication
time but does not produce the best image quality for graphics and photos.
• Fine (200 dpi) is recommended for line art and photos. This is the best choice in most cases.
Fax Directory
The Fax Directory is used to store individual fax numbers which are used frequently. The Fax Directory
can be accessed from all screens where a fax number requires entering. Up to 29 entries can be added.
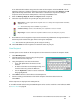
Using the Fax Directory
If numbers have been entered into the Fax Directory they can be accessed via the Fax Directory
button.
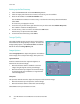
1. Select the Fax Directory button.
A list of fax numbers entered in the Fax Directory is
displayed.
2. Select the required number and select Add to
Recipients from the drop-down menu. The number is
added to the Recipient list.
Continue adding recipients as required.
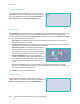
3. To edit an entry, select it in the list and select the Edit
button.
Edit the entry as required and select Save.
4. To clear an entry from the list, select the entry requiring deletion and select Clear Entry from the
drop-down menu. A confirmation screen is displayed, select Clear Entry.
5. Select Close to return to the fax options.
The fax will be sent to all the numbers in the Recipient list.