
User guide


Fax
Xerox WorkCentre 5735/5740/5745/5755/5765/5775/5790
Fax
70
• Photo is used specifically for originals containing photos or continuous tones without any text or
line art. Produces the best quality for photos but reduced quality text and line art.
• Text produces sharper edges and is recommended for text and line art. This option requires less
communication time.
• Halftone Photo is used if your original is from a magazine or newspaper that contains
photographs or text.
Resolution
The Resolution affects the appearance of the fax at the receiving fax terminal. A higher resolution
produces a better quality image. A lower resolution reduces communication time. The options are:
• Standard (200x100 dpi) is recommended for text originals. It requires less communication time
but does not produce the best image quality for graphics and photos.
• Fine (200 dpi) is recommended for line art and photos. This is the best choice in most cases.
• Superfine (600 dpi) is recommended for photos and halftones, or images that have gray tones. It
requires more communication time, but produces the best image quality.
Cover Letter
The Cover Letter feature attaches a cover letter to the document being transmitted. Using the cover
letter feature replaces the routine of manually sending a cover letter each time you send a document.
The Cover Letter includes the following information:
• To the recipients name, can be entered at the device.
• From the sender’s name, as entered at the device.
• Comment the comment as specified from the comment list.
• Start Time the date and time of the fax transmission. Depending on the setup, the time is
displayed as a 12 or 24 hour clock. This information is added automatically to the cover letter.
• Pages the page count, excluding the cover page. This information is added automatically to the
cover letter.
• Fax number the number of the sending fax device. This information is added automatically to the
cover letter.
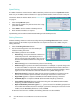
To select a Cover Letter:
1. Select the Cover Letter button and select On.
2. Select the To... field and enter the name of the recipient using the keyboard.
• Up to 30 alphanumeric characters can be entered.
• To delete a character use the backspace key, or to clear the entire entry select the X button.
•Use the Keyboards... button to access additional language keyboards.
3. Select the From... field and enter the name of the sender using the keyboard.