
User guide


Printing a Document
Xerox WorkCentre 5735/5740/5745/5755/5765/5775/5790
Print
144
Printing a Document
1. Ensure that the correct Xerox print driver has been installed on your PC. To install the print drivers
refer to the System Administrator Guide.
2. Open the document to be printed. From your application, select File > Print and select the Xerox
device from the list of printers displayed.
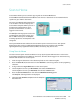
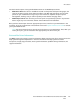
3. To change the default printing properties click Properties.
The print driver has various tabs that contain options
and properties.
•Use the Paper/Output tab to choose the type of
media, size and color and output choices such as
2-sided prints.
•The Special Pages tab allows you to add covers,
inserts and exceptions.
•The Image Options tab enables you to adjust the
image quality.
•The Layout/Watermark tab has various options
to add watermarks to pages, change image
orientation (landscape or portrait) and enable
booklet and multi-up printing.
•The Advanced tab contains various font, document and printing options.
Choose the options required for your printing job and click OK to print the document.
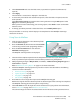
4. The print job will be sent to the device and will appear in the Active Jobs list. To view the list at the
device, press the Job Status button on the control panel.
If your job is held in the list it requires additional resources or a passcode to print. To identify the
resources required, select the job and select Required Resources. Once the resources are available
the job will print. If a passcode is required, select Release and enter the secure passcode.