
User guide


Scan to Mailbox
Xerox WorkCentre 5735/5740/5745/5755/5765/5775/5790
Workflow Scanning
135
5. Select Create Folder and enter the folder name, a password and password confirmation (if
required).
6. Select Apply.
The new folder is created and is displayed in the folder list.
7. To access the private folder and customize the options, select the folder. If required, enter the
folder password.
Select Personalize Settings to customize the scanning selections using the Edit option. Select
Apply after customizing each option.
When you have finished customizing your scanning options, select Back to return to the Folder
Contents screen.
8. To change your folder password or delete the folder, use the Modify Folder option.
Your private folder is now set up and will display in the templates list when Workflow Scanning is
selected on the device.
Using Scan to Mailbox
1. Load the original documents in the document feeder
or on the document glass.
2. Press the Clear All (AC) button twice and then Confirm
to cancel any previous screen programing selections.
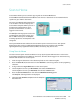
3. Press the Services Home button and select the
Workflow Scanning option.
The Workflow Scanning features are displayed.
4. Select the folder template required from the Template Destination list. If you select a private
folder, a password may be requested. Enter the folder password using the keyboard.
5. Make programing changes to Output Color (if available), 2-Sided Scanning, Original Type and
Scan Presets as required.
Refer to Workflow Scanning Options on page 115 for more information.
6. Additional Workflow Scanning options are provided on each of the tabs. Refer to the following
sections for further information:
• Advanced Settings on page 119
• Layout Adjustment on page 122
• Filing Options on page 124
• Job Assembly on page 126
7. Press Start to scan the originals and process the Workflow Scanning job.
Remove the originals from the document feeder or document glass when scanning has completed.
The Workflow Scanning job enters the job list ready for filing.
8. Select Job Status to view all the job lists and check the status of your job. For more information,
refer to Job Status on page 233 of Machine and Job Status.
The scanned images are filed in the selected folder and can be accessed using Internet Services.