
User guide


Overview 6-5
6
8
Adjust the scan options as desired before initiating the final scan.
9
Reload the document back into the Automatic Document Feeder.
10
Click the
Scan
button.
11
The document is scanned by the WorkCentre 480cx and the updated
image is displayed in the TWAIN compliant application.
Starting the WorkCentre 480cx TWAIN Scanner application
from TextBridge Pro
1
From the
File
menu, click on
Select Scanner
. A list of supported
scanners will be displayed.
2
From the list, select Xerox WorkCentre 480cx (TWAIN). Click OK.
3
From the TextBridge Pro
Process
menu, select
Get Page
. A Page Type
dialog will be displayed.
4
Select the desired page type and select
Scanner
as the
Page Source
.
Click OK.
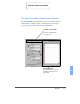
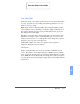
5
The WorkCentre 480cx TWAIN Scanner application is displayed.
Select the appropriate scan options for the document or photograph to
be scanned.
After adjusting the settings in the Scan window, you can perform a
preliminary preview scan of the image before performing a final scan.
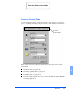
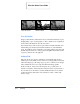
To launch a preview scan:
a)
Load the document to be scanned in the Automatic Document
Feeder.
b)
Click the
Prescan
button.
The WorkCentre 480cx scans the image and a preview appears in the
WorkCentre 480cx TWAIN Scanner window.
Print the 480cx User Guide