
User guide


Xerox 4590/4110 Copier/Printers User Guide
4-21
4. Scan
Scan to Mailbox
You can scan documents on the machine and save the scanned
data to a mailbox on the machine.
To use the Scanner to Mailbox feature, select Scan to Mailbox.
A mailbox needs to be created.
KEY POINT: Create a mailbox in advance. To do this select Setup
Menu from the All Services screen. Select Mailbox and then
Create/Delete. Enter the appropriate information to create the
mailbox.
For more information about Mailbox creation, refer to "Local Disk/
Mailbox" in the System Administration Guide or ask your System
Administrator for help.
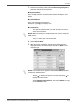
1. Select Scan to Mailbox from the All Services screen.
NOTE 1: If the All Services screen is not shown, press the All
Services button.
NOTE 2: If you have the optional Color Scanner Kit installed, the
bottom section of the screen will be different than the one shown
above. The differences are noted below.
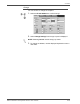
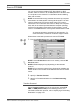
2. In the Basic Scanning screen, specify a mailbox to save the
scanned data.
NOTE: If a password is set for the mailbox, the password entry
screen appears. Enter the password and select Confirm. If you
have forgotten the password, reconfigure the mailbox password in
System Administration mode.
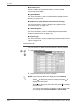
Mailbox
Select the mailbox to store the scanned data. Select the
button
to display the previous screen and select the button to display
the next screen.
Go to
Use the numeric keypad to enter a 3-digit mailbox number. That
mailbox then appears at the top of the list.