ETR-CH01 Page 1 Wednesday, October 23, 1996 6:41 PM Chapter 1 Introduction 1 r e tpahC Overview ............................................................................... 1-3 Document Conventions ........................................................ 1-3 The XNIC-ENET .................................................................... 1-4 The XNIC-TRING .................................................................. 1-4 Before You Begin .......................................................
ETR-CH01 Page 2 Wednesday, October 23, 1996 6:41 PM Introduction Installation of the XNIC ...................................................... 1-11 Configuration Sheets .......................................................... 1-11 Printing the Network Interface Configuration ..................... 1-11 Default Configuration .........................................................
ETR-CH01 Page 3 Wednesday, October 23, 1996 6:41 PM Introduction Overview Congratulations on using the Xerox Network Interface Card (XNIC) to connect your Xerox DocuPrint 4517 and/or 4520, 4510, and 4505 laser printers to your network environment. This guide describes the XNIC-ENET and XNIC-TRING and tells you how to configure either one on your network for remote printing.
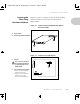
ETR-CH01 Page 4 Wednesday, October 23, 1996 6:41 PM Introduction The XNIC-ENET The XNIC-TRING The XNIC-ENET is an Ethernet interface card that plugs directly into the printer. Connection to the Ethernet network may be made using either Thinnet (10base2) cable (which uses a BNC connector), or unshielded twisted-pair (UTP/10baseT) cable (which uses an RJ-45 connector). Two LEDs on the connection panel are visual indicators of network activity.
ETR-CH01 Page 5 Wednesday, October 23, 1996 6:41 PM Overview The XNIC can currently be used with these popular operating systems and protocols: Table 1.
ETR-CH01 Page 6 Wednesday, October 23, 1996 6:41 PM Before You Begin Before You Begin Before you begin installation, take a moment to verify that you have received everything listed below: XNIC-ENET or XNIC-TRING board in an antistatic bag XNIC-ENET/TRING Configuration Guide (this book) Three 3.5 inch diskettes: Utilities for: LAN Server, LAN Manager, Novell NetWare (TES). Three separate utilities on one DOS formatted diskette.
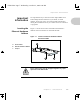
ETR-CH01 Page 7 Wednesday, October 23, 1996 6:41 PM Important Information Important Information Locating the Ethernet Hardware Address It is important that you write down the unique Ethernet or Token Ring hardware address of your XNIC, its serial number, and server name. You will need this information during the installation and if you contact Xerox for assistance or upgrades. Figure 1.1 shows the location of the Ethernet hardware address and serial number on the XNIC-ENET. Figure 1.
ETR-CH01 Page 8 Wednesday, October 23, 1996 6:41 PM Important Information Once the XNIC-ENET is installed, the numbers will not be easily accessible. We suggest you note them here and on the back of this guide for later reference.
ETR-CH01 Page 9 Wednesday, October 23, 1996 6:41 PM Important Information Locating the Token Ring Hardware Address A Serial number B Token Ring hardware address A Figures 1.2 and 1.3. show the location of the Token Ring hardware address, serial number and speed of the XNIC-TRING. Figure 1.2 Location of Token Ring hardware address and serial number Figure 1.3 Location of JX1 and JX2 pins JX1 pins Pins 2 and 3 on JX1 must be strapped together for proper operation of the XNIC-TRING.
ETR-CH01 Page 10 Wednesday, October 23, 1996 6:41 PM Important Information Once the XNIC-TRING is installed, the numbers will not be easily accessible. We suggest you note them here and on the back of this guide for later reference.
ETR-CH01 Page 11 Wednesday, October 23, 1996 6:41 PM Important Information Installation of the XNIC Before you begin the physical installation of the XNIC, make sure you have the proper cabling and software available. If your printer is a Xerox 4517, refer to Appendix C of the 4517 User Guide for installation instructions. If your printer is either a Xerox 4505, 4510, or 4520, refer to the instructions in the Installation Supplement.
ETR-CH01 Page 12 Wednesday, October 23, 1996 6:41 PM Important Information If the configuration sheets do not print, verify that the XNIC is properly installed, and that the printer control panel displays the Online Ready message. Note Default Configuration If DS/P is enabled on the XNIC, the Network Interface Configuration sheets will not print. Make sure you print the configuration sheets before enabling DS/P. The default DS/P setting on the XNIC is disabled.
Etr-ch02 Page 1 Thursday, October 24, 1996 4:49 PM Chapter 2 Connecting the XNIC 2 r e tpahC Overview ............................................................................... 2-2 Connecting XNIC-ENET to the Network ............................. 2-3 Thinnet (10base2) Connection .............................................. 2-4 Twisted-pair (10baseT) Connection ....................................... 2-5 Network Indicator LEDs ........................................................
Etr-ch02 Page 2 Thursday, October 24, 1996 4:49 PM Connecting the XNIC Overview This chapter discusses connecting the XNIC to the network after you have installed it in the printer. Before connecting to the network, power the printer off.
Etr-ch02 Page 3 Thursday, October 24, 1996 4:49 PM Connecting the XNIC Connecting XNIC-ENET to the Network The XNIC-ENET may be connected to your network using Thinnet (10base2) cable with a BNC connector, or UTP (Unshielded Twisted Pair, 10baseT) cable with an RJ-45 connector. Figure 2.1 shows the location of the ports on the XNIC-ENET. Figure 2.1 XNIC-ENET Connection Panel Never connect network cables to both the BNC and UTP ports on the XNIC-ENET at the same time.
Etr-ch02 Page 4 Thursday, October 24, 1996 4:49 PM Connecting XNIC-ENET to the Network Thinnet (10base2) Connection 1 If you are patching into the middle of the cable, use a BNC T-adapter to connect to the Ethernet cable. 2 If you are connecting to the end of a cable segment, connect the Ethernet cable to one side of the BNC T-adapter and connect a 50 Ohm Ethernet terminator to the other side. 3 Attach the BNC T-adapter to the BNC port on the XNIC-ENET.
Etr-ch02 Page 5 Thursday, October 24, 1996 4:49 PM Connecting XNIC-ENET to the Network Twisted-pair (10baseT) Connection 1 Attach one end of the twisted-pair cable to the UTP port on the XNIC-ENET, using a standard RJ-45 connector. 2 Attach the other end of the cable to a UTP wall outlet adapter, or other 10baseT Ethernet source. Do not attach anything to the port marked BNC. Network Indicator LEDs The XNIC-ENET has two LEDs on the connection panel that are visual indicators of network activity.
Etr-ch02 Page 6 Thursday, October 24, 1996 4:49 PM Connecting the XNIC Connecting XNIC-TRING to the Network The XNIC-TRING may be connected to your network using shielded twisted pair (STP) cable with a DB-9 connector, or unshielded twisted pair (UTP) cable with an RJ-45 connector. Figure 2.2 shows the location of the ports on the XNIC-TRING. Figure 2.2 XNIC-TRING Connection Panel UTP STP Never connect network cables to both the STP and UTP ports on the XNIC-TRING at the same time.
Etr-ch02 Page 7 Thursday, October 24, 1996 4:49 PM Connecting XNIC-TRING to the Network UTP (RJ-45) Connection 1 Attach one end of the twisted-pair cable to the UTP port on the XNIC-TRING, using a standard RJ-45 connector. 2 Attach the other end of the cable to a Token Ring MAU with the correct speed. Do not attach anything to the port marked STP. STP (DB-9) Connection 1 Attach the DB-9 end cable to the STP port on the XNIC-TRING.
Etr-ch02 Page 8 Thursday, October 24, 1996 4:49 PM Initial Testing Initial Testing After installing the XNIC and connecting the network cable, you are ready to power on the printer and test the system as follows: 1 Verify that the network cable is connected to only one port: For Ethernet: BNC or UTP For Token Ring: UTP or STP. 2 Power ON the printer. 3 Move to Step 4 if you are installing an XNIC-TRING. Wait for the printer to complete its self-tests and display Online Ready.
Etr-ch02 Page 9 Thursday, October 24, 1996 4:49 PM Using Multiple Network Cards Using Multiple Network Cards Caution Depending on the model of your printer, combinations of optional network cards may be installed (i.e., Ethernet, Token Ring, and LocalTalk). Refer to your printers user guide for details. For information about the XNIC-LTALK, refer to the XNIC-LTALK Xerox Network Interface Card for LocalTalk Configuration Guide.
Etr-ch02 Page 10 Thursday, October 24, 1996 4:49 PM Next Steps Next Steps 2-10 ❖ You are now ready to configure your printer for your network. This table will help you decide what chapter(s) to read to do this.
ETR-CH03 Page 1 Wednesday, October 23, 1996 6:46 PM Chapter 3 Using the Printer with Novell NetWare 3 r e tpahC Overview ............................................................................... 3-4 Available Utilities .................................................................... 3-5 Network Considerations ....................................................... 3-6 PServer and RPrinter/NPrinter Modes .................................... 3-7 Configuring the XNIC as a Print Server (NetWare 2.
ETR-CH03 Page 2 Wednesday, October 23, 1996 6:46 PM Using the Printer with Novell NetWare Using PConsole ................................................................... 3-16 Creating the Print Queue .................................................... 3-16 Adding the Print Server ...................................................... 3-17 Adding the Printer .............................................................. 3-18 Selecting the Print Queue ...................................................
ETR-CH03 Page 3 Wednesday, October 23, 1996 6:46 PM Using the Printer with Novell NetWare Using PConsole ................................................................... 3-34 Creating a Print Queue ....................................................... 3-34 Adding the Printer .............................................................. 3-35 Adding the Print Server ...................................................... 3-36 Associating the Printer with the Novell PServer ...................
ETR-CH03 Page 4 Wednesday, October 23, 1996 6:46 PM Using the Printer with Novell NetWare Setting Optional Configurations ....................................... 3-50 Remote Logging into the XNIC via TES ................................ 3-50 Basic XNIC Commands ........................................................
ETR-CH03 Page 5 Wednesday, October 23, 1996 6:46 PM Overview Overview This chapter provides an overview and step-by-step procedures for setting up the printer on a Novell NetWare network. These procedures require that you have the NetWare access privileges of the system supervisor. While the instructions in this section are complete, you may need to consult your system supervisor or network administrator, or refer to Chapter 11: Troubleshooting.
ETR-CH03 Page 6 Wednesday, October 23, 1996 6:46 PM Using the Printer with Novell NetWare Available Utilities In the Novell NetWare environment, you have the option of using the utilities in Table 3.1 to configure your printer. These utilities are provided with your XNIC. Table 3.
ETR-CH03 Page 7 Wednesday, October 23, 1996 6:46 PM Overview PServer and RPrinter/NPrinter Modes The XNIC as shipped from the factory allows both PServer and RPrinter modes in NetWare 2.x/3.x to be active. In NetWare 4.x NDS, the XNIC allows either PServer or NPrinter mode to be active at a given time. Refer to Setting Optional Configurations (page 3-50) for additional information.
ETR-CH03 Page 8 Wednesday, October 23, 1996 6:46 PM Configuring the XNIC as a Print Server (NetWare 2.x/3.x) Configuring the XNIC as a Print Server (NetWare 2.x/ 3.x) Note Note 3-8 ❖ To configure your XNIC as a Print Server under NetWare 2.x/3.
ETR-CH03 Page 9 Wednesday, October 23, 1996 6:46 PM Configuring the XNIC as a Print Server (NetWare 2.x/3.x) Adding the Print Server and Printer These procedures use the commands for Novell NetWare 2.x or 3.x. Unless noted, commands can be upper or lower case. Typed commands should be entered by pressing the < E nte r > key. 1 Log in to the Novell file server so that you have supervisor privileges. At the prompt, enter: L O GI N fileserver \ S U P E R V I S O R At the prompt, enter the password.
ETR-CH03 Page 10 Wednesday, October 23, 1996 6:46 PM Configuring the XNIC as a Print Server (NetWare 2.x/3.x) 10 Enter the XNIC printer name as: X N E xxxxxx _ 1 ( f o r X N I C- E N E T) or as : X N T xxxxxx _ 1 (fo r X NI C- T RI NG ) , The printer name is the print server name followed by an underscore _ and a 1. Upper and lower case letters arent important.
ETR-CH03 Page 11 Wednesday, October 23, 1996 6:46 PM Configuring the XNIC as a Print Server (NetWare 2.x/3.x) Assigning the Print Queue Note 1 Select Print Server Information from the Available Options menu. 2 3 4 Select the print server from the list. 5 Select the Xerox printer name. 6 Press < I n s e r t > to display the list of available queues. 7 Enter a Priority level number for the printer (default is 1, highest) and press < E n t e r >.
ETR-CH03 Page 12 Wednesday, October 23, 1996 6:46 PM Using the Printer with Novell NetWare Restarting the XNIC After you complete the setup in PConsole, the XNIC needs to be restarted so it can read the new configuration in the NetWare file server. Power the printer off and power it on to restart the XNIC. The following procedure is an alternative method to restart the XNIC. 1 Select Print Server Information from the Available Options menu. 2 3 Select your XNIC Print Server name.
ETR-CH03 Page 13 Wednesday, October 23, 1996 6:46 PM Configuring the XNIC as a Print Server (NetWare 2.x/3.x) Linking File Servers to Each Other (If Queues Are from More Than One File Server) Follow the steps below when queues on multiple Novell file servers are configured for the same XNIC. This procedure will cross link the file servers to ensure the XNIC will service all the print queues. The menu names in these steps may differ for the 4.x file server, depending on from where you logon to it.
ETR-CH03 Page 14 Wednesday, October 23, 1996 6:46 PM Using the Printer with Novell NetWare 9 Repeat steps 1 to 8 again on every File Server in the cross link pool. The Available File Servers (Available NetWare Servers in 4.x) list should be the same on all File Servers that will have the same common Print Server. For example if File Servers A, B, and C on the network need to be cross linked, perform steps 1 to 8 on Server A. Then log in File Server B, and repeat steps 1 to 8.
ETR-CH03 Page 15 Wednesday, October 23, 1996 6:46 PM Configuring the XNIC as a Print Server (NetWare 4.x NDS) Configuring the XNIC as a Print Server (NetWare 4.x NDS) When Novell NetWare is configured to use the XNIC printer server, up to 128 file servers (the default is 16) may service the printer server with a maximum of 256 queues. This section includes procedures for configuring the XNIC as PServer in NetWare 4.
ETR-CH03 Page 16 Wednesday, October 23, 1996 6:46 PM Using PConsole Using PConsole To configure your XNIC as Print Server using PConsole in NetWare 4.
ETR-CH03 Page 17 Wednesday, October 23, 1996 6:46 PM Using PConsole 4 5 Select Change Context from the Available Options menu. Enter the desired context name or press to browse for available contexts. The context name defines the location of the print queue in the NDS tree. 6 7 Select Print Queues from the Available Options menu. 8 9 Enter the Queue name. 10 11 Adding the Print Server Press to create a new print queue. Enter the volume where the queue will be located.
ETR-CH03 Page 18 Wednesday, October 23, 1996 6:46 PM Using the Printer with Novell NetWare Adding the Printer 1 Select Printers from the Available Options menu and press . An error message may pop up indicating a mode mismatch. Ignore this message and continue with the next step. 2 3 Press . Enter the Printer name as: X N E xxxxxx _ 1 (fo r XN IC E NE T) or as : X N T xxxxxx _ 1 (fo r XN IC T RI NG) The printer name is the print server name followed by an underscore _ and a 1.
ETR-CH03 Page 19 Wednesday, October 23, 1996 6:46 PM Using PConsole 7 8 9 10 Linking the Print Server to the Printer Select a print queue from the list. Once you select a queue, press to change the priority or to designate it as the default queue. Press to save the changes. Press repeatedly until the Available Options menu is displayed. 1 Select Print Servers from the Available Options menu and press . 2 3 Choose the print server to link and press .
ETR-CH03 Page 20 Wednesday, October 23, 1996 6:46 PM Using the Printer with Novell NetWare If your network has more than 25 file servers, it is recommended to configure the XNIC as follows before continuing on to the next section Restarting the XNIC: Note 7. Setting NDS Context, (page 3-47) 8. Setting the NDS Tree, (page 3-48) 9. Disabling 3.x/BEM or NDS Discovery, (page 3-49). Setting the above parameters on the XNIC will automatically reset the XNIC.
ETR-CH03 Page 21 Wednesday, October 23, 1996 6:46 PM Using PConsole 5 Select Going Down After Current Print Jobs if any jobs are in the queue or select Down to restart the server immediately. Then press < E n t e r>. This brings the print server down. 6 Press repeatedly until you exit PCONSOLE. You have completed PServer and print queue configuration using PConsole in a DOS environment.
ETR-CH03 Page 22 Wednesday, October 23, 1996 6:46 PM Using NWAdmin Using NWAdmin Logging into the NetWare File Server To configure your XNIC as a print server under NetWare 4.
ETR-CH03 Page 23 Wednesday, October 23, 1996 6:46 PM Using NWAdmin Establishing the Context 1 Select Set Context from the View menu on the title bar. If the current context is correct, go to the next section, Creating the Print Queue. The context name defines the location of the print queue in the NDS tree. Creating the Print Queue Adding the Print Server 2 Select the desired context from the displayed list. 1 Use the right mouse button to click the context to which the queue will be created.
ETR-CH03 Page 24 Wednesday, October 23, 1996 6:46 PM Using NWAdmin 4 Enter the Print Server name as: X N E xxxxxx (f or XN IC E NE T ) or as : X N T xxxxxx (f or XN IC T R ING) where xxxxxx is the last six characters of the XNIC hardware address. Adding the Printer 5 Click the Create button. 1 Use the right mouse button to click the context to which the XNIC Print Server will be added. 2 3 4 Select Create from the displayed menu. Select the Printer object and click OK.
ETR-CH03 Page 25 Wednesday, October 23, 1996 6:46 PM Using NWAdmin Assigning the Print Queue to the Printer Linking the Print Server to the Printer 1 2 3 4 Double click the Printer icon for your newly created printer. 5 6 Click OK. 1 Double click on the Print Server icon on the main NWAdmin screen. Click the Assignments button. Click the Add... button. Select a print queue. The name becomes the selected object. The selected printer is automatically set as the default. Click OK.
ETR-CH03 Page 26 Wednesday, October 23, 1996 6:46 PM Using NWAdmin If your network has more than 25 file servers, it is recommended to configure the XNIC as follows before continuing on to the next section Restarting the XNIC: Note 7. Setting NDS Context, (page 3-47) 8. Setting the NDS Tree, (page 3-48) 9. Disabling 3.x/BEM or NDS Discovery, (page 3-49). Setting the above parameters on the XNIC will automatically reset the XNIC.
ETR-CH03 Page 27 Wednesday, October 23, 1996 6:46 PM Using NWAdmin 5 Select Information and Status from the Printer Configuration menu and press . This option appears only if the XNIC is powered on and connected to the network and the configuration was successful. Refer to the note on page 3-26 if your network has more than 25 file servers.
ETR-CH03 Page 28 Wednesday, October 23, 1996 6:46 PM Changing the Polling Interval (Optional) Changing the Polling Interval (Optional) The default polling interval for the XNIC to pull print jobs is set at 10 seconds for 3.x/bindery mode and five seconds for NDS mode. This interval gauges the frequency that the XNIC polls the file server to determine if jobs are available. Once the XNIC determines that jobs are available, all the jobs in the queue may be called at the network bandwidth.
ETR-CH03 Page 29 Wednesday, October 23, 1996 6:46 PM Configuring the XNIC as a Remote Printer (NetWare 2.x/3.x) Configuring the XNIC as a Remote Printer (NetWare 2.x/ 3.x) To configure your XNIC as a remote printer under NetWare 2.x/3.x, complete each of the procedures in this section as follows: Creating the Print Queue Adding the Remote Printer Assigning and Restarting the Print Queue Defining the Print Job Configuration (optional) These procedures use the commands for Novell NetWare 2.
ETR-CH03 Page 30 Wednesday, October 23, 1996 6:46 PM Configuring the XNIC as a Remote Printer (NetWare 2.x/3.x) Creating the Print Queue 1 Login to the Novell file server with supervisor privileges. At the DOS prompt, enter: L O GI N fileserver \ S U P E R V I S O R At the prompt, enter the password. 2 At the DOS prompt, enter: P C ON S O L E 3 Select Print Queue Information from the Available Options menu. 4 To create a new queue, press , which opens a dialog box.
ETR-CH03 Page 31 Wednesday, October 23, 1996 6:46 PM Configuring the XNIC as a Remote Printer (NetWare 2.x/3.x) 6 Enter the XNIC printer name as: X N E xxxxxx _ 1 ( f o r X N I C- E N E T) or as : X N T xxxxxx _ 1 (fo r X NI C- T RI NG ) , Where xxxxxx is the last six characters of the XNIC hardware address. Upper and lower case letters arent important.
ETR-CH03 Page 32 Wednesday, October 23, 1996 6:46 PM Configuring the XNIC as a Remote Printer (NetWare 2.x/3.x) 7 Press < E s c > until the message Exit PCONSOLE appears. 8 Follow Novell procedures to load PServer from the NetWare file server console. Select Yes to exit PCONSOLE. For example: load pserver remote_mode 9 Defining the Print Job Configuration (Optional) 3-32 ❖ Power the printer off and power it on. There are many utility and add-on programs that define special printer configurations.
ETR-CH03 Page 33 Wednesday, October 23, 1996 6:46 PM Configuring the XNIC as a Remote Printer (NetWare 4.x NDS) Configuring the XNIC as a Remote Printer (NetWare 4.x NDS) This section includes procedures for configuring the XNIC as NPrinter in NetWare 4.x NDS network using either PConsole in a DOS environment or NetWare Administrator (NWAdmin) in a Windows environment. NDS objects can also be defined and administered using NetAdminTM in DOS environments.
ETR-CH03 Page 34 Wednesday, October 23, 1996 6:46 PM Using PConsole Using PConsole To configure your XNIC as an NPrinter under NetWare 4.x using PConsole, complete the procedures in this section as follows: Creating a Print Queue Adding the Print Server Adding the Printer Associating the Printer with Novell PServer Linking the Print Queue to the Printer Restarting the Novell PServer These procedures use the commands for Novell NetWare 4.x NDS.
ETR-CH03 Page 35 Wednesday, October 23, 1996 6:46 PM Using PConsole 5 Enter the desired context name or press to browse for available contexts. The context name defines the location of the print queue in the NDS tree. 6 7 8 Select Print Queues from the Available Options menu. Press to create a new print queue. Enter the printer queue volume name, or Press to view a list of volumes. This is the name of the file servers volume where the print queue will be created.
ETR-CH03 Page 36 Wednesday, October 23, 1996 6:46 PM Using PConsole Adding the Print Server Associating the Printer with the Novell PServer 3-36 ❖ If a print server does not exist, one must be created. Follow this procedure. 1 2 Select Print Server from the Available Options menu. 3 Press to return to the Available Options menu. 1 2 Select Print Server from the Available Options menu. 3 Select Printers from the Print Server Information menu. 4 Press .
ETR-CH03 Page 37 Wednesday, October 23, 1996 6:46 PM Using PConsole Linking the Print Queue to the Printer 1 2 3 4 Select Print Queues from the Available Options menu. 5 Press three times. 6 7 Select Printers from the Available Options menu. 8 9 10 Select Print Queues to link. Select Print Servers from the Print Queue Information. Press and select the Print Server from the list. For example: remote_mode Select the defined Printer. Select Print Queues Assigned.
ETR-CH03 Page 38 Wednesday, October 23, 1996 6:46 PM Using PConsole Restarting the Novell PServer 1 Follow Novell procedure to load PServer from the NetWare file server console. 2 Power off the printer and power it on. You have completed NPrinter configuration on the XNIC using PConsole in a DOS environment. You can skip the next section, Using NWAdmin and continue with the section XNIC Configuration Options (page 3-43).
ETR-CH03 Page 39 Wednesday, October 23, 1996 6:46 PM Using NWAdmin Using NWAdmin Logging into the NetWare File Server To configure your XNIC as a print server under NetWare 4.
ETR-CH03 Page 40 Wednesday, October 23, 1996 6:46 PM Using NWAdmin Establishing the Context 1 Select Set Context from the View menu on the title bar. If the current context is correct, go to the next section Creating the Print Queue. The context name defines the location of the print queue in the NDS tree. Creating the Print Queue Adding the Printer 3-40 ❖ 2 Select the desired context from the displayed list. 1 Use the right mouse button to click the context to which the queue will be created.
ETR-CH03 Page 41 Wednesday, October 23, 1996 6:46 PM Using NWAdmin 4 Enter the Printer name as: X N E xxxxxx _ 1 (fo r XN IC E NE T) or as : X N T xxxxxx _ 1 (fo r XN IC T RI NG) . where xxxxxx is the last six characters of the XNIC hardware address. Upper and lower case letters arent important. For example, a valid name would be: X NE 1076E3 _ 1 or X N T 88E829 _ 1 If the printer name has been changed using the DS/P utility, print the Printer Configuration Sheet to verify the printers name.
ETR-CH03 Page 42 Wednesday, October 23, 1996 6:46 PM Using NWAdmin Associating the Printer with the Novell PServer 1 Double click on the NetWare native PServer that exists in the context on the main NWAdmin window. The PServer must already exist. 2 3 From the Print Server window, click the Assignments button. 4 5 6 Select Printer. Select Add. Select OK. Select OK at the Print Server window.
ETR-CH03 Page 43 Wednesday, October 23, 1996 6:46 PM XNIC Configuration Options XNIC Configuration Options When the XNIC is shipped from the factory, it is ready to operate in most NetWare environments without customizing. However, depending upon your network needs, you can configure the XNIC with other optional settings. The optional XNIC configuration procedures will enhance the performance of the XNIC and help reduce unnecessary traffic on the network.
ETR-CH03 Page 44 Wednesday, October 23, 1996 6:46 PM XNIC Configuration Options 2. Setting Frame Type (Optional) The default is: Automatic. The frame type options for Ethernet are: 802.2 Ethernet II 802.3 SNAP The frame type options for Token Ring are: 802.2 SNAP When the printer is powered on, the XNIC will begin the process of discovering a Novell file server. The default operation is to search for an 802.2 frame type first. If the XNIC finds any file server with an 802.
ETR-CH03 Page 45 Wednesday, October 23, 1996 6:46 PM XNIC Configuration Options 3. Disabling RPrinter/NPrinter Mode (Optional) The default is: Both RPrinter/NPrinter and PServer modes enabled. If the XNIC will be running in PServer mode only, you can reduce network traffic caused by the XNIC initiating periodic autodiscovery for RPrinter/NPrinter mode, by disabling the RPrinter/NPrinter mode. You can do this by issuing this command from TES: >define server netware rprinter disabled >init delay 0 4.
ETR-CH03 Page 46 Wednesday, October 23, 1996 6:46 PM XNIC Configuration Options Issue these commands from TES to set a preferred file server name (preferred is the recommended option) in the XNIC. >define server netware required disabled >define node server_name nfserver >init delay 0 Issue these commands from TES to set a required file server name in the XNIC.
ETR-CH03 Page 47 Wednesday, October 23, 1996 6:46 PM XNIC Configuration Options 6. Setting the Remote PServer Name for RPrinter/NPrinter (Recommended for Large Networks) The default is: No name. When the XNIC is running RPrinter/NPrinter in large networks (over 25 file servers) it is recommended to set the XNIC with the PServer name that will remotely attach to the XNIC. This setting will reduce the waiting time for the first job to print after the printer is powered on.
ETR-CH03 Page 48 Wednesday, October 23, 1996 6:46 PM XNIC Configuration Options 8. Setting the NDS Tree (Recommended for Large Networks) The default is: No name. If running in NetWare 4.x NDS in large networks (over 25 file servers) it is recommended to set the XNIC with the NDS tree name where the PServer object exists. This setting will reduce the waiting time for the first job to print after the printer is powered on.
ETR-CH03 Page 49 Wednesday, October 23, 1996 6:46 PM XNIC Configuration Options 9. Disabling 3.x/BEM or NDS Discovery (Recommended for Large Networks) The default is: Both 3.x/BEM and NDS discovery enabled. When the printer is powered on, the XNIC discovers the PServer definition intended for the XNIC through the NDS file servers. If the XNIC does not find PServer definitions on NDS file servers within two routers reach, it stops NDS discovery and starts the discovery process through the 3.
ETR-CH03 Page 50 Wednesday, October 23, 1996 6:46 PM Setting Optional Configurations Setting Optional Configurations This section describes procedures for communicating with the XNIC to monitor system parameters or to change the parameters from their factory defaults, as discussed in the previous section. Remote Logging into the XNIC via TES To monitor or change configuration parameters on the XNIC, you must first login to the XNIC from your Novell workstation.
ETR-CH03 Page 51 Wednesday, October 23, 1996 6:46 PM Setting Optional Configurations This procedure installs the TES/Kermit software on your Novell workstation and establishes a connection with the XNIC. 1 Insert the Utilities for: LAN Server, LAN Manager, Novell NetWare (TES) diskette into your floppy disk drive and enter the following command to install the files from the floppy diskette in drive A: to hard drive C on your system: a : \t e s \ i n s t a l l a : \ te s c : 2 Run TES by entering: cd c
ETR-CH03 Page 52 Wednesday, October 23, 1996 6:46 PM Setting Optional Configurations 5 To connect to the XNIC, enter: c o nn e c t 6 When the Kermit connection screen appears, press < E nt e r > until the XNIC login banner is displayed. At the E n t er u s e r n a m e, o r HELP > prompt, enter first_name At the S er v er > prompt enter s u At the P as sw o rd> > prompt, enter s y s t e m On certain hosts, you need to enter a Backspace keystroke before you enter the password.
ETR-CH03 Page 53 Wednesday, October 23, 1996 6:46 PM Basic XNIC Commands Basic XNIC Commands The basic XNIC commands are as follows: SHOW displays the XNICs current information. Display screens vary according to the specific SHOW parameter. The syntax is: s h ow parameter MONITOR is the same as SHOW, except that the display screen is updated every 10 seconds (every 1 second in privileged mode). Press any key to exit the display.
ETR-CH03 Page 54 Wednesday, October 23, 1996 6:46 PM Basic XNIC Commands CHANGE is a combination of SET and DEFINE. It immediately changes a parameter and permanently updates it in the NVRAM as well. Reinitializing the XNIC is not needed for the changes to take effect. The syntax is: c h an g e parameter value HELP displays instructions on the use of the various commands. The syntax is: h e lp commandname In XNIC, Version 5.x, the Help command is not available.
ETR-CH03 Page 55 Wednesday, October 23, 1996 6:46 PM Basic XNIC Commands Table 3.2 XNIC Tasks and Commandslists the most useful XNIC commands, organized by task. Table 3.2 XNIC Tasks and Commands Task Display information about the XNIC characteristics. Command show server characteristics Each parameter displayed may be altered using the appropriate SET/CHANGE/DEFINE command.
ETR-CH03 Page 56 Wednesday, October 23, 1996 6:46 PM Basic XNIC Commands Table 3.2 XNIC Tasks and Commands (continued) Task Change the frame type. Command define server netware frame_type (where Ethernet frame_type is one of the following: default IPX will try 802.2, Ethernet II, 802.3, and 802.2 snap in order. The first one found will be selected. 802.2 IPX will only look for Ethernet 802.2 frames. snap IPX will only look for Ethernet snap frames. 802.
ETR-CH03 Page 57 Wednesday, October 23, 1996 6:46 PM Basic XNIC Commands Table 3.2 XNIC Tasks and Commands (continued) Task Command Enable/disable Bindery Emulation or NDS modes. define server netware pserver mode Define a preferred or required NetWare file server for the XNIC. define node server_name nfserver Define the file server as required. define server netware required enabled (where mode is one of the following: auto Discovers through both NDS and bindery. This is the default.
ETR-CH03 Page 58 Wednesday, October 23, 1996 6:46 PM Basic XNIC Commands Table 3.2 XNIC Tasks and Commands (continued) Task Define the printers IP address for TCP/IP. Command define server ip ddd.ddd.ddd.ddd (where ddd.ddd.ddd.ddd is the new IP address of the printer.) Redefine the subnet mask define server subnet mmm.mmm.mmm.mmm (where mmm.mmm.mmm.mmm is the subnet mask for the network.) Define gateway address. define node ip ggg.ggg.ggg.ggg gateway default (where ggg.ggg.ggg.
ETR-CH04 Page 3 Wednesday, October 23, 1996 6:52 PM Using the Printer with EtherTalk or TokenTalk Installing the Printer Driver Your printer requires the installation of two types of software before printing can begin. The first is a PostScript printer driver that is optimized for use with many different Xerox printers. The second is known as a PostScript Printer Description (PPD) file and is written to take advantage of your printers unique printing capabilities.
ETR-CH04 Page 4 Wednesday, October 23, 1996 6:52 PM Installing the Printer Driver If you wish to rename your printer, it should be done before selecting the driver in the Chooser. See Customizing a Printer Service (page 4-7). Note 4-4 ❖ The default name of your printer in an AppleTalk environment can be changed only from a Macintosh. You can not use Xerox DS/P, TES, or Telnet to rename an AppleTalk printer.
ETR-CH04 Page 5 Wednesday, October 23, 1996 6:52 PM Using the Printer with EtherTalk or TokenTalk Accessing a Remote Printer The XNIC is preconfigured with AppleTalk services. Use the following procedure to access your printer on an AppleTalk network. If your Macintosh is connected to more than one type of network, you may need to select the appropriate network before you can access your printers XNIC card. 1 2 3 Select Control Panels from the Apple menu. 4 Click OK.
ETR-CH04 Page 6 Wednesday, October 23, 1996 6:52 PM Accessing a Remote Printer 4-6 ❖ 12 Choose the PostScript Printer Definition (PPD) utility that corresponds to your printer. 13 Close the Chooser and return to your application. 14 Click OK to return to your application. The computer will indicate that you have changed your current printer.
ETR-CH04 Page 7 Wednesday, October 23, 1996 6:52 PM Using the Printer with EtherTalk or TokenTalk Customizing a Printer Service To change the AppleTalk configuration of your printer server, use the OnPage utility. This utility is in a folder named OnPage Extras and can be installed when the OnPage driver is installed.
ETR-CH04 Page 8 Wednesday, October 23, 1996 6:52 PM Selecting EtherTalk or TokenTalk Setting up the Printer 1 Select the Apple Icon from the menu bar at the top of the screen. 2 3 4 Select the Control Panel option. 1 Select Chooser from the Apple menu. 2 3 Click the OnPage icon (or the LPS equivalent). 4 If your network administrator has divided your AppleTalk network into zones, click the zone that includes your printer. Select Network. Select EtherTalk or TokenTalk.
Etr-ch05 Page 3 Thursday, October 24, 1996 7:31 PM Using the Printer with UNIX TCP/IP Overview The UNIX operating system comes in many different varieties. The following environments are supported: AT&T SYSTEM V releases 3.2 and 4.0 Hewlett-Packard HP-UX releases 8.05 and 9.0 IBM AIX releases 1.0, 3.1, 3.2.5, and 4.1 INTERACTIVE UNIX System V/386 release 3.2 SCO UNIX release 3.2 SOLARIS releases 1.1, 2.2, 2.3, and 2.4 SunOS releases 4.0, 4.1, 4.1.1, and 4.1.
Etr-ch05 Page 4 Thursday, October 24, 1996 7:31 PM Overview Installation Installing a networked printer in the UNIX environment under TCP/IP requires these operations: 1. Setting up an IP address on the XNIC 2. Setting up print queues on the host system. These procedures are discussed below.
Etr-ch05 Page 5 Thursday, October 24, 1996 7:31 PM Overview XNIC Version 5.x no longer supports the pre-configured default IP addresses of 138.239.254.253 for Ethernet and 138.239.254.252 for Token Ring. Note Note When the printer is powered on without the network cable attached to the XNIC, the IP address will remain at none or at a previously set value.
Etr-ch05 Page 6 Thursday, October 24, 1996 7:31 PM Overview Setting up Print Queues on the Host System Print queues can be configured on the host system using one of the following methods: Automatic installation: Performed with the user-friendly Enstall program contained on the UNIX Installation Utility diskette.
Etr-ch05 Page 7 Thursday, October 24, 1996 7:31 PM Overview XNIC Requirements XNIC versions 4.x, 5.x, or above The UNIX Installation Utility diskette. Printer Language Settings Refer to Table 5.1 for the correct printer language settings. Table 5.
Etr-ch05 Page 8 Thursday, October 24, 1996 7:31 PM Using the Printer with UNIX TCP/IP Automatic Installation Procedure Automatic installation is performed by a program called Enstall. The user-friendly Enstall program automatically: Installs the required files on your UNIX system, Allows you to enter an IP address for your XNIC, if the XNIC does not already have one, and Configures the print queues on the host for network printing.
Etr-ch05 Page 9 Thursday, October 24, 1996 7:31 PM Automatic Installation Procedure Do not install the Xerox printer drivers that are supplied with your printer before finishing the Enstall installation for network printing. Note For complete installation procedures for the SUN environment, refer to Appendix B, at the back of this configuration guide.
Etr-ch05 Page 10 Thursday, October 24, 1996 7:31 PM Automatic Installation Procedure 5 Enter the commands: c d xrx . / en s t a l l - s 6 7 Read and follow the instructions on the screen. When you are asked to enter the device full path and file specification of your distribution medium, type the name of your floppy drive. For example: /dev/fd0, /dev/rdiskette 8 When you are asked to which LAN Hardware Interface the Xerox servers will be connected, enter your Ethernet or Token Ring device name.
Etr-ch05 Page 11 Thursday, October 24, 1996 7:31 PM Automatic Installation Procedure Adding or Removing Print Queues After the initial installation of the Enstall program, follow these instructions either to add another print queue to the same host system or to delete an existing one: 1 2 3 Log on as root at the system prompt. Go to the xrx directory on your hard disk. Enter: cd./xrx ./enstall -m 4 Read and follow the instructions on the screen.
Etr-ch05 Page 12 Thursday, October 24, 1996 7:31 PM Using the Printer with UNIX TCP/IP Manual Installation Procedure If you wish to install the Xerox printer manually, you must assign the IP address, configure some system files, and then configure the print queue. Assigning the IP address is easiest if you have the BootP (Bootstrap Protocol), DHCP (Dynamic Host Configuration Protocol), or RARP (Reverse Address Resolution Protocol) daemon running on your network.
Etr-ch05 Page 13 Thursday, October 24, 1996 7:31 PM Manual Installation Procedure Figure 5.1 Manual installation procedures 1.
Etr-ch05 Page 14 Thursday, October 24, 1996 7:31 PM Manual Installation Procedure In the following procedures, if the /etc/ethers or /etc/hosts file on your host is administered by NIS (formerly, Yellow Pages), you must update the appropriate NIS master hosts database instead. Note BootP, DHCP, and RARP Parameters When the printer is powered on, the default sequence of IP address acquisition is to attempt BootP first. If BootP fails, attempt DHCP. If DHCP fails, attempt RARP.
Etr-ch05 Page 15 Thursday, October 24, 1996 7:31 PM Manual Installation Procedure IP Address Option 1: Using BootP Overview BootP (Bootstrap Protocol) is a service provided under TCP/IP. XNIC versions 4.14 and above support BootP with the default being enabled. When the printer is powered on, the XNIC attempts BootP requests as follows: Two requests are attempted if the IP address is unknown on the XNIC No requests are attempted if the IP address is known on the XNIC.
Etr-ch05 Page 16 Thursday, October 24, 1996 7:31 PM Manual Installation Procedure Installing the BootP Server on the Same Segment 1 Identify which UNIX platform will be the BootP server. 2 Check to be sure that TCP/IP is running on the server: p s - e f | g r e p i ne t d If TCP/IP is not running do not continue until you have TCP/IP running. BootP will not work until TCP/IP is running, as it is activated by the inetd (internet daemon).
Etr-ch05 Page 17 Thursday, October 24, 1996 7:31 PM Manual Installation Procedure Installing the BootP Server on a Different Segment and Using a Router 1 2 Perform Steps 1 through Step 4 beginning on page 5-16. 3 Telnet into the above router and enable BootP service. This will allow the BootP request to be passed from the router. 4 While still logged in on the router, specify the address of the BootP server or the network segment where a BootP server can be found.
Etr-ch05 Page 18 Thursday, October 24, 1996 7:31 PM Manual Installation Procedure Verifying BootP Operation on the XNIC 1 Power on the printer so that it can send a BootP request on the network. 2 Verify that the XNIC received the IP address by entering arp -a on the UNIX machine. This will show you the entries made into the ARP Static Table. 3 You can also verify that the printer received the IP address by printing out a Printer Configuration Sheet.
Etr-ch05 Page 19 Thursday, October 24, 1996 7:31 PM Manual Installation Procedure IP Address Option 2: Using DHCP If the UNIX host is configured as a DHCP server, the IP address is assigned automatically. Refer to your UNIX documentation to configure your DHCP server on the network. The XNIC must be configured as reserved client by the host DHCP administration facility. This guarantees that an IP address assigned by DHCP will be reserved exclusively for that printer through its LAN hardware address.
Etr-ch05 Page 20 Thursday, October 24, 1996 7:31 PM Manual Installation Procedure IP Address Option 3: Using RARP To determine if RARP is running on your host, enter: p s -a x | g r e p ra r p d (BSD) or p s -e f | g r e p ra r p d (System V) If the system does not display a process number for the RARP daemon, skip to the section IP Address Option 4: Using ARP (page 5-22). Note To begin the RARP procedure, the IP address on the XNIC must be none.
Etr-ch05 Page 21 Thursday, October 24, 1996 7:31 PM Manual Installation Procedure 2 Edit the file /etc/hosts (or /usr/etc/hosts) by adding a line describing the XNIC as follows: ddd.ddd.ddd.ddd server_node_name where ddd.ddd.ddd.ddd is the IP address that the XNIC is assigned. The server_node_name must match the name entered in the /etc/ethers file. For example, if the IP address is 138.239.111.111, enter: 1 3 8. 2 3 9 . 1 1 1 .
Etr-ch05 Page 22 Thursday, October 24, 1996 7:31 PM Manual Installation Procedure IP Address Option 4: Using ARP This method offers a convenient means of assigning an IP address on the XNIC. The ARP command is standard on all UNIX platforms, although its syntax may vary from one system to another. You will need the XNICs hardware address and the IP address you wish to assign for this procedure. To begin the ARP procedure, the IP address on the XNIC must be None.
Etr-ch05 Page 23 Thursday, October 24, 1996 7:31 PM Manual Installation Procedure On some systems, such as AT&T System V, the ARP command is implemented as arpbypass with the following syntax: a r pb y p a s s - f 1 s et ddd.ddd.ddd.ddd 0xnn.0xnn.0xnn.0xnn.0xnn.0xnn.0xnn where the nns are hexadecimal digits. For example: a r pb y p a s s - f 1 s et 1 2 6 . 1 6 . 1 . 2 0 x0 . 0 x 0 . 0 x c 9 . 0 x0 . 0 x 8 . 0 x 2 a 3 From the UNIX command prompt, enter: p i ng ddd.ddd.ddd.ddd where ddd.ddd.ddd.
Etr-ch05 Page 24 Thursday, October 24, 1996 7:31 PM Manual Installation Procedure IP Address Option 5: Using Telnet On previous XNIC versions, the default IP address was 138.239.254.253 for Ethernet or 138.259.254.252 for Token Ring. These defaults have been eliminated in XNIC Version 5.x to avoid confusion. The default IP address of the XNIC is None. Telnet can be used only if the XNIC has already been assigned an IP address using one of the other options.
Etr-ch05 Page 25 Thursday, October 24, 1996 7:31 PM Manual Installation Procedure 3 Login to the XNIC card on the printer through telnet by entering: t e ln e t yyy.yyy.yyy.yyy 2 0 4 8 (where yyy.yyy.yyy.yyy is your printers XNIC IP address) The port number 2048 is important for proper terminal emulation. 4 At the # prompt enter a c c e s s 5 6 At the Local> prompt, enter s u This password access will not appear on the screen.
Etr-ch05 Page 26 Thursday, October 24, 1996 7:31 PM Manual Installation Procedure 9 Define routing tables in the XNIC card if the printer needs to know the address of routers in the network. Otherwise skip to the next step. Enter: d e fi n e n o d e i p ggg.ggg.ggg.ggg g a t e w a y d e fa u l t (where ggg.ggg.ggg.ggg is the address of the default router for the printers network segment).
Etr-ch05 Page 27 Thursday, October 24, 1996 7:31 PM Manual Installation Procedure Next you will need to configure the print queue, using one of the following three options: Print Queue Option 1: Setting up lpd Print Queue Option 1: Setting up lpd (page 5-27) Print Queue Option 2: Setting up RPRINT on BSD Hosts (page 5-30) Print Queue Option 3: Setting up RPRINT on System V Hosts (page 5-32). Follow this procedure to use the native lpd print protocol on a BSD host with the XNIC.
Etr-ch05 Page 28 Thursday, October 24, 1996 7:31 PM Manual Installation Procedure If lpd is supported, proceed as follows: 1 On your host, check to see if an error log exists. If not, create it. Then edit the /etc/printcap file to contain an entry similar to the following: XRX_PCL | X e r o x 4 5 05 | X N I O p o r t :\ :lp=:\ : r m = node_name:\ : r p = queue_name:\ :mx#0:\ : l f = / u s r / s p oo l / l p d / e r r o rl o g : \ : s d = / u s r / s p oo l / l p d / x r x _ pc l : where XRX_PCL is the
Etr-ch05 Page 29 Thursday, October 24, 1996 7:31 PM Manual Installation Procedure 3 Add the servers node_name to the /etc/hosts file. The node_name must match the name entered in the printcap file in step 1. For example: 1 3 8. 2 3 9 . 1 1 1 . 1 1 1 node_name Be sure that node_name is the same name you entered in the /etc/printcap file in step 1. Update the DNS database instead of /etc/hosts if the system uses a Domain Name Service.
Etr-ch05 Page 30 Thursday, October 24, 1996 7:31 PM Manual Installation Procedure Print Queue Option 2: Setting up RPRINT on BSD Hosts Follow this procedure to configure your BSD host with rprint, so that it can initiate a print job. A C compiler is required to perform this procedure, or you may use one of the pre-compiled binary sets on the UNIX Installation Utility diskette (if applicable). Note 1 Using the compiler, tar the Xerox utility rprint.
Etr-ch05 Page 31 Thursday, October 24, 1996 7:31 PM Manual Installation Procedure 5 Create the directory for the spooled files. For example: m k di r / u s r / s p o o l/ xrx c h ow n d a e m o n / u sr / s p o o l / xrx c h mo d 6 6 6 / u s r / sp o o l / xrx where xrx is the name of the spooler. 6 Edit /etc/printcap to add an entry for the Xerox printer.
Etr-ch05 Page 32 Thursday, October 24, 1996 7:31 PM Manual Installation Procedure Print Queue Option 3: Setting up RPRINT on System V Hosts Follow this procedure to configure your System V host so that it can initiate a print job: A C compiler is required to perform this procedure, or you may use one of the pre-compiled binary sets on the UNIX Installation Utility diskette (if applicable). Note 1 Using the compiler, tar the Xerox utility rprint.
Etr-ch05 Page 33 Thursday, October 24, 1996 7:31 PM Manual Installation Procedure 4 Edit the /usr/xrx/printcap file to include an entry for the Xerox printer(s). If you are using the rprint precompiled binary, the printcap file must be in the / e t c directory. For example, the following entry defines a printer on the XNIO port (port 1, TCP port 2501): x r x_ p c l | x r x _ 1 | X NI O p r i n t e r : \ :lp=xrx_pcl:\ (dummy device name) : x r x _ n = 1 3 8 . 2 39 . 1 1 1 . 1 1 1 : \ (IP address) :xrx_p=2
Etr-ch05 Page 34 Thursday, October 24, 1996 7:31 PM Manual Installation Procedure 7 Install the printer into the System V spooler system. Before shutting down the spooling system, check to see that there are no print jobs running (enter: l p st a t - o p r i n t er _ n a m e). If jobs are running, wait until they are completed.
Etr-ch05 Page 35 Thursday, October 24, 1996 7:31 PM Using the Printer with UNIX TCP/IP Setting Optional Configurations This section describes optional procedures for communicating with the XNIC to monitor system parameters or to change the parameters from their factory defaults. Logging into the XNIC To monitor or change configuration parameters on the XNIC, you must first login to the XNIC from your host.
Etr-ch05 Page 36 Thursday, October 24, 1996 7:31 PM Setting Optional Configurations 4 At the Password>> prompt, enter the password. The default is sy s t e m. You will not see what you type. On certain hosts, you must press the Backspace key before you can enter the password. For example: system. After the password is entered, the Local> prompt is redisplayed and you can then enter XNIC commands. See Table 5.2 on page 5-39 for a list of basic commands.
Etr-ch05 Page 37 Thursday, October 24, 1996 7:31 PM Using the Printer with UNIX TCP/IP Basic XNIC Commands The basic XNIC commands are as follows: SHOW displays the XNICs current information. Display screens vary according to the specific SHOW parameter. The syntax is: s how parameter MONITOR is the same as SHOW, except that the display screen is updated every 10 seconds (every 1 second in privileged mode). Press any key to exit the display.
Etr-ch05 Page 38 Thursday, October 24, 1996 7:31 PM Basic XNIC Commands CHANGE is a combination of SET and DEFINE; it immediately changes a parameter and permanently updates it in the NVRAM as well. The syntax is: c han g e parameter value HELP displays instructions on the use of the various commands. The syntax is: h elp commandname In XNIC, Version 5.x, the Help command is not available. Refer to the table which begins on the next page for information about commands.
Etr-ch05 Page 39 Thursday, October 24, 1996 7:31 PM Basic XNIC Commands Table 5.2 lists the most useful XNIC commands, organized by network environment and task. Table 5.2 XNIC tasks and commands Task Command Display information about the XNIC characteristics and the specific options that are enabled. show server characteristics Each parameter displayed may be altered using the appropriate SET/CHANGE/DEFINE command.
Etr-ch05 Page 40 Thursday, October 24, 1996 7:31 PM Basic XNIC Commands Table 5.2 XNIC tasks and commands (continued) Task Define the printers IP address. Command define server ip ddd.ddd.ddd.ddd (where ddd.ddd.ddd.ddd is the IP address of the printer) Set the IP address to none. define server ip none Redefine the subnet mask. define server subnet mmm.mmm.mmm.mmm (where mmm.mmm.mmm.mmm is the subnet mask for the network) Define routing tables. define node ip ggg.ggg.ggg.
ETR-CH06 Page 1 Wednesday, October 23, 1996 9:24 PM Chapter 6 Using the Printer with LAT on XNIC-ENET Only 6 r e tpahC Overview ............................................................................... 6-2 Network Considerations ....................................................... 6-2 Configuring an OpenVMS LAT Host for LATSYM ............... 6-3 Setting Optional Configurations ......................................... 6-5 Logging into the XNIC-ENET ............................................
ETR-CH06 Page 2 Wednesday, October 23, 1996 9:24 PM Using the Printer with LAT on XNIC-ENET Only Overview Network Considerations 6-2 ❖ This chapter provides a procedure to follow when configuring a Xerox printer on a LAT host system. The procedure requires the VMS access privileges of the system administrator. LAT systems require: Client support of the LAT protocol under the VAX/VMS or ULTRIX-32 operating systems XNIC-ENET.
ETR-CH06 Page 3 Wednesday, October 23, 1996 9:24 PM Using the Printer with LAT on XNIC-ENET Only Configuring an OpenVMS LAT Host for LATSYM The following is a procedure that the system administrator may use to set up the printer queue on the host. The actual commands will vary according to system configuration, type of printer, and application requirements.
ETR-CH06 Page 4 Wednesday, October 23, 1996 9:24 PM Configuring an OpenVMS LAT Host for LATSYM 3 To set up the terminal parameters, at the $ prompt enter the following sequence of commands: s e t t e r m i n a l ltannn : / p e r m / de v i c e = l a 3 6 / wi d t h = 8 0 / p a ge = 6 6 / lo w e r c a s e / n o br o a d c a s t s e t p r o t e c t i o n = (s : r w l p , o , g , w: r w l p ) / de v i c e ltannn : s e t d e v i c e ltannn : / sp o o l e d = ( queue_name , s ys $ s y s d e v i c e : ) where q
ETR-CH06 Page 5 Wednesday, October 23, 1996 9:24 PM Using the Printer with LAT on XNIC-ENET Only Setting Optional Configurations Logging into the XNIC-ENET This section describes optional procedures for communicating with the XNIC-ENET to monitor system parameters or to change the parameters from their factory defaults. To monitor or change configuration parameters on the XNIC-ENET, you must first log into the XNIC-ENET from your host.
ETR-CH06 Page 6 Wednesday, October 23, 1996 9:24 PM Setting Optional Configurations 6 At the Password>> prompt, enter the password. The default is sy s t e m. You wont see what you enter. After entering the password, the Local> prompt is redisplayed and you can enter XNIC commands. See Table 6.1 on page 6-9 for a list of basic commands.
ETR-CH06 Page 7 Wednesday, October 23, 1996 9:24 PM Basic XNIC-ENET Commands Basic XNIC-ENET Commands The basic XNIC-ENET commands are as follows: SHOW displays the XNIC-ENETs current information. Display screens vary according to the specific SHOW parameter. The syntax is: s h ow parameter MONITOR is the same as SHOW, except that the display screen is updated every 10 seconds (every 1 second in privileged mode). Press any key to exit the display.
ETR-CH06 Page 8 Wednesday, October 23, 1996 9:24 PM Basic XNIC-ENET Commands HELP displays instructions on the use of the various commands. The syntax is: h e lp commandname In XNIC-ENET, Version 5.x, the Help command is not available. You will need to refer to the table which begins on the next page for information about commands.
ETR-CH06 Page 9 Wednesday, October 23, 1996 9:24 PM Basic XNIC-ENET Commands Table 6.1 lists the most useful XNIC-ENET commands, organized by network environment and task. Table 6.1 XNIC-ENET tasks and commands Task Display information about the XNIC-ENET characteristics and the specific options that are enabled. Command show server characteristics Each parameter displayed may be altered using the appropriate SET/CHANGE/DEFINE command.
ETR-CH06 Page 10 Wednesday, October 23, 1996 9:24 PM Basic XNIC-ENET Commands Table 6.1 XNIC-ENET tasks and commands (continued) Task Command Reset the XNIC-ENET to factory defaults. init delay 0 default Display network configuration parameters. show server lat Change enabled LAT group codes. define server groups n1-n2,n3-n4,... define port 1 authorized group n1-n2, n3-n4,... The n1, n2, n3, and n4 represent group numbers and n1-n2 represents a range of group numbers.
ETR-CH07 Page 1 Wednesday, October 23, 1996 9:41 PM Chapter 7 Using the Printer with LAN Manager 7 r e tpahC Overview ............................................................................... 7-2 Network Considerations ....................................................... 7-2 Navigating through This Chapter .......................................... 7-4 TCP/IP Requirements ............................................................. 7-5 Testing TCP/IP on LAN Manager .............................
ETR-CH07 Page 2 Wednesday, October 23, 1996 9:41 PM Using the Printer with LAN Manager Changing Printer Properties (TCP/IP or NetBIOS) ............. 7-19 The Telrcf Utility (Optional) ............................................... 7-20 Configuring Telrcf .............................................................. 7-20 Using the Telrcf Script Facility .............................................
ETR-CH07 Page 3 Wednesday, October 23, 1996 9:41 PM Using the Printer with LAN Manager Overview This chapter discusses the configuration of the XNIC in a LAN Manager network. It is assumed that the system administrator has already configured the LAN Manager and related software. Therefore the chapter focuses on adding the XNIC printer server to an existing LAN Manager network. The OS/2 Print Manager running on LAN Manager allows up to 16 print queue connections per server (an OS/2 limitation).
ETR-CH07 Page 4 Wednesday, October 23, 1996 9:41 PM Overview Client workstations on the network can include the following: Navigating through This Chapter PC DOS, Version 6.0 or higher with IBM DOS LAN Requester OS/2, Version 2.1 or higher with OS/2 LAN Requester OS/2 Warp Connect, Version 3.0 with NetBIOS installed WIN-OS/2 Windows 3.
ETR-CH07 Page 5 Wednesday, October 23, 1996 9:41 PM Using the Printer with LAN Manager TCP/IP Requirements Testing TCP/IP on LAN Manager This section describes the procedures for configuring the LAN Manager file server to communicate with your XNIC via TCP/IP. Follow the instructions below to make sure your LAN Manager system is properly set up for TCP/IP. 1 Log into the LAN Manager Server as ADMIN (or ADMIN equivalent). 2 Verify that the OS/2 LAN Manager is installed with the TCP/IP protocol stack.
ETR-CH07 Page 6 Wednesday, October 23, 1996 9:41 PM TCP/IP Requirements IP Address on the XNIC When you are using TCP/IP as your print protocol, the XNIC needs to be assigned an IP address. The factory default for the IP address on the XNIC is None. XNIC Version 5.x no longer supports the pre-configured default IP addresses of 138.239.254.253 for Ethernet and 138.239.254.252 for Token Ring.
ETR-CH07 Page 7 Wednesday, October 23, 1996 9:41 PM Using the Printer with LAN Manager Configuring LAN Manager for TCP/IP or NetBIOS The Xerox LAN Manager Printer Utility Program provided on the Utilities for: LAN Server, LAN Manager, Novell NetWare (TES) diskette will be installed on the LAN Manager file server. It allows you to configure the file servers and clients for TCP/IP or NetBIOS printing.
ETR-CH07 Page 8 Wednesday, October 23, 1996 9:41 PM Configuring LAN Manager for TCP/IP or NetBIOS Installation from the Diskette 1 Insert the Utilities for: LAN Server, LAN Manager, Novell NetWare (TES) diskette into the floppy drive on the LAN Manager file server. 2 3 Open an OS/2 window. 4 Run the installation program. Select the drive where you inserted the diskette. For example, A: For example, if the diskette is in the A drive, enter: A : \L A N M A N \ i n s t a ll This displays the Installa
ETR-CH07 Page 9 Wednesday, October 23, 1996 9:41 PM Configuring LAN Manager for TCP/IP or NetBIOS Creating a Print Queue on the File Server 1 Install the Xerox OS/2 driver (for PCL or PostScript) that is shipped with your printer. This is done via the OS/2 Print Manager. 2 Double click on the Xerox LAN Manager Printer Utility in the Desktop Manager Group. This displays the LAN Manager Printer Utility - Icon View window.
ETR-CH07 Page 10 Wednesday, October 23, 1996 9:41 PM Configuring LAN Manager for TCP/IP or NetBIOS 5 Select one of these two protocols: TCP/IP Protocol NetBIOS Protocol. Depending upon your choice, you should see one of these two windows on your display: Add New TCP/IP RPrint Printer window Add New NetBIOS Printer window. 6 If you selected TCP/IP, turn to Creating a TCP/IP Print Queue (page 7-10) to continue the printer installation.
ETR-CH07 Page 11 Wednesday, October 23, 1996 9:41 PM Configuring LAN Manager for TCP/IP or NetBIOS 4 Select a printer Driver. The Xerox OS/2 driver that you installed earlier should appear in this field. Select the Xerox OS/2 driver for your printer. To add additional printer drivers to the Xerox LAN Manager Printer Utility driver list, install a new printer driver from the OS/2 Print Manager and select the desired driver for the new printer. 5 Enter the Service Name.
ETR-CH07 Page 12 Wednesday, October 23, 1996 9:41 PM Configuring LAN Manager for TCP/IP or NetBIOS 8 Click on More >>> to optionally modify timing parameters. This opens the Advanced Options window. Table 7.1 Advanced printer properties options (page 7-13) lists these options and describes their purposes. Select any desired options. Click OK when you have entered your options. This returns you to the Add New TCP/IP RPrint Printer window. 9 10 Click Add. A new printer will be created on the desktop.
ETR-CH07 Page 13 Wednesday, October 23, 1996 9:41 PM Configuring LAN Manager for TCP/IP or NetBIOS Advanced Printer Properties Options This table explains the Advanced Printer Properties options that can be set in the Advanced Options window during printer installation. Table 7.1 Advanced printer properties options Option Function Trace Mode Enabling this option is not recommended. Sends debugging information to RPRINTNB.EXE stdout file.
ETR-CH07 Page 14 Wednesday, October 23, 1996 9:41 PM Configuring LAN Manager for TCP/IP or NetBIOS Creating a NetBIOS Print Queue Note This NetBIOS-specific activity is a continuation of Creating a Print Queue on the File Server. To print using the NetBIOS protocol, the user must logon to the servers domain. To do this, add the command: logon/D:domain before the NPMST.EXE line and after the Net Start line in the STARTUP.CMD file.
ETR-CH07 Page 15 Wednesday, October 23, 1996 9:41 PM Configuring LAN Manager for TCP/IP or NetBIOS 4 Select a printer Driver. The Xerox OS/2 driver that you installed earlier should appear in this field. Select the Xerox OS/2 driver for your printer. To add additional printer drivers to the Xerox LAN Manager Printer Utility driver list, install a new printer driver from the OS/2 Print Manager and select the desired driver for the new printer. 5 Enter the Server Name.
ETR-CH07 Page 16 Wednesday, October 23, 1996 9:41 PM Configuring LAN Manager for TCP/IP or NetBIOS 7 Click on More >>> to optionally modify timing parameters. This opens the Advanced Options window. Table 7.1 Advanced printer properties options (page 7-13) lists these options and describes their purposes. Select any desired options. Click OK when you have entered your options. This returns you to the Add New NetBios Printer window. 8 Click Add. 9 The printer queue is now ready for use.
ETR-CH07 Page 17 Wednesday, October 23, 1996 9:41 PM Configuring LAN Manager for TCP/IP or NetBIOS Testing the Printer Test the printer you have just installed following this procedure: 1 Verify that the printer is powered on and that the printer control panel indicates that the printer is Online. 2 3 Select a file to print. 4 In the pop-up window that asks you to select the type of data in the object, select either: Drag the file to the newly created printer icon on the desktop.
ETR-CH07 Page 18 Wednesday, October 23, 1996 9:41 PM Using the Printer with LAN Manager Deleting Print Queues (TCP/IP or NetBIOS) To delete print queues, begin from the Xerox LAN Manager Printer Utility icon. Always delete created print queues from the LAN Manager Printer Utility. This ensures that the printer queue and its properties are deleted properly. Caution 1 Double click on the Xerox LAN Manager Printer Utility folder on the LAN Manager desktop.
ETR-CH07 Page 19 Wednesday, October 23, 1996 9:41 PM Using the Printer with LAN Manager Changing Printer Properties (TCP/IP or NetBIOS) To change printer properties, begin from the Xerox LAN Manager Printer Utility. 1 Double click on the Xerox LAN Manager Printer Utility folder on the LAN Manager desktop. This displays the LAN Manager Printer Utility window. 2 3 4 5 6 7 Double click on the Xerox LAN Manager Printer Utility icon. Select an existing printer to change its properties.
ETR-CH07 Page 20 Wednesday, October 23, 1996 9:41 PM Using the Printer with LAN Manager The Telrcf Utility (Optional) The telrcf utility allows you to log into any XNIC with a valid IP address from any host terminal on the network. The Telrcf utility is automatically installed along with the other LAN Manager files from the Utilities for LAN Server, LAN Manager, Novell NetWare (TES) diskette. You need only to configure Telrcf for your application.
ETR-CH07 Page 21 Wednesday, October 23, 1996 9:41 PM The Telrcf Utility (Optional) Using the Telrcf Script Facility Telrcf may be used to execute XNIC command scripts for remotely configuring your XNIC. Telrcf is especially useful if you want to configure many XNIC servers remotely from your LAN Manager host. Refer to the XNIC tasks and commands tables in each chapter of this guide for specific XNIC commands. To execute scripts, Telrcf should be run directly from an OS/2 window.
ETR-CH07 Page 22 Wednesday, October 23, 1996 9:41 PM 7-22 ❖ XNIC-ENET/TRING Configuration Guide
ETR-CH08 Page 3 Wednesday, October 23, 1996 9:46 PM Using the Printer with LAN Server Overview This chapter discusses the configuration of the XNIC in a LAN Server network. It is assumed that the system administrator has already configured the LAN Server and related software. Therefore the chapter focuses on adding the XNIC printer server to an existing LAN Server network. The OS/2 Print Manager running on LAN Server allows up to 16 print queue connections per server (an OS/2 limitation).
ETR-CH08 Page 4 Wednesday, October 23, 1996 9:46 PM Overview Client workstations on the network can include the following: Navigating through This Chapter PC DOS, Version 6.0 or higher with IBM DOS LAN Requester OS/2, Version 2.1 or higher with OS/2 LAN Requester OS/2 Warp Connect, Version 3.0 with NetBIOS installed WIN-OS/2 Windows 3.
ETR-CH08 Page 5 Wednesday, October 23, 1996 9:46 PM Using the Printer with LAN Server Establishing an IP/Network Connection (TCP/IP Only) To establish an IP/network connection, use the following procedures to assign a node name and the hardware address. These procedures are required for printing in LAN Server via TCP/IP. To start this procedure, the IP address on the XNIC must be None.
ETR-CH08 Page 6 Wednesday, October 23, 1996 9:46 PM Establishing an IP/Network Connection (TCP/IP Only) Assigning the IP Address You must now assign the IP address to the XNIC. 1 2 Open an OS/2 command prompt window. At the command prompt, enter: [ C :\ ] a r p - s HOSTNAME Hardware_address where Hardware_address is the XNIC hardware address in hexadecimal notation. Do not use leading zeroes in the IP address on the XNIC hardware address.
ETR-CH08 Page 7 Wednesday, October 23, 1996 9:46 PM Using the Printer with LAN Server Testing the IP/Network Connection (TCP/IP Only) To test the installation, use the following procedure: 1 At the OS/2 command prompt, enter: [ C :\ ] p i n g HOSTNAME 3 2 2 The printer should respond back that 2 packets were transmitted, 2 packets received, and 0% packets lost. If the system responds that 2 packets were transmitted, 0 packets received, and 100% packets lost, print a Printer Configuration Sheet.
ETR-CH08 Page 8 Wednesday, October 23, 1996 9:46 PM Using the Printer with LAN Server Configuring LAN Server for TCP/IP or NetBIOS The Xerox LAN Server Printer Utility Program provided on the Utilities for: LAN Server, LAN Manager, Novell NetWare (TES) diskette will be installed on the LAN Server file server. It allows you to configure the file servers and clients for TCP/IP or NetBIOS printing.
ETR-CH08 Page 9 Wednesday, October 23, 1996 9:46 PM Configuring LAN Server for TCP/IP or NetBIOS 3 Enter the following at the command prompt in the OS/2 window: a : \L A N s v r \ i n s t a ll This displays the Installation Screen. Creating a Print Queue on the File Server 4 Click the Install LAN Server button. 5 A completion message will appear when the installation is finished. 6 Click on OK. 7 Remove the diskette from the floppy drive.
ETR-CH08 Page 10 Wednesday, October 23, 1996 9:46 PM Configuring LAN Server for TCP/IP or NetBIOS 3 Double click on the Xerox LAN Server Printer Utility icon to display the LAN Server Printer Utility window. 4 Pull down the Install menu on the LAN Server Printer Utility window. Select Add Printers This window will appear. 5 Select one of these two protocols: TCP/IP Protocol NETBIOS Protocol.
ETR-CH08 Page 11 Wednesday, October 23, 1996 9:46 PM Configuring LAN Server for TCP/IP or NetBIOS Creating a TCP/IP Print Queue This TCP/IP-specific activity is a continuation of Creating a Print Queue on the File Server. 1 The Add New TCP/IP RPrint Printer window will be displayed. Enter the Printer name of your choice. The name can be up to eight characters long. For example: Eagle 2 Select Share Printer On the Network by clicking the box.
ETR-CH08 Page 12 Wednesday, October 23, 1996 9:46 PM Configuring LAN Server for TCP/IP or NetBIOS 6 Enter the IP Address. This is the XNIC IP Address For example: 138.236.99.26). Refer to Before Installation (page 8-8) where you wrote this earlier. 7 Enter the Port Number: 2501 8 Click on More >>> to optionally modify timing parameters. This is the TCP port number associated with the printer port on the XNIC. This opens the Advanced Options window. Table 8.
ETR-CH08 Page 13 Wednesday, October 23, 1996 9:46 PM Configuring LAN Server for TCP/IP or NetBIOS 9 10 Click Add. A new printer icon will be created on the desktop. The printer is now ready for use. Continue with Testing the Printer (page 8-17). Advanced Printer LAN Properties Options This table explains the Advanced Printer Properties options that can be set in the Advanced Options window during installation of printers. Table 8.
ETR-CH08 Page 14 Wednesday, October 23, 1996 9:46 PM Configuring LAN Server for TCP/IP or NetBIOS Creating a NetBIOS Print Queue Note This NetBIOS-specific activity is a continuation of Creating a Print Queue on the File Server. To print using the NetBIOS protocol, the user must logon to the servers domain. To do this, add the command: logon/D:domain before the NPMST.EXE line and after the Net Start line in the STARTUP.CMD file.
ETR-CH08 Page 15 Wednesday, October 23, 1996 9:46 PM Configuring LAN Server for TCP/IP or NetBIOS 4 Select a printer Driver. The Xerox OS/2 driver that you installed earlier should appear in this field. Select the Xerox OS/2 driver for your printer. To add additional drivers to the Xerox LAN Server Printer Utility driver list, install a new printer under the OS/2 Print Manager and select the desired driver for the new printer. 5 Enter the Server Name.
ETR-CH08 Page 16 Wednesday, October 23, 1996 9:46 PM Configuring LAN Server for TCP/IP or NetBIOS 7 Click on More >>> to optionally modify timing parameters. This opens the Advanced Options window. Table 8.1 Advanced printer properties options (page 8-13) lists these options and describes their purposes. Select any desired options. Click OK when you have entered your options. This returns you to the Add New NetBIOS Printer window. 8-16 ❖ 8 Click Add. 9 The printer is now ready for use.
ETR-CH08 Page 17 Wednesday, October 23, 1996 9:46 PM Configuring LAN Server for TCP/IP or NetBIOS Testing the Printer Test the printer you have just installed following this procedure: 1 Verify that the printer is powered on and that the printer control panel indicates that the printer is Online. 2 3 Select a file to print. 4 In the pop-up window that asks you to select the type of data in the object, select either: Drag the file to the newly created printer icon on the desktop.
ETR-CH08 Page 18 Wednesday, October 23, 1996 9:46 PM Using the Printer with LAN Server Deleting Print Queues (TCP/IP or NetBIOS) 8-18 ❖ To delete print queues, begin from the Xerox LAN Server Printer Utility folder on your desktop. 1 Double click on the Xerox LAN Server Printer Utility folder on the LAN Server desktop. This displays the LAN Server Printer Utility window. 2 3 Double click on the Xerox LAN Server Printer Utility icon. 4 Pull down the Launch menu.
ETR-CH08 Page 19 Wednesday, October 23, 1996 9:46 PM Using the Printer with LAN Server Changing Printer Properties (TCP/IP or NetBIOS) To change printer properties, begin from the Xerox LAN Server Printer Utility folder on your desktop. 1 Double click on the Xerox LAN Server Printer Utility folder icon on the LAN Server desktop. This displays the LAN Server Printer Utility window. 2 3 4 5 6 Double click on the Xerox LAN Server Printer Utility icon.
ETR-CH08 Page 20 Wednesday, October 23, 1996 9:46 PM Changing Printer Properties (TCP/IP or NetBIOS) 13 14 8-20 ❖ Click More >>> to view the Advanced Options screen. Make any necessary changes. Click OK to save the changes. This saves your modifications to the NetBIOS printer.
ETR-CH08 Page 21 Wednesday, October 23, 1996 9:46 PM Using the Printer with LAN Server Changing Printer Options (TCP/IP or NetBIOS) To change printer options, begin from the Xerox LAN Server Printer Utility folder on your desktop. 1 Double click on the Xerox LAN Server Printer Utility folder icon on the LAN Server desktop. This displays the LAN Server Printer Utility window. 2 3 Double click on the Xerox LAN Server Printer Utility icon.
ETR-CH08 Page 22 Wednesday, October 23, 1996 9:46 PM Using the Printer with LAN Server Setting Optional Configurations (TCP/IP Only) This section describes optional procedures for communicating with the XNIC via TCP/IP to monitor system parameters or to change the parameters from their factory defaults using Telnet. Logging into the XNIC To monitor or change configuration parameters on the XNIC, you must first log into the XNIC from your host.
ETR-CH08 Page 23 Wednesday, October 23, 1996 9:46 PM Setting Optional Configurations (TCP/IP Only) 4 At the Password>> prompt, hit < B a ck s p a c e >. Then enter the password. The default password is s y s t e m. You will not see what you enter. After the password is entered, the Local> prompt is redisplayed and you can enter server commands. Refer to Table 8.2 XNIC tasks and commands (page 8-26) for a list of basic commands.
ETR-CH08 Page 24 Wednesday, October 23, 1996 9:46 PM Using the Printer with LAN Server Basic XNIC Commands The basic XNIC commands are as follows: SHOW displays the XNICs current information. Display screens vary according to the specific SHOW parameter. The syntax is: s how parameter MONITOR is the same as SHOW, except that the display screen is updated every 10 seconds (every 1 second in privileged mode). Press any key to exit the display.
ETR-CH08 Page 25 Wednesday, October 23, 1996 9:46 PM Basic XNIC Commands CHANGE is a combination of SET and DEFINE. It immediately changes a parameter and permanently updates it in the NVRAM as well. Reinitializing the XNIC is not necessary for the changes to take place.The syntax is: c h an g e parameter value HELP displays instructions on the use of the various commands. The syntax is: h e lp commandname In XNIC, Version 5.x, the Help command is not available.
ETR-CH08 Page 26 Wednesday, October 23, 1996 9:46 PM Basic XNIC Commands Table 8.2 lists the most useful XNIC commands, organized by network environment and task. Table 8.2 XNIC tasks and commands Task Display information about the XNIC characteristics. Command show server characteristics Each parameter displayed may be altered using the appropriate SET/CHANGE/DEFINE command.
ETR-CH08 Page 27 Wednesday, October 23, 1996 9:46 PM Basic XNIC Commands Table 8.2 XNIC tasks and commands (continued) Task Command Reset the XNIC remotely (soft reset). init delay 0 Reset the XNIC to factory defaults. init delay 0 default Display NetBIOS characteristics. show server netbios Display network configuration parameters. show server TCP Create a new remote printer service.
ETR-CH08 Page 28 Wednesday, October 23, 1996 9:46 PM 8-28 ❖ XNIC-ENET/TRING Configuration Guide
ETR-CH10 Page 11 Wednesday, October 23, 1996 10:05 PM Emulex Private MIB Table 10.
ETR-CH10 Page 12 Wednesday, October 23, 1996 10:05 PM Emulex Private MIB Table 10.
ETR-CH10 Page 13 Wednesday, October 23, 1996 10:05 PM Emulex Private MIB Table 10.
ETR-CH10 Page 14 Wednesday, October 23, 1996 10:05 PM Emulex Private MIB Table 10.
ETR-CH10 Page 15 Wednesday, October 23, 1996 10:05 PM Emulex Private MIB Table 10.
ETR-CH10 Page 16 Wednesday, October 23, 1996 10:05 PM Emulex Private MIB Table 10.
ETR-CH11 Page 1 Thursday, October 24, 1996 7:14 AM Chapter 11 Troubleshooting 11 r e tpahC Overview ............................................................................. 11-2 Basic Check Procedure ........................................................ 11-3 Network Operational Problems ......................................... 11-4 Resetting the XNIC to the Factory Defaults ...................... 11-7 Novell NetWare Problems ..................................................
ETR-CH11 Page 2 Thursday, October 24, 1996 7:14 AM Troubleshooting Overview This chapter describes some methods you can use to troubleshoot problems with the XNIC. It also tells you how to obtain further assistance. When connected to an Ethernet network, there is a certain maximum number of devices per network segment and per network.
ETR-CH11 Page 3 Thursday, October 24, 1996 7:14 AM Troubleshooting Basic Check Procedure If you experience problems printing to the printer, first check for the following: Is the printer powered on? The printers Control Panel display reads: O n li n e _ __ R e ad y If the Control Panel display reports an error, refer to your printers user guide for further information. Print a Printer Configuration Sheet from the Test Menu and verify that the network settings are correct.
ETR-CH11 Page 4 Thursday, October 24, 1996 7:14 AM Troubleshooting Network Operational Problems Table 11.1 lists common network operational problems, the possible causes, and recommended corrective actions. Table 11.1 Network Operational Problems Problem Possible Causes Files wont print. Bad cable connections. Corrective Actions Check the network: If XNIC-ENET: Observe the green and yellow LEDS between the twisted pair and coaxial on the XNIC connection panel.
ETR-CH11 Page 5 Thursday, October 24, 1996 7:14 AM Network Operational Problems Table 11.1 Network Operational Problems (continued) Problem There are intermittent breaks in transmission. Possible Causes A network cable is damaged. Corrective Actions A damaged cable may still be capable of intermittent throughput, with occasional breaks in transmission. It is difficult to detect if no external cable damage is visible.
ETR-CH11 Page 6 Thursday, October 24, 1996 7:14 AM Network Operational Problems Table 11.1 Network Operational Problems (continued) Problem Possible Causes Performance is degraded. Corrective Actions A slowdown in network performance may be caused by an inappropriate use of network services. (Example: Running a print job from a file server instead of from a local hard disk may cause unnecessary slowdown in performance.) Observe proper network usage.
ETR-CH11 Page 7 Thursday, October 24, 1996 7:14 AM Troubleshooting Resetting the XNIC to the Factory Defaults If you want to return XNIC settings to their factory defaults such as IP address, and Required/Preferred File Server Name, or in the event that you are unable to log into the XNIC remotely (as explained in the Setting Optional Configurations section of the applicable network chapter), use the following procedure: 1 2 Power OFF the printer and remove the network connections.
ETR-CH11 Page 8 Thursday, October 24, 1996 7:14 AM Resetting the XNIC to the Factory Defaults 12 Power Off and replace the network connections. 13 Power On the printer. You are now ready to use your printer.
ETR-CH11 Page 9 Thursday, October 24, 1996 7:14 AM Troubleshooting Novell NetWare Problems Table 11.2 lists common Novell NetWare problems, the possible causes, and recommended corrective actions. Before you take any action, however, refer to the Novell Print Server Guide, and verify that the queue, print server, and printer were configured correctly. Table 11.2 Novell NetWare problems Problem Possible Causes Corrective Actions Print job doesnt print.
ETR-CH11 Page 10 Thursday, October 24, 1996 7:14 AM Novell NetWare Problems Table 11.2 Novell NetWare problems (continued) Problem Possible Causes Files won't print. Corrective Actions Print Queue is not attached to print server. Use PCONSOLE to make sure the print queue is attached to the print server. The steps are as follows: 1. Type PCONSOLE at the command line. 2. Select Print Queue Information. 3. Select the print queue associated with the printer. 4. Select Currently Attached Servers.
ETR-CH11 Page 11 Thursday, October 24, 1996 7:14 AM Troubleshooting Table 11.2 Novell NetWare problems (continued) Problem NetWare File Server console message: XNExxxxxx can't add printer 0, no resources. Possible Causes Corrective Actions Incorrect installation of Print Server XNExxxxxx for XNIC-ENET. Delete print server XNExxxxxx and associated print queues. Re-do install.
ETR-CH11 Page 12 Thursday, October 24, 1996 7:14 AM Novell NetWare Problems Table 11.2 Novell NetWare problems (continued) Problem Possible Causes Jobs sent by Microsoft Windows applications are not re-routed from LPT1 to the network printer after the NetWare Capture command is run. Fast Printing Direct to Port is selected under the Control Panel options in Windows, causing the application to drive LPT1 directly. Corrective Actions De-select fast printing.
ETR-CH11 Page 13 Thursday, October 24, 1996 7:14 AM Troubleshooting EtherTalk Problems If your Macintosh jobs will not print and an Out of memory message is displayed on the Mac screen, an incorrect printer type was selected under the Chooser menu. The LaserWriter printer type should be selected. For installing a Macintosh printer on the Ethernet network: To select EtherTalk or TokenTalk: 1 Select the apple icon from the menu bar at the top of the screen. 2 Select the Control Panel option.
ETR-CH11 Page 14 Thursday, October 24, 1996 7:14 AM Troubleshooting UNIX TCP/IP Problems Table 11.3 UNIX TCP/IP problems (page 11-16) lists common UNIX TCP/IP problems, their possible causes, and recommended corrective actions. Before you take any action, however, first check for the following: On a TCP/IP network host computer, enter the command: p ing ddd.ddd.ddd.ddd where ddd.ddd.ddd.ddd is the printers IP address.
ETR-CH11 Page 15 Thursday, October 24, 1996 7:14 AM UNIX TCP/IP Problems Check the error log(s) in the /tmp directory for possible problems. If errors are not reported or if the error log does not exist, verify the printer status using the lpc (BSD) or lpstat -t commands (System V). Examine the /etc/printcap file for the xrx_text entry and change disable to enable. Log into the XNIC and verify that the print definitions are enabled for the protocol you are using.
ETR-CH11 Page 16 Thursday, October 24, 1996 7:14 AM UNIX TCP/IP Problems Table 11.3 UNIX TCP/IP problems Problem Possible Causes Cannot access the XNIC from your workstation. Card was previously installed, and the IP address is from a different network (i.e., subnet) than the network you are trying to reach it from (e.g., 13.0.0.18). Corrective Actions Use a manual routine to set the IP address. Set up a routing table on the workstation. The workstation in this example has IP address 13.1.217.153.
ETR-CH11 Page 17 Thursday, October 24, 1996 7:14 AM UNIX TCP/IP Problems Table 11.3 UNIX TCP/IP problems (continued) Problem Cannot access the XNIC from your workstation (continued). Possible Causes Corrective Actions Printer is not on the same network. Telnet into the printer from a workstation on the same network.
ETR-CH11 Page 18 Thursday, October 24, 1996 7:14 AM UNIX TCP/IP Problems Table 11.3 UNIX TCP/IP problems (continued) Problem Possible Causes UNIX files won't print. Missing entries in /etc/hosts and /etc/printcap files. Corrective Actions Check the /etc/hosts and /etc/printcap files, and rectify if needed. The following examples are from a SUN workstation connected to an XNIC-ENET. /etc/hosts /etc/hosts connects the IP address with the server name. The server name is case sensitive.
ETR-CH11 Page 19 Thursday, October 24, 1996 7:14 AM Troubleshooting LAT Problems If you are printing from a LAT host, ensure that the queue was set up and is running. If the printer will not print, the XNICs name has been changed. Follow these steps to correct the problem: 1 Connect to the card using the instructions in the section Logging into the XNIC-ENET (page 6-5) 2 Issue the command: s h o w s e r v e r l a t 3 Issue this command only if your XNIC is Version 4.
ETR-CH11 Page 20 Thursday, October 24, 1996 7:14 AM Troubleshooting LAN Manager Problems Table 11.4 LAN Manager problems (page 11-21) lists common LAN Manager problems using the TCP/IP protocols, the possible causes, and recommended corrective actions. If you are having trouble reaching the XNIC on the network, first verify the following points: Verify that all network connections are functioning.
ETR-CH11 Page 21 Thursday, October 24, 1996 7:14 AM LAN Manager Problems Table 11.4 LAN Manager problems Problem TelRcf does not connect. Printer does not get a ready status. Corrective Actions Possible Causes Printer is OFF, off-line, or disconnected from the network. Make sure the printer is ON. There are problems with the network. Check that cables are properly connected to the network and to the printer. XNIC IP address has been incorrectly defined in the TelRcf icon.
ETR-CH11 Page 22 Thursday, October 24, 1996 7:14 AM Troubleshooting LAN Server Problems Table 11.5 lists common LAN Server problems, the possible causes, and recommended corrective actions. Table 11.5 LAN Server problems Problem Possible Causes Printer will not print. Corrective Actions IP address not defined in Host Table. Check Services screen 3 in the TCP/IP configuration folder. Host Name incorrect. See above. Also check Host Name in LPD Pipe.
ETR-CH11 Page 23 Thursday, October 24, 1996 7:14 AM Troubleshooting Windows NT Problems Table 11.6 lists common Windows NT problems when printing via TCP/IP, the possible causes, and recommended corrective actions. Table 11.6 Windows NT Problems Problem Possible Causes Corrective Actions Cannot access the XNIC from your workstation. XNIC cannot complete workstation request for connection. Make sure the printer is on the same physical segment as the workstation.
ETR-CH11 Page 24 Thursday, October 24, 1996 7:14 AM Windows NT Problems Table 11.6 Windows NT Problems (continued) Problem A new IP address cannot be set using ARP/PING Print jobs come out incorrect. Possible Causes Corrective Actions Initial IP address was not set as None. Either the XNIC was already given a pre-defined IP address by a system administrator, or a DHCP server is enabled on a file server.
ETR-CH11 Page 25 Thursday, October 24, 1996 7:14 AM Windows NT Problems Table 11.6 Windows NT Problems (continued) Problem Text files print off the right edge of the page. Possible Causes Incorrect value in the Name of printer on that machine field. Corrective Actions For ASCII text, to add carriage return for each linefeed, enter T EX T in the Name of printer on that machine box. This box is located in the Add LPR Compatible Printer window.
ETR-CH11 Page 26 Thursday, October 24, 1996 7:14 AM Windows NT Problems Table 11.6 Windows NT Problems (continued) Problem Possible Causes A General Protection error occurs in CorelDraw! when printing. 11-26 ❖ CorelDraw! does not accept the string of the Printer Port as PASSTHRU. Corrective Actions Change the printer service to the printers model number using the following commands: 1. Open a telnet session from a DOS prompt: telnet print_server_ip_address 2048 2.
ETR-CH11 Page 27 Thursday, October 24, 1996 7:14 AM Windows NT Problems Table 11.6 Windows NT Problems (continued) Problem A General Protection error occurs in CorelDraw! when printing (continued). Possible Causes Corrective Actions CorelDraw! does not accept the string of the Printer Port as PASSTHRU (continued). 5. 6.
ETR-CH11 Page 28 Thursday, October 24, 1996 7:14 AM Troubleshooting Before Obtaining Technical Assistance If you continue to experience problems with your XNIC and cannot resolve them with the procedures discussed above, contact your dealer, Xerox, or Rank Xerox.
ETR-APPA Page 1 Thursday, October 24, 1996 7:21 AM Appendix A Subnetting Example A x i dneppA Subnetting is a process often used to divide a TCP/IP network into different logical networks. This process requires special considerations to be taken when installing the XNIC. The following subnetting example is provided to illustrate these considerations and procedures. Consider the following situation: The subnet mask is 255.255.255.
ETR-APPA Page 2 Thursday, October 24, 1996 7:21 AM Subnetting Example A routing information table must be set up on the XNIC card so that the printer will know the address of the router it must go through to communicate with the workstation. Until this communication link is working, Telnet will not work. Two solutions are possible: Solution 1: Put the printer on the same network as the UNIX workstation, and use Telnet to install the printer.
ETR-APPB Page 1 Thursday, October 24, 1996 7:51 AM Appendix B Installation on Sun Platforms B x i dneppA Overview .............................................................................. B-3 Document Conventions ........................................................ B-3 Initial Installation ................................................................. B-4 Network Printing .................................................................. B-4 From a Local Floppy Device ........................
ETR-APPB Page 2 Thursday, October 24, 1996 7:51 AM Installation on Sun Platforms PostScript Driver Installation ............................................... B-9 From a Local Floppy Device ................................................... B-9 From a Remote Floppy Device ............................................. B-10 From an FTP server .............................................................. B-12 From a Local CD-ROM Device ..............................................
ETR-APPB Page 3 Thursday, October 24, 1996 7:51 AM Overview This appendix describes the complete installation of your Xerox printer is the SunOS and Solaris environments. Document Conventions The following conventions are used throughout this appendix: The # sign indicates the UNIX prompt. Do not type it. Characters to be entered are in computer typeface. The ¬ sign indicates that the command line continues, and that what follows should be typed as a continuation of the command string.
ETR-APPB Page 4 Thursday, October 24, 1996 7:51 AM Initial Installation Network Printing Choose Network Printing (below), Parallel Port Printing (page B-8), or both. From a Local Floppy Device 1 Decide where you want to store the Xerox Installation Files on the hard disk of your workstation and create a directory. Change to the directory you just created.
ETR-APPB Page 5 Thursday, October 24, 1996 7:51 AM Initial Installation 6 When asked to enter the number corresponding to the file type for this printer: 1) Plain text (ASCII) 2) PASSTHRU For PCL, Postscript, HPGL or graphic image files, enter selection 2 PASSTHRU to handle all the 3 types of files.
ETR-APPB Page 6 Thursday, October 24, 1996 7:51 AM Initial Installation From a Remote Floppy Device 1 Decide where you want to store the Xerox installation files on the hard disk of your local workstation and create a directory. 2 Change to the directory you just created. You will be using the BSD R commands and may need assistance from a system or network administrator to modify the following files: /.rhosts ~/hosts.equiv /etc/hosts /etc/inetd.
ETR-APPB Page 7 Thursday, October 24, 1996 7:51 AM Initial Installation 7 Enter: # cd ./xrx # ./enstall -s 8 (this will start the installation program) When asked to which LAN Interface will the Xerox servers be connected, enter either your Ethernet or Token Ring device name.
ETR-APPB Page 8 Thursday, October 24, 1996 7:51 AM Initial Installation From a Remote CD-ROM Device Refer to Installing Files from a Remote CD-ROM Device (page B-26) for the instructions to retrieve and install files from the remote CD-ROM device. Parallel Port Printing On SunOS Systems Installation instructions for this section are currently not available.
ETR-APPB Page 9 Thursday, October 24, 1996 7:51 AM PostScript Driver Installation From a Local Floppy Device To obtain updated driver diskettes for your printer, contact your dealer, Xerox/Rank Xerox, or obtain the files from the Xerox FTP site. The Xerox DocuPrint 4517 Printer includes three diskettes for Solaris 2.3+ drivers and three other diskettes for SunOS 4.1.3+ drivers. 1 Decide where you want to store the Xerox installation files on the hard disk of your workstation and create a directory.
ETR-APPB Page 10 Thursday, October 24, 1996 7:51 AM PostScript Driver Installation 7 8 Insert diskette 3 of 3 into the floppy drive. Enter: # cpio -icvdB < /dev/fd0 9 # eject (eject the 3rd floppy disk) # ./install (begin the print driver installation) When asked to enter install directory, enter the name of the directory where you want the driver software to be installed. Do not use the scratch area directory for this purpose. Create a new directory other than the scratch area.
ETR-APPB Page 11 Thursday, October 24, 1996 7:51 AM PostScript Driver Installation 2 Change to the directory you just created. You will be using the BSD R commands and may need assistance from a system or network administrator to modify the following files: /.rhosts ~/hosts.equiv /etc/hosts /etc/inetd.conf 3 To install printer drivers for the Xerox DocuPrint 4517 printer, insert diskette 1 of 3 of the Xerox DocuPrint 4517 Printer Drivers into the floppy drive.
ETR-APPB Page 12 Thursday, October 24, 1996 7:51 AM PostScript Driver Installation 9 10 Enter: # cpio -icvdB < /dev/fd0 (this will extract more installation files) # eject (eject the 3rd floppy disk) # /etc/init.d/volmgt start (start volume manager, optionally. Only on Solaris System) At your local workstation, enter: # mkdir /home/xerox # cd /home/xerox # rcp -r remote_hostname:/home/¬ driver_install_scratch_area /home (copying files from the remote machine) # more user_guide.
ETR-APPB Page 13 Thursday, October 24, 1996 7:51 AM PostScript Driver Installation From a Local CD-ROM Device Refer toInstalling Xerox DocuPrint 4517 Files from a Local CD-ROM Device (page B-22) for the instructions to retrieve and install the files from the local CD-ROM device. From a Remote CD-ROM Device Refer to Installing Files from a Remote CD-ROM Device (page B-26) for the instructions to retrieve and install the files from the remote CD-ROM device.
ETR-APPB Page 14 Thursday, October 24, 1996 7:51 AM Addition or Deletion of Printers on the Host Network Printers Adding or Deleting Printers 1 2 3 Go to the xrx directory on the hard disk of your workstation. Enter: # cd ./xrx (this is an example of using a relative path to the xrx directory) # ./enstall -m (this will start the program) When asked to enter the number corresponding to the file type for this printer: 1) Plain text (ASCII) 2) PASSTHRU.
ETR-APPB Page 15 Thursday, October 24, 1996 7:51 AM Addition or Deletion of Printers on the Host Adding or Deleting Respective Drivers To configure printers, run the xpconfig program. For example, enter: # /home/xerox/driver_software/bin/xpconfig (your directory path might be different) Parallel Port Printers Adding or Deleting Printers On SunOS Installation instructions for this section is currently not available.
ETR-APPB Page 16 Thursday, October 24, 1996 7:51 AM Addition or Deletion of Printers on the Host Adding or Deleting Printers On Solaris 1 Bring up Openwin. enter: # /usr/openwin/bin/openwin 2 Click the right mouse button and select Command Tool. 3 In Command Tool, bring up the Admintool window. Enter: # admintool & 4 When the Admintool window comes up, click Printer Manager. 5 Deleting a Printer: When the Printer Manager window comes up, select a printer, click on Edit and select Delete Printer.
ETR-APPB Page 17 Thursday, October 24, 1996 7:51 AM Installing Files from an FTP Server Retrieving Installation Files There are two FTP sites that maintain the necessary files: spectrum.xerox.com ftp.xerox.com 1 Decide where you want to store the Xerox installation files on the hard disk of your local workstation and create a directory. 2 Login as the root user. Enter: 3 4 5 At the login prompt, enter the username: anonymous. # ftp spectrum.xerox.
ETR-APPB Page 18 Thursday, October 24, 1996 7:51 AM Installing Files from an FTP Server 6 If your workstation is SunOS, enter: # cd SunOS # get suno1of3.cpio (retrieves the 4517 Drivers installation file 1 of 3) # get suno2of3.cpio (retrieves the 4517 Drivers installation file 2 of 3) # get suno3of3.cpio (retrieves the 4517 Drivers installation file 3 of 3) If your workstation is Solaris, enter: # cd Solaris 7 # get sol21of3.
ETR-APPB Page 19 Thursday, October 24, 1996 7:51 AM Installing Files from an FTP Server 2 If your workstation is SunOS, enter: # cp ./hostbin/sunsparc/* ./xrx If your workstation is Solaris, enter: # cp ./hostbin/solsparc/* ./xrx # cd ./xrx # ./enstall -s 3 (this will start the installation program) When asked to which LAN Interface will the Xerox servers be connected, enter either your Ethernet or Token Ring device name.
ETR-APPB Page 20 Thursday, October 24, 1996 7:51 AM Installing Files from an FTP Server Initial Installation of the PostScript Driver For the installation of the Xerox DocuPrint 4517 Postscript Driver, follow these instructions: 1 Enter the following commands: # cd .. (change to the directory where the ftp files were copied to) # mkdir driver_install_scratch_area (creating a scratch area for driver installation) # mv *.
ETR-APPB Page 21 Thursday, October 24, 1996 7:51 AM Installing Files from an FTP Server 4 When asked to run the xpconfig program to configure the printers, you can change to the bin directory or run it with the full path name.
ETR-APPB Page 22 Thursday, October 24, 1996 7:51 AM Installing Xerox DocuPrint 4517 Files from a Local CD-ROM Device Retrieving Installation Files To acquire the Xerox UNIX Installation CD-ROM for the Xerox DocuPrint 4517 Printer, contact your dealer or Xerox or Rank Xerox. 1 2 Login to your workstation as root. Decide where you want to store the Xerox Installation Files on the hard disk, create a directory, and change to the directory you created.
ETR-APPB Page 23 Thursday, October 24, 1996 7:51 AM Installing Xerox DocuPrint 4517 Files from a Local CD-ROM Device 6 Unmount the CD-ROM and eject it.
ETR-APPB Page 24 Thursday, October 24, 1996 7:51 AM Installing Xerox DocuPrint 4517 Files from a Local CD-ROM Device 3 When asked to enter the number corresponding to the file type for this printer: 1) Plain text (ASCII) 2) PCL 3) PostScript 4) HPGL or other graphic image files For PCL, Postscript, HPGL or graphic image files, you can define one type of printer (queue)on your host such as PostScript (selection 3) to handle all the 3 types of files.
ETR-APPB Page 25 Thursday, October 24, 1996 7:51 AM Installing Xerox DocuPrint 4517 Files from a Local CD-ROM Device 2 When asked to enter install directory, enter the name of the directory where you want the driver software to be installed. Do not use the current directory for this purpose. Create a new directory other than the current directory. For example: # /home/xerox/driver_software.
ETR-APPB Page 26 Thursday, October 24, 1996 7:51 AM Installing Files from a Remote CD-ROM Device Retrieving Installation Files Remotely 1 At your workstation, follow steps Step 1 through Step 7 in the section Retrieving Installation Files (page B-22). 2 3 At your local workstation, login as root. Decide where you want to store the Xerox Installation Files and change to that directory.