AUG-TITL Page -1 Black,Red,Cyan Tuesday, February 7, 1995 12:20 PM The Xerox 4505/4505ps and 4510/4510ps Desktop Laser Printers User’s Guide
AUG-TITL Page 0 Black,Red Tuesday, February 7, 1995 12:20 PM Xerox Corporation 701 South Aviation Blvd. El Segundo, CA 90245 USA Xerox Canada, Limited 5650 Yonge Street North York, Ontario Canada M2M 4G7 Americas Operations 200 First Stamford Place Greenwich Avenue Stamford, CT 06904-2343 USA Rank Xerox, Limited Parkway Marlow Buckinghamshire S17 1YL United Kingdom Copyright 1994 Xerox Corporation. All Rights Reserved.
AUG-TOC Page 1 Black,Cyan Friday, February 3, 1995 12:42 AM Table of Contents Chapter 1 Introduction ................................................... 1-1 Overview 1-2 Sharing the Printer 1-5 Memory Considerations 1-6 Chapter 2 Handling Paper ............................................. 2-1 Overview 2-3 Paper Input 2-4 Paper Output 2-5 Paper Specifications 2-6 Paper Trays 2-8 Loading Paper 2-14 Selecting a Paper Source 2-22 Chapter 3 Using the Control Panel ..............................
AUG-TOC Page 2 Black,Cyan Friday, February 3, 1995 12:42 AM Table of Contents PCL Menu 3-15 PostScript Menu 3-29 Interface Menu 3-37 System Menu 3-57 Test Menu 3-61 Reset Menu 3-65 Printer Settings that Affect Memory 3-67 Chapter 4 Using Fonts .................................................... 4-1 Overview 4-3 Fonts Resident on the Printer 4-5 Adding Fonts 4-9 Selecting a Font 4-12 Downloading Fonts 4-13 Chapter 5 Adding Printer Options ...............................
AUG-TOC Page 3 Black,Cyan Friday, February 3, 1995 12:42 AM Table of Contents Print Quality Problems 7-29 Appendix A Printer and Cable Specifications .............. A-1 4505 and 4505ps Printer Specifications A-2 4510 and 4510ps Printer Specifications A-4 Cable Specifications A-7 Appendix B Printer Commands (Escape Sequences) ... B-1 Xerox-Unique Settings B-2 PCL Printer Commands B-3 HP-GL/2 Context Printer Commands B-21 Control Codes B-25 Appendix C I/O Port Polling .......................................
AUG-TOC Page 4 Black Friday, February 3, 1995 12:42 AM iv ❖ 4505/4505ps or 4510/4510ps User’s Guide
AUG-CH01 Page 1 Black,Red,Cyan Saturday, January 21, 1995 6:00 PM Chapter 1 Introduction 1 r e tpahC Overview ............................................................................... 1-2 Printer Components 1-3 Factory Settings 1-4 Sharing the Printer ............................................................... 1-5 Memory Considerations .......................................................
AUG-CH01 Page 2 Black,Red,Cyan Saturday, January 21, 1995 6:00 PM Overview Overview The Xerox 4505, 4505ps, 4510, and 4510ps Desktop Laser Printers offer the most cost-effective, best price-performance solution to single-user or networked printing of any advanced laser printer in their class.
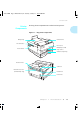
AUG-CH01 Page 3 Black,Red,Cyan Saturday, January 21, 1995 6:00 PM Overview Printer Components The key printer components are called out in Figure 1.1. Figure 1.
AUG-CH01 Page 4 Black,Red,Cyan Saturday, January 21, 1995 6:00 PM Overview Factory Settings The printer is controlled by numerous settings whose values are pre-set at the factory. These values are called factory settings. If the factory settings do not suit the needs of your printing environment, you can select a new setting in either of two ways: 1-4 ❖ • Control Panel on the printer. See Chapter 3: Using the Control Panel. • Remote User Interface on the host computer.
AUG-CH01 Page 5 Black,Red,Cyan Saturday, January 21, 1995 6:00 PM Sharing the Printer Sharing the Printer Particular care must be taken when changing settings for a printer being shared by users such as those on a local area network (LAN). When the printer is shared, settings must accommodate the common needs of users. Considerations for a networked environment include the following: • Downloading fonts and macros by individual users may consume printer memory.
AUG-CH01 Page 6 Black,Red,Cyan Saturday, January 21, 1995 6:00 PM Memory Considerations Memory Considerations In today’s printing environments, technologies have advanced greatly but so have their corresponding memory requirements. To make use of specialized graphics features, fonts, and other applications on the market today, you may find it necessary to increase memory size. From the factory, the 4505 and 4510 are equipped with 2 MB of resident base memory.
AUG-CH02 Page 1 Black,Red,Cyan Tuesday, March 21, 1995 5:06 PM Chapter 2 Handling Paper 2 r e tpahC Overview ............................................................................... 2-3 Paper Input ............................................................................ 2-4 Paper Output ........................................................................ 2-5 Paper Specifications ............................................................. 2-6 Weight 2-6 Dimensions 2-6 Paper Trays ........
AUG-CH02 Page 2 Black,Red Tuesday, March 21, 1995 5:06 PM Loading Letterhead, Pre-printed, Drilled, or Label Paper 2-20 Loading Envelopes 2-21 Selecting a Paper Source ....................................................
AUG-CH02 Page 3 Black,Red,Cyan Tuesday, March 21, 1995 5:06 PM Overview Overview This chapter provides specific information on paper handling: • Paper specifications • Paper sources and paper trays • Manual feeding and loading of paper, including letterhead, pre-printed stationery, envelopes, labels, and transparencies • Paper source mapping • Printing In this guide, paper source refers to the slot or opening where paper enters the printer.
AUG-CH02 Page 4 Black,Red,Cyan Tuesday, March 21, 1995 5:06 PM Paper Input Paper Input Paper input sources are the slots or openings where paper enters the printer. As shown in Figure 2.1, the 4505/4505ps and 4510/4510ps printers have as many as three paper input sources. Figure 2.
AUG-CH02 Page 5 Black,Red,Cyan Tuesday, March 21, 1995 5:06 PM Paper Output Paper Output As shown in Figure 2.2, printed output is delivered face down to the tray located on top of the printer. Output capacity is 250 sheets of standard weight paper. Figure 2.2 ! Output tray Depending on paper weight, you may find the output tray holds fewer than 250 sheets. Paper jams may occur if output capacity is exceeded.
AUG-CH02 Page 6 Black,Red,Cyan Tuesday, March 21, 1995 5:06 PM Paper Specifications Paper Specifications Weight Factors such as embossing, special edges, and general paper quality affect paper handling. Paper weight specifications include the following: • 250-sheet and 500-sheet paper trays support paper weights of 60 gsm (16 lb) to 105 gsm (28 lb). • MP tray supports paper weights of 60 gsm (16 lb) to 135 gsm (36 lb).
AUG-CH02 Page 7 Black,Red,Cyan Tuesday, March 21, 1995 5:06 PM Paper Specifications Figure 2.3 Note Paper dimensions (continued) Paper Size Dimensions Legal 216 x 356 mm 8.5 x 14 inches COM-10 Envelope 105 x 241 mm 4.13 x 9.5 inches Monarch Envelope 98 x 191 mm 3.87 x 7.5 inches DL Envelope 110 x 220 mm 4.33 x 8.66 inches C5 Envelope 162 x 229 mm 6.38 x 9.02 inches The Xerox printer driver supports all paper sizes in Figure 2.3.
AUG-CH02 Page 8 Black,Red,Cyan Tuesday, March 21, 1995 5:06 PM Paper Trays Paper Trays As shown in Figure 2.4, the 4505/4505ps and 4510/4510ps printers are packaged with one 250-sheet paper tray and one multipurpose (MP) tray. An optional lower base provides an additional tray, as shown in Figure 2.4. Figure 2.
AUG-CH02 Page 9 Black,Red,Cyan Tuesday, March 21, 1995 5:06 PM Paper Trays Standard Tray The 250-sheet tray packaged with the printer is called a universal tray because it is adjustable to a variety of paper sizes, as shown in Figure 2.5. Figure 2.5 Universal tray Capacity‡ (Sheets) Paper† A4 250 Letter (8.5 x 11) 250 Executive 250 A5 250 OHP (Overhead Projector) Film (transparency) 10 Label paper 10 † Paper dimensions are listed on page 2-6.
AUG-CH02 Page 10 Black,Red,Cyan Tuesday, March 21, 1995 5:06 PM Paper Trays Two other standard trays are available for the printer, as shown in Figure 2.6. Figure 2.6 Additional standard trays Paper† Optional Tray Legal Envelope Capacity‡ (Sheets) Folio (8.5 x 13) 250 Legal (8.5 x 14) 250 Letter (8.5 x 11) 250 COM-10 30 Monarch 30 DL 30 C5 30 † Paper dimensions are listed on page 2-6. ‡ Tray capacity may differ based on the weight of the paper. Maximum paper stack: 25mm/1 inch.
AUG-CH02 Page 11 Black,Red,Cyan Tuesday, March 21, 1995 5:06 PM Paper Trays Multipurpose Tray The multipurpose (MP) tray provides for manually feeding a single sheet or loading small quantities of paper, envelopes, transparencies, or labels (see Figure 2.7). Figure 2.7 MP tray Capacity‡ (Sheets) Paper† A4 50 Letter (8.5 x 11) 50 B5 (ISO) 50 A5 50 Executive 50 Folio 50 Legal (8.5 x 14) 10 Monarch 5 Com-10 5 C5 5 DL 5 Transparencies 35 Labels Less than 4 mm (.
AUG-CH02 Page 12 Black,Red,Cyan Tuesday, March 21, 1995 5:06 PM Paper Trays Typical uses of the MP tray include: • Printing a document whose first page is to be printed on letterhead and the rest from the standard tray. See Figure 2.8 (page 2-20) for the orientation of headed paper in the MP tray. • Printing documents that require pages of special paper size, color, or other attribute. To use letterhead, pre-printed stationery, or drilled paper in the MP tray, see Figure 2.
AUG-CH02 Page 13 Black,Red,Cyan Tuesday, March 21, 1995 5:06 PM Paper Trays Optional Lower Base The 4505/4505ps and 4510/4510ps printers accommodate one of two optional lower bases with a paper tray: • The 250-sheet lower base equipped with a universal tray In the 250-sheet lower base, you can also use either the legal or envelope tray shown in Figure 2.6 (page 2-10). • The 500-sheet lower base equipped with either an A4 or Letter (8.
AUG-CH02 Page 14 Black,Red,Cyan Tuesday, March 21, 1995 5:06 PM Loading Paper Loading Paper Loading the Standard or Lower Paper Tray To load paper into the standard or lower paper tray, follow the steps below. 1 2-14 ❖ When loading the standard tray, remove the multipurpose tray, if it is installed.
AUG-CH02 Page 15 Black,Red,Cyan Tuesday, March 21, 1995 5:06 PM Loading Paper 2 Remove the tray from the printer. Place the tray on a flat surface. 3 ! Caution If necessary, adjust the end guide to the desired paper size and the side guide to its widest position. Make sure that the end guide is positioned in the appropriate detent for the paper size installed in the tray. If the guide is not positioned in the detent, the printer may not correctly recognize the installed paper size.
AUG-CH02 Page 16 Black,Red,Cyan Tuesday, March 21, 1995 5:06 PM Loading Paper 4 Note Load paper in the tray, making sure the paper is tucked under the metal corners. For best performance, load paper with curl side up. If you are loading letterhead, pre-printed stationery, or drilled paper, see Figure 2.8 (page 2-20). If loading envelopes, see Figure 2.9 (page 2-21). 5 2-16 ❖ If necessary, adjust the side guide to the correct paper width.
AUG-CH02 Page 17 Black,Red,Cyan Tuesday, March 21, 1995 5:06 PM Loading Paper 6 Insert the paper tray in the printer. Reinstall the multipurpose tray if it was removed at Step 1. ! With a lower base installed, do not remove the standard tray while the printer is feeding from the lower tray.
AUG-CH02 Page 18 Black,Red,Cyan Tuesday, March 21, 1995 5:06 PM Loading Paper Feeding the Multipurpose Paper Tray To feed paper into the multipurpose (MP) tray, follow the steps below. It is assumed the MP tray has already been installed. If not, install it by referring to the Setting Up Guide packaged with the printer. 1 Adjust the side guides to the desired paper size. See “Multipurpose Tray” (page 2-11).
AUG-CH02 Page 19 Black,Red,Cyan Tuesday, March 21, 1995 5:06 PM Loading Paper 2 Feed paper or envelopes into the MP tray. If you are loading letterhead, pre-printed stationery, or drilled paper, see Figure 2.8 (page 2-20). See Figure 2.9 (page 2-21) for envelopes. ! Whenever you open the front cover, you must first remove the MP tray. Reinsert it once you have closed the front cover.
AUG-CH02 Page 20 Black,Red,Cyan Tuesday, March 21, 1995 5:06 PM Loading Paper Loading Letterhead, Pre-printed, Drilled, or Label Paper Figure 2.8 illustrates the paper orientation needed to print headed, pre-printed, drilled, or label paper. Of course, you may need to adjust your software application’s printing margins to: • Prevent overwriting the letterhead or pre-printed images. • Prevent overwriting the drilled holes. • Accommodate an individual label size.
AUG-CH02 Page 21 Black,Red,Cyan Tuesday, March 21, 1995 5:06 PM Loading Paper Loading Envelopes Figure 2.9 illustrates the envelope orientation needed to print COM-10, Monarch, DL, or C5 envelopes in the 30-envelope tray and the MP tray. Envelopes may only be loaded in the standard 30-envelope tray or the MP tray. See Figure 2.6 (page 2-10) for more information on the envelope tray. Note Figure 2.
AUG-CH02 Page 22 Black,Red,Cyan Tuesday, March 21, 1995 5:06 PM Selecting a Paper Source Selecting a Paper Source For a print job, your software application sends information, called the Printer Command Language (PCL), to the printer to communicate paper source and page size. How the printer interprets the PCL command for paper source and page size depends on the printer menu settings for Source Mapping and MP Tray Size.
AUG-CH02 Page 23 Black,Red,Cyan Tuesday, March 21, 1995 5:06 PM Selecting a Paper Source Printing a Page When a print job is received by the printer, the sequence to select the paper tray for each page is as follows: 1. Page size is established. If page size is not sent by the application, the PCL Menu setting called Paper Size is used. 2. Paper source is established. If a paper source is sent by the application, it will be one of the six PCL paper sources listed in Figure 2.10 (page 2-22).
AUG-CH02 Page 24 Black,Red Tuesday, March 21, 1995 5:06 PM Selecting a Paper Source Panel along with a message to load the correct paper size. Printing halts. — Put paper of the requested size in a tray in the tray sequence and the page will be printed. — Or, press Enter to print from the first tray in the tray sequence, regardless of paper size. If that tray becomes empty, the next tray with the same paper size will be used.
AUG-CH02 Page 25 Black,Red,Cyan Tuesday, March 21, 1995 5:06 PM Selecting a Paper Source Source Mapping Settings For each of the six PCL paper sources listed in Figure 2.10 (page 2-22), a Source Mapping setting from Figure 2.11 is used. You may change settings depending on your printing needs. For details, see “Factory Source Mapping Settings” (page 2-26), “Source Mapping Examples” (page 2-27), and Source Mapping (page 3-22). Figure 2.
AUG-CH02 Page 26 Black,Red,Cyan Tuesday, March 21, 1995 5:06 PM Selecting a Paper Source Factory Source Mapping Settings Figure 2.12 shows the factory Source Mapping settings for the six PCL paper sources, and how the settings change when the optional lower base is installed and Reset Menus is implemented. See Chapter 3: Using the Control Panel, “Reset Menu” (page 3-65). Figure 2.
AUG-CH02 Page 27 Black,Red,Cyan Tuesday, March 21, 1995 5:06 PM Selecting a Paper Source Source Mapping Examples Review the following Source Mapping examples to take full advantage of the 4505/4505ps and 4510/4510ps capabilities. All examples assume that Default Source is set to Standard. Example 1 You do not have a lower base installed. You want to load as much paper in the printer as possible. You use only one size of paper. You do not do manual feeding. 1.
AUG-CH02 Page 28 Black,Red,Cyan Tuesday, March 21, 1995 5:06 PM Selecting a Paper Source ! To avoid a paper jam, do not remove the standard or lower tray while the printer is feeding paper. Caution Example 2 You have a lower base installed. You want to load as much paper in the printer as possible. You use only one size of paper. You do not do manual feeding. 1. Load the standard, lower, and MP trays with regular paper stock. 2. Set Source Mapping for “Standard” to “Low-Std-MP.” 3.
AUG-CH02 Page 29 Black,Red,Cyan Tuesday, March 21, 1995 5:06 PM Selecting a Paper Source Example 3 You do not have a lower base installed. You want to print mostly on Letter (8.5 x 11) paper but sometimes on Legal (8.5 x 14). You do not intend to do manual feeding. 1. Load the standard tray with Letter paper stock. 2. Load the MP tray with Legal paper stock. 3. Set Source Mapping for “Standard” to “Standard.” 4. Set Source Mapping for “Manual” to “MP Tray.” 5. Set MP Tray Size to “Legal (8.5x14).” 6.
AUG-CH02 Page 30 Black,Red,Cyan Tuesday, March 21, 1995 5:06 PM Selecting a Paper Source Example 4 You have a lower base installed. You also have the optional standard legal tray (page 2-10). You want to print mostly on Letter (8.5 x 11) paper but sometimes on Legal (8.5 x 14). You intend to do manual feeding. 1. Load the lower tray with Letter paper stock. 2. Load the standard tray with Legal paper stock. 3. Empty the MP tray. 4. Set Source Mapping for “Standard” to “Standard.” 5.
AUG-CH02 Page 31 Black,Red,Cyan Tuesday, March 21, 1995 5:06 PM Selecting a Paper Source display “Lower-Standard” as the location to load that paper size. You must know which paper size goes into which tray. Example 5 You do not have a lower base installed. You want to print mostly on white A4 paper but sometimes on pre-printed A4 paper. You occasionally print on DL envelopes. 1. Load the standard tray with white A4 paper stock. 2. Load the MP tray with pre-preprinted A4 paper stock (face down). 3.
AUG-CH02 Page 32 Black,Red,Cyan Tuesday, March 21, 1995 5:06 PM Selecting a Paper Source Example 6 You have a lower base (with either a universal tray or an A4 tray) installed, and you have a DL envelope tray—see Figure 2.6 (page 2-10). You want to print mostly on white A4 paper but sometimes on DL envelopes. Occasionally, you print on color or pre-printed A4 paper. 1. Load the lower tray with white A4 paper stock. 2. Insert the DL envelope tray, filled with DL envelopes, in the standard paper source. 3.
AUG-CH02 Page 33 Black,Red,Cyan Tuesday, March 21, 1995 5:06 PM Selecting a Paper Source Example 7 You do not have a lower base installed. You want to use pre-printed stationery for the first page and regular stock for the other pages of your document. Your software application has the capability to ask for the first page of a document from a different source than the remainder of the document. The Xerox PCL 5e emulation Windows printer driver also has this capability.
AUG-CH02 Page 34 Black,Red,Cyan Tuesday, March 21, 1995 5:06 PM Selecting a Paper Source Example 8 You do not have a lower base installed. You want to use pre-printed stationery for the first page and regular stock for the other pages of your document. Neither your software application nor your printer driver has the capability to ask for the first page of a document from a different source than the remainder of the document.
AUG-CH03 Page 1 Black,Red,Cyan Friday, February 3, 1995 12:22 AM Chapter 3 Using the Control Panel 3 r e tpahC Overview ............................................................................... 3-3 Control Panel Features ......................................................... 3-4 The Display 3-4 The Indicator Lights 3-5 The Keys 3-6 Navigating the Menu System .............................................. 3-8 Menu System Indicators 3-9 Setting a Menu Option 3-10 Main Menu System .................
AUG-CH03 Page 2 Black,Red Friday, February 3, 1995 12:22 AM PCL Menu Options 3-18 PostScript Menu .................................................................. 3-29 PostScript Menu Hierarchy 3-30 PostScript Menu Options 3-32 Interface Menu ................................................................... 3-37 Interface Menu Hierarchy 3-37 Parallel Menu Options 3-41 Serial Menu Options 3-45 LocalTalk Menu Option 3-50 Ethernet Menu Options 3-51 Token Ring Menu Options 3-54 System Menu ................
AUG-CH03 Page 3 Black,Red,Cyan Friday, February 3, 1995 12:22 AM Overview Overview Shown in Figure 3.1, the Control Panel is both informative and interactive. Not only does it display status and user actions required, the Control Panel also enables you to change printer settings to control how the 4505/4505ps and 4510/4510ps printers operate in your environment. Figure 3.
AUG-CH03 Page 4 Black,Red,Cyan Friday, February 3, 1995 12:22 AM Control Panel Features Control Panel Features The three major components of the Control Panel are shown in Figure 3.2: Figure 3.2 Control Panel components Three Indicator Lights Two-line by 16-character Display Eight Control Keys The Display The Control Panel display: • Presents a hierarchy of menu options and settings to configure and control the printer.
AUG-CH03 Page 5 Black,Red,Cyan Friday, February 3, 1995 12:22 AM Control Panel Features The Indicator Lights Shown in Figure 3.3, three indicator lights—also called LEDs for light-emitting diodes—show the activity status of the printer. Figure 3.3 Indicator lights Online Online Ready Form Feed Ready ___ Figure 3.4 describes the function of each indicator light. Figure 3.
AUG-CH03 Page 6 Black,Red,Cyan Friday, February 3, 1995 12:22 AM Control Panel Features The Keys Figure 3.5 As described in Figure 3.5, the Control Panel keypad consists of eight keys, identified as international symbols and labeled in English. Control Panel keys and their functions Key Description Toggles between online and offline. Online When online, the printer is able to receive and print pages.
AUG-CH03 Page 7 Black,Red,Cyan Friday, February 3, 1995 12:22 AM Control Panel Features Figure 3.5 Control Panel keys and their functions (continued) Key Esc Description In the menu system, exits the current menu level and returns to the previous one. Press Esc at any time in the menu system to take you to the previous level. No changes to values will be saved unless you first press Enter Press Esc Enter while at Reset Menu or the top level of Main Menu to exit either menu.
AUG-CH03 Page 8 Black,Red,Cyan Friday, February 3, 1995 12:22 AM Navigating the Menu System Navigating the Menu System The 4505/4505ps and 4510/4510ps Control Panel contains two menu structures: • Main Menu and its submenus: — Language — PCL Menu — PostScript Menu (when the PostScript option is installed) — Interface Menu — System Menu — Test Menu The Main Menu system is accessed by pressing Menu Each of the submenus may have other submenus, settings, or functions.
AUG-CH03 Page 9 Black,Red,Cyan Friday, February 3, 1995 12:22 AM Navigating the Menu System Menu System Indicators Figure 3.6 Symbol > As shown in Figure 3.6, three symbols called indicators may appear on menu displays. Menu indicator symbols on the Control Panel display Description Indicates another menu level below this one. Example Main Menu Language > = Indicates that a value or setting follows the option on the bottom line.
AUG-CH03 Page 10 Black,Red,Cyan Friday, February 3, 1995 12:22 AM Navigating the Menu System Setting a Menu Option To set a Main Menu option or to invoke a Test Menu or Reset Menu function, follow the steps below: 1 Press Online to take the printer offline. You will see: Offline _/_ Press a key... 2 Press Menu to access the Main Menu or press Reset to access the Reset Menu. 3 Press Down or Up to scroll through the list of submenus, options, or functions.
AUG-CH03 Page 11 Black,Red,Cyan Friday, February 3, 1995 12:22 AM Navigating the Menu System 6 You may either continue to work in the menu system by repeating the steps above, or exit and return to normal operation by pressing Online If you press Online not be saved. before Enter the value will Note Other ways to exit a menu option or the menu system completely are as follows: • In the Main Menu, press Menu the top of the Main Menu.
AUG-CH03 Page 12 Black,Red,Cyan Friday, February 3, 1995 12:22 AM Main Menu System Main Menu System The Main Menu system is hierarchical, based on a cascading system of submenus, each containing other submenus or options designed to configure the printer for your environment. The Main Menu hierarchy is depicted in Figure 3.7 (page 3-13). In this chapter, factory settings are shown boldfaced and followed by an asterisk (* ). See Chapter 1: Introduction (page 1-4) for a definition of factory setting.
AUG-CH03 Page 13 Black,Red,Cyan Friday, February 3, 1995 12:22 AM Main Menu System Figure 3.7 Main Menu hierarchy Language Deutsch English Español Français Français canad. Italiano Português (BRA) Menu PCL Menu PostScript See Figure 3.9 (page 3-16). Menu† See Figure 3.11 (page 3-31). Interface Menu See Figure 3.13 (page 3-38). System Menu See Figure 3.19 (page 3-57). Test Menu See Figure 3.21 (page 3-61). † Appears only when the PostScript option is installed.
AUG-CH03 Page 14 Black,Red,Cyan Friday, February 3, 1995 12:22 AM Language Language Language includes a list of international languages used to display messages on the Control Panel and used to print text on the Configuration Sheet (page 3-62). Language Options Figure 3.8 shows the Language options and their English equivalent. See “Setting a Menu Option” (page 3-10) for the steps to find and change the language option. The Language option is not changed by the Reset Menus function (page 3-66).
AUG-CH03 Page 15 Black,Red,Cyan Friday, February 3, 1995 12:22 AM PCL Menu PCL Menu PCL Menu Hierarchy PCL Menu options establish the default configuration for the printer. PCL (Printer Control Language) is used by software applications to send information and instructions to the printer. The PCL Menu hierarchy is depicted in Figure 3.9 (page 3-16).
AUG-CH03 Page 16 Black,Red,Cyan Friday, February 3, 1995 12:22 AM PCL Menu Figure 3.9 PCL Menu hierarchy showing factory settings Menu Language PCL Menu PostScript Menu Interface Menu System Menu Test Menu Copies 1* - 99 Font Source Internal* Upper† Lower† Soft† Font Number 0* - 999 Pitch .44 - 99.99 by .01 (10.00*) Point Size 4.00 - 999.75 by .25 (12.
AUG-CH03 Page 17 Black,Red,Cyan Friday, February 3, 1995 12:22 AM PCL Menu Figure 3.9 PCL Menu hierarchy (continued) Paper Size MP Tray Size Legal (8.5x14) Folio (8.5x13) Letter (8.5x11)* (USA) A4 (210x297)* (Europe) Exec (7.25x10.5) B5 (176x250) A5 (148.5x210) Com-10 Monarch DL C5 Orientation Portrait* Landscape Form Length 005 - 128 64* (Europe) 60* (USA) Symbol Set Note: The default for Jam Recovery is On for firmware release 4.0. The default is Off (as shown at right) for releases > 4.0.
AUG-CH03 Page 18 Black,Red,Cyan Friday, February 3, 1995 12:22 AM PCL Menu PCL Menu Options PCL Menu options and their settings are described in Figure 3.10 (page 3-19). Factory settings are boldfaced, followed by an asterisk (*). See “Setting a Menu Option” (page 3-10) for the steps to find and change a setting, or refer to the Document Services for Printing Guide to use the RUI to change settings. Settings for certain PCL Menu options may be overridden from many software applications.
AUG-CH03 Page 19 Black,Red,Cyan Friday, February 3, 1995 12:22 AM PCL Menu Figure 3.10 PCL Menu options showing factory settings Option Copies Setting 1* - 99 Description Number of times each page is printed. Most software applications override this setting. If your application does not, the printer assumes the default setting here. Font Source Internal* Upper† Lower† Soft† Location of the default font in PCL. Internal refers to the font set residing in the printer’s permanent memory.
AUG-CH03 Page 20 Black,Red,Cyan Friday, February 3, 1995 12:22 AM PCL Menu Figure 3.10 PCL Menu options showing factory settings (continued) Option Setting Font Number 0* - 999 Description Default font in PCL. Only Font Number values valid for the Font Source location (page 3-19) are displayed. For example, if you have internal fonts only, the maximum Font Number is 50. Font Number values are printed on the PCL Font List (page 3-63) in the first column.
AUG-CH03 Page 21 Black,Red,Cyan Friday, February 3, 1995 12:22 AM PCL Menu Figure 3.10 PCL Menu options showing factory settings (continued) Option Point Size Setting 4.00 - 999.75 by .25 (12.00*) Description Point size (a measurement for type height, 1 point equals 0.351 mm or approximately 1/72 inch) for the font represented by Font Number (page 3-20). Appears only when the Font Number setting specifies a scalable proportional spaced font, such as Times New Roman.
AUG-CH03 Page 22 Black,Red,Cyan Friday, February 3, 1995 12:22 AM PCL Menu Figure 3.
AUG-CH03 Page 23 Black,Red,Cyan Friday, February 3, 1995 12:22 AM PCL Menu Figure 3.10 PCL Menu options showing factory settings (continued) Option Paper Size Setting Legal (8.5x14) Folio (8.5x13) Letter (8.5x11)* (USA) A4 (210x297)* (Europe) Exec (7.25x10.5) B5 (176x250) A5 (148.5x210) Com-10 Monarch DL C5 Description Paper size used to print a page if no paper size is specified by your software application. The Xerox printer driver supports all Paper Size settings.
AUG-CH03 Page 24 Black,Red,Cyan Friday, February 3, 1995 12:22 AM PCL Menu Figure 3.10 PCL Menu options showing factory settings (continued) Option Setting Form Length Description 005 - 128 Number of lines per page used in PCL. 64* (Europe) 60* (USA) The Form Length setting is automatically adjusted when the Paper Size (page 3-23) default is changed. For example, if you set Paper Size to “A4 (210x297)” Form Length is adjusted to 64 automatically. If Paper Size is set to “Letter (8.
AUG-CH03 Page 25 Black,Red,Cyan Friday, February 3, 1995 12:22 AM PCL Menu Figure 3.10 PCL Menu options showing factory settings (continued) Option Symbol Set Setting Desktop ISO L1 ISO L2 ISO L5 ISO-4 UK ISO-6 ASCII ISO-11 Swedish ISO-15 Italian ISO-17 Spanish ISO-21 German ISO-60 Norw. V1 ISO-69 French Legal Math-8 Microsoft Publ. PC-8 PC-8 DN PC-8 Tk PC-850 PC-852 Pi Font PS Math PS Text Roman-8* Ventura Int’l. Ventura Math Ventura US Win 3.
AUG-CH03 Page 26 Black,Red,Cyan Friday, February 3, 1995 12:22 AM PCL Menu Figure 3.10 PCL Menu options showing factory settings (continued) Option Setting Page Protection Off* A4 (210x297) Legal (8.5x14) Letter (8.5x11) Description Use to reserve memory for a full page of the selected paper size. When Off, memory is not reserved for an entire page. It then becomes possible for a page to be too complex to compose.
AUG-CH03 Page 27 Black,Red,Cyan Friday, February 3, 1995 12:22 AM PCL Menu Figure 3.10 PCL Menu options showing factory settings (continued) Option Resolution Setting 300x300 600x600* Description Dots per inch (dpi). Some software applications override this setting. If your software application does not, the printer assumes the default setting here. Resolution can be overridden by software when the Xerox printer driver is installed. Higher resolutions use more printer memory.
AUG-CH03 Page 28 Black,Red,Cyan Friday, February 3, 1995 12:22 AM PCL Menu Figure 3.10 PCL Menu options showing factory settings (continued) Option Setting State Saving Off* On Description Reserves memory for saving permanently downloaded fonts and macros, when the printer switches from using the PCL printer language to using the PostScript printer language, or when the printer steps down in Page Protection or Resolution .
AUG-CH03 Page 29 Black,Red,Cyan Friday, February 3, 1995 12:22 AM PostScript Menu PostScript Menu PostScript Menu options establish the default PostScript configuration for the printer. PostScript may be used by software applications to send information and instructions to the printer. The 4505ps and 4510ps printers are factory-equipped with PostScript. Note Note PostScript is available as an option for the 4505 and 4510 printers. See Appendix D: Ordering Information.
AUG-CH03 Page 30 Black,Red,Cyan Friday, February 3, 1995 12:22 AM PostScript Menu PostScript Menu Hierarchy 3-30 ❖ Figure 3.11 (page 3-31) shows the PostScript Menu hierarchy, which appears only when the PostScript option is installed .
AUG-CH03 Page 31 Black,Red,Cyan Friday, February 3, 1995 12:22 AM PostScript Menu Figure 3.11 PostScript Menu hierarchy showing factory settings Menu Language PCL Menu PostScript Menu Interface Menu System Menu Test Menu Note: The default for Tray Switching is Standard-MP or Low-Std-MP for firmware release 4.0. The default is Off (as shown at right) for releases > 4.0. To determine the firmware release of your printer, print a Configuration Sheet.
AUG-CH03 Page 32 Black,Red,Cyan Friday, February 3, 1995 12:22 AM PostScript Menu PostScript Menu Options PostScript Menu options and their settings are described in Figure 3.12. Factory settings are boldfaced, followed by an asterisk (*). See “Setting a Menu Option” (page 3-10) for the steps to find and change a setting, or refer to the Document Services for Printing Guide to use the RUI to change settings.
AUG-CH03 Page 33 Black,Red,Cyan Friday, February 3, 1995 12:22 AM PostScript Menu Figure 3.12 PostScript Menu options showing factory settings (continued) Option Tray Switching Note: The default for Tray Switching is Standard-MP or Low-Std-MP for firmware release 4.0. The default is Off (as shown at right) for releases > 4.0. To determine the firmware release of your printer, print a Configuration Sheet.
AUG-CH03 Page 34 Black,Red,Cyan Friday, February 3, 1995 12:22 AM PostScript Menu Figure 3.12 PostScript Menu options showing factory settings (continued) Option Setting Manual Size Legal (8.5x14) Folio (8.5x13) Letter (8.5x11)* (USA) A4 (210x297)* (Europe) Exec (7.25x10.5) B5 (176x250) A5 (148.5x210) Com-10 Monarch DL C5 Description Paper size to expect in the manual slot if none is specified in your software application. Manual Size communicates the paper size feeding through the MP tray.
AUG-CH03 Page 35 Black,Red,Cyan Friday, February 3, 1995 12:22 AM PostScript Menu Figure 3.12 PostScript Menu options showing factory settings (continued) Option Jam Recovery Setting Description Determines how the printer recovers from a paper jam. It is set independently for PCL and PostScript. Off* On Note: The default for Jam Recovery is On for firmware release 4.0. The default is Off (as shown at right) for releases > 4.0.
AUG-CH03 Page 36 Black,Red,Cyan Friday, February 3, 1995 12:22 AM PostScript Menu Figure 3.12 PostScript Menu options showing factory settings (continued) Option Setting State Saving Off* On Description Reserves memory for saving the contents of virtual memory, when print jobs switch from PostScript to the PCL printer language or when the printer steps down in Page Protection or Resolution. When Off , if print jobs switch from PostScript to PCL, the contents of virtual memory are cleared.
AUG-CH03 Page 37 Black,Red,Cyan Friday, February 3, 1995 12:22 AM Interface Menu Interface Menu The Interface Menu contains submenus for the parallel and serial ports on the printer as well as submenus for network interface ports when a network option(s) is installed. The Interface Menu may include submenus for the following: Interface Menu Hierarchy • Parallel Menu (See page 3-41.) • Serial Menu (See page 3-45.) • LocalTalk Menu (See page 3-50.) • Ethernet Menu (See page 3-51.
AUG-CH03 Page 38 Black,Red,Cyan Friday, February 3, 1995 12:22 AM Interface Menu Figure 3.13 Interface Menu hierarchy showing factory settings Menu Language PCL Menu PostScript Menu† Interface Menu System Menu Test Menu Parallel Menu Port Enable Off On* Port Timeout 5 - 999 secs (30*) System Language PCL* PostScript† Lang. Sensing Off On* Auto Job End Off On* Bidirectional Off* On Transfer Rate High Low* † Appears only when the PostScript option is installed.
AUG-CH03 Page 39 Black,Red,Cyan Friday, February 3, 1995 12:22 AM Interface Menu Figure 3.13 Interface Menu hierarchy showing factory settings (continued) Port Enable Off On* Port Timeout 5 - 999 secs (30*) System Language PCL* PostScript† Lang. Sensing Off On* Auto Job End Off On* Port Type RS232* RS422 Baud Rate 57600 38400 19200 9600* 4800 2400 1200 600 300 Handshake Robust XON* XON Hardware DTR Polarity High* Low Data Bits 7 8* Parity None* Even Odd Stop Bits 2 1.
AUG-CH03 Page 40 Black,Red,Cyan Friday, February 3, 1995 12:22 AM Interface Menu Figure 3.13 Interface Menu hierarchy showing factory settings (continued) LocalTalk Menu‡ Port Timeout 5 - 999 secs (30*) Ethernet Menu‡ Port Timeout 5 - 999 secs (30*) System Language PCL* PostScript† Lang. Sensing Off On* Auto Job End Off On* Frame Type 802.3* Ethernet II Port Timeout 5 - 999 secs (30*) System Language PCL* PostScript† Lang.
AUG-CH03 Page 41 Black,Red,Cyan Friday, February 3, 1995 12:22 AM Interface Menu Parallel Menu Options The Parallel Menu , a submenu of the Interface Menu , Figure 3.13 (page 3-38), contains options for configuring the printer’s bidirectional parallel port. Figure 3.14 describes each Parallel Menu option. Factory settings are boldfaced and followed by an asterisk (*).
AUG-CH03 Page 42 Black,Red,Cyan Friday, February 3, 1995 12:22 AM Interface Menu Figure 3.14 Parallel Menu options showing factory settings (continued) Option Setting Lang. Sensing Off On* Description Automatic recognition of the page description language (PDL) used in an incoming print job. When On, if the parallel port receives print jobs of different PDLs—such as a PostScript print job followed by a PCL print job—it can automatically sense which PDL the print job is using.
AUG-CH03 Page 43 Black,Red,Cyan Friday, February 3, 1995 12:22 AM Interface Menu Figure 3.14 Parallel Menu options showing factory settings (continued) Option Auto Job End Setting Off On* Description Automatic ending of a print job that does not finish. When On, after the current print job has paused long enough to exceed the Port Timeout (page 3-41) interval and no data has been received on any other port, the print job will be stopped.
AUG-CH03 Page 44 Black,Red,Cyan Friday, February 3, 1995 12:22 AM Interface Menu Figure 3.14 Parallel Menu options showing factory settings (continued) Option Setting Bidirectional Off* On Description Activation of two-way communications between the printer and your computer. Bidirectional On enables the printer to send messages to your computer. ! Only set Bidirectional On if you have a software application that supports it. Caution Transfer Rate 3-44 ❖ High Low* Relative speed of the port.
AUG-CH03 Page 45 Black,Red,Cyan Friday, February 3, 1995 12:22 AM Interface Menu Serial Menu Options The Serial Menu, a submenu of the Interface Menu, Figure 3.13 (page 3-38), contains options for configuring the printer’s serial port. Figure 3.15 describes each Serial Menu option. Factory settings are boldfaced and followed by an asterisk (*).
AUG-CH03 Page 46 Black,Red,Cyan Friday, February 3, 1995 12:22 AM Interface Menu Figure 3.15 Serial Menu options showing factory settings (continued) Option Setting Lang. Sensing Off On* Description Automatic recognition of the page description language (PDL) used in an incoming print job. When On, if the serial port receives print jobs of different PDLs—such as a PostScript print job followed by a PCL print job—it can automatically sense which PDL the print job is using.
AUG-CH03 Page 47 Black,Red,Cyan Friday, February 3, 1995 12:22 AM Interface Menu Figure 3.15 Serial Menu options showing factory settings (continued) Option Auto Job End Setting Off On* Description Automatic ending of a print job that does not finish. When On, after the current print job has paused long enough to exceed the Port Timeout (page 3-45) interval and no data has been received on any other port, the print job will be stopped.
AUG-CH03 Page 48 Black,Red,Cyan Friday, February 3, 1995 12:22 AM Interface Menu Figure 3.15 Serial Menu options showing factory settings (continued) Option Setting Baud Rate 57600 38400 19200 9600* 4800 2400 1200 600 300 Description Speed at which data is transferred. Baud rate translates approximately to bits per second. Note The serial port Baud Rate setting must match the host computer baud rate setting. Your software application may set the baud rate.
AUG-CH03 Page 49 Black,Red,Cyan Friday, February 3, 1995 12:22 AM Interface Menu Figure 3.15 Serial Menu options showing factory settings (continued) Option Data Bits Setting 7 8* Description Number of data bits in a character. The Data Bits setting must match the host computer data bits setting. Note Parity None* Even Odd How the parity bit is used in error checking. The parity bit may be checked against the received character by means of an Even or Odd error checking mechanism.
AUG-CH03 Page 50 Black,Red,Cyan Friday, February 3, 1995 12:22 AM Interface Menu LocalTalk Menu Option The LocalTalk Menu, a submenu of the Interface Menu, Figure 3.13 (page 3-38), contains a single option for configuring the printer’s LocalTalk port, when the LocalTalk option has been installed. The LocalTalk option supports AppleTalk protocols. For detailed information on the supported protocols, refer to Networking: LocalTalk packaged with the LocalTalk option. Figure 3.16 describes the option.
AUG-CH03 Page 51 Black,Red,Cyan Friday, February 3, 1995 12:22 AM Interface Menu Ethernet Menu Options The Ethernet Menu, a submenu of the Interface Menu, Figure 3.13 (page 3-38), contains options for configuring the printer’s Ethernet port, when the Ethernet option has been installed . The Ethernet option supports the following protocols: • Novell NetWare, Version 3.
AUG-CH03 Page 52 Black,Red,Cyan Friday, February 3, 1995 12:22 AM Interface Menu Figure 3.17 Ethernet Menu options showing factory settings (continued) Option Setting Lang. Sensing Off On* Description Automatic recognition of the page description language (PDL) used in an incoming print job. When On, if the Ethernet port receives print jobs of different PDLs—such as a PostScript print job followed by a PCL print job—it can automatically sense which PDL the print job is using.
AUG-CH03 Page 53 Black,Red,Cyan Friday, February 3, 1995 12:22 AM Interface Menu Figure 3.17 Ethernet Menu options showing factory settings (continued) Option Auto Job End Setting Off On* Description Automatic ending of a print job that does not finish. When On, after the current print job has paused long enough to exceed the Port Timeout (page 3-51) interval and no data has been received on any other port, the print job will be stopped.
AUG-CH03 Page 54 Black,Red,Cyan Friday, February 3, 1995 12:22 AM Interface Menu Token Ring Menu Options The Token Ring Menu, a submenu of the Interface Menu, Figure 3.13 (page 3-38), contains options for configuring the printer’s Token Ring port, when the Token Ring option has been installed. The Token Ring option supports the following protocols: • Novell NetWare, Version 3.
AUG-CH03 Page 55 Black,Red,Cyan Friday, February 3, 1995 12:22 AM Interface Menu Figure 3.18 Token Ring Menu options showing factory settings Option Port Timeout Setting 5-999 secs (30*) Description Time interval for determining when to end an incomplete print job and poll the next port in the polling sequence. Port Timeout works in conjunction with Auto Job End (page 3-56). See Appendix C: I/O Port Polling for more information on how port polling works. System Language Lang.
AUG-CH03 Page 56 Black,Red,Cyan Friday, February 3, 1995 12:22 AM Interface Menu Figure 3.18 Token Ring Menu options showing factory settings (continued) Option Setting Auto Job End Off On* Description Automatic ending of a print job that does not finish. When On, after the current print job has paused long enough to exceed the Port Timeout (page 3-55) interval and no data has been received on any other port, the print job will be stopped.
AUG-CH03 Page 57 Black,Red,Cyan Friday, February 3, 1995 12:22 AM System Menu System Menu System Menu Hierarchy The System Menu options set general printer features. Figure 3.19 highlights the System Menu hierarchy. Figure 3.19 System Menu hierarchy showing factory settings Menu Language PCL Menu PostScript Menu† Interface Menu System Menu Test Menu Note: The System Messages and Print Density options (as shown at right) are available for firmware release 4.0 only.
AUG-CH03 Page 58 Black,Red,Cyan Friday, February 3, 1995 12:22 AM System Menu System Menu Options In Figure 3.20, System Menu options and their settings are described. Factory settings are boldfaced, followed by an asterisk ( *). See “Setting a Menu Option” (page 3-10) for the steps to find and change a setting, or refer to the Document Services for Printing Guide to use the RUI to change settings. Figure 3.
AUG-CH03 Page 59 Black,Red,Cyan Friday, February 3, 1995 12:22 AM System Menu Figure 3.20 System Menu options showing factory settings (continued) Option Auto Continue Setting Description Control of the resumption of printing after system errors occur. Off* On Certain errors may occur that halt printer operations. Two examples are: Out of Memory and Page Too Complex. When Auto Continue is Off, the printer does not automatically resume.
AUG-CH03 Page 60 Black,Red,Cyan Friday, February 3, 1995 12:22 AM System Menu Figure 3.20 System Menu options showing factory settings (continued) Option Setting Defaults Europe USA Description Control of default paper size settings in various menus. There is no standard factory-set default for this option; the default varies by world region. When Europe, all paper size-related options are set to A4 (210x297) and Form Length is set to 64. When USA, all paper size-related options are set to Letter (8.
AUG-CH03 Page 61 Black,Red,Cyan Friday, February 3, 1995 12:22 AM Test Menu Test Menu Test Menu options are functions that provide output to help you maintain high quality printing. Options in the Test Menu are functions to be performed by the printer rather than settings. There are no submenus. Note Test Menu Hierarchy Figure 3.21 shows the Test Menu hierarchy. Figure 3.21 Test Menu hierarchy Menu Note: The Demo Page option (as shown at right) is available for firmware releases > 4.0 only.
AUG-CH03 Page 62 Black,Red,Cyan Friday, February 3, 1995 12:22 AM Test Menu Test Menu Functions Figure 3.22 describes each Test Menu function. See “Setting a Menu Option” (page 3-10) for the steps in performing a Test Menu function. Figure 3.22 Test Menu functions Function Description Config. Sheet Configuration Sheet to show the printer’s current information and menu settings. The Configuration Sheet contains a variety of information such as: • Number of sheets printed to date.
AUG-CH03 Page 63 Black,Red,Cyan Friday, February 3, 1995 12:22 AM Test Menu Figure 3.22 Test Menu functions (continued) Function PCL Font List Description Complete list of all PCL fonts currently available in the printer. PCL fonts include those that are internal, on font card(s), and permanently downloaded soft fonts. See Font Source (page 3-19) for font storage locations.
AUG-CH03 Page 64 Black,Red,Cyan Friday, February 3, 1995 12:22 AM Test Menu Figure 3.22 Test Menu functions (continued) Function Description Memory Check Complete check of printer memory (resident and any SIMMs installed) and a reporting of the results on the Control Panel display. Memory Check is more extensive than the check performed when the printer is powered on. When you invoke Memory Check, you will see: Memory Check Please Wait....
AUG-CH03 Page 65 Black,Red,Cyan Friday, February 3, 1995 12:22 AM Reset Menu Reset Menu The Reset Menu offers several functions to reset various printer functions. Options in the Reset Menu are functions to be performed by the printer rather than settings. There are no submenus. Note Reset Menu Hierarchy Figure 3.23 shows the Reset Menu hierarchy. Figure 3.23 Reset Menu hierarchy Note: The Reset I/f Cards option (as shown at right) is available for firmware release 4.0 only.
AUG-CH03 Page 66 Black,Red,Cyan Friday, February 3, 1995 12:22 AM Reset Menu Figure 3.24 Reset Menu options Option Description Reset Printer Reset of the printer’s PCL and PostScript printer languages to their power-on state. Reset Printer is useful when you have printing problems. First, cancel the print job from the host. Second, invoke Reset Printer. Reset Printer cancels any print jobs being processed and clears all temporary fonts and macros.
AUG-CH03 Page 67 Black,Red,Cyan Friday, February 3, 1995 12:22 AM Printer Settings that Affect Memory Printer Settings that Affect Memory Certain PCL Menu and PostScript Menu options affect the printer’s performance and memory usage, as described in “PCL Menu” (page 3-15) and “PostScript Menu” (page 3-29). Figure 3.25 provides more detailed information on these options. Figure 3.
AUG-CH03 Page 68 Black,Red,Cyan Friday, February 3, 1995 12:22 AM Printer Settings that Affect Memory Figure 3.25 PCL and PostScript Menu options that affect printing speed and memory usage Option Description Jam Recovery PCL Menu (page 3-26) PostScript Menu (page 3-35) A paper jam may cause a page image being printed to become lost. When Jam Recovery is On, the printer will automatically reprint the image of the jammed page, after the jam has been cleared.
AUG-CH03 Page 69 Black,Red,Cyan Friday, February 3, 1995 12:22 AM Printer Settings that Affect Memory Minimum Memory Requirements The memory requirements shown in Figure 3.26 provide for optimal memory usage and printer performance. If you encounter memory warning messages, try different combinations of Resolution and Page Protection before purchasing additional memory. Note Figure 3.
AUG-CH03 Page 70 Black,Red Friday, February 3, 1995 12:22 AM 3-70 ❖ 4505/4505ps or 4510/4510ps User’s Guide
AUG-CH04 Page 1 Black,Cyan Saturday, January 21, 1995 6:33 PM Chapter 4 Using Fonts 4 r e tpahC Overview ............................................................................... 4-3 Bitmapped and Scalable Fonts 4-3 Where Fonts Reside 4-4 Fonts Resident on the Printer .............................................. 4-5 TrueType Fonts 4-6 Intellifont Fonts 4-7 PCL Bitmap Font 4-8 Adding Fonts .........................................................................
AUG-CH04 Page 2 Black Saturday, January 21, 1995 6:33 PM Downloading Fonts ............................................................
AUG-CH04 Page 3 Black,Cyan Saturday, January 21, 1995 6:33 PM Overview Overview A font is a collection of characters of one typeface, one weight, and one posture. An example is Courier New Italic. A font generally contains uppercase and lowercase alphabets, numbers, and special characters such as punctuation marks. A font family is composed of one typeface in all its available weights and postures. Courier New, for example, has medium, italic, bold, and bold italic.
AUG-CH04 Page 4 Black,Cyan Saturday, January 21, 1995 6:33 PM Overview At one time, computers used bitmapped fonts only. One set of bitmapped fonts was needed to display characters on a terminal screen, and another set was needed for printing. These were called screen fonts and printer fonts, respectively. Today, software applications use many scalable fonts because they can be used for both screen and printer. Where Fonts Reside Screen fonts are always stored on the host computer, not the printer.
AUG-CH04 Page 5 Black,Cyan Saturday, January 21, 1995 6:33 PM Fonts Resident on the Printer Fonts Resident on the Printer Note The 4505/4505ps and 4510/4510ps printers are equipped with resident fonts installed at the factory on memory chips on the printer controller board. Resident fonts are used by software applications that communicate with the printer in PCL (Printer Command Language) . See Appendix B: Printer Commands (Escape Sequences) for more information on all PCL commands.
AUG-CH04 Page 6 Black,Cyan Saturday, January 21, 1995 6:33 PM Fonts Resident on the Printer TrueType Fonts TrueType fonts are used by Microsoft Windows 3.1 or later and may be printed to PostScript and non-PostScript printers.
AUG-CH04 Page 7 Black,Cyan Saturday, January 21, 1995 6:33 PM Fonts Resident on the Printer Intellifont Fonts Intellifont is a scalable font format. The printers are fully compatible with this font format and provide these 35 resident Intellifont fonts: Antique Olive Medium Antique Olive Italic Antique Olive Bold Albertus Medium Albertus Extra Bold CG Omega Medium CG Omega Italic CG Omega Bold CG Omega Bold Italic CG Times Medium CG Times Italic CG Times Bold CG Times Bold Italic Clarendon Cond.
AUG-CH04 Page 8 Black,Cyan Saturday, January 21, 1995 6:33 PM Fonts Resident on the Printer PCL Bitmap Font The printers have one resident bitmap font called Line Printer. It comes in only one typeface, weight, and posture. The Line Printer font may be used to provide: • Line printer emulation for a print job. • Backward compatibility for those applications that make use of the line printer font. To review the PCL fonts in your printer, print a PCL Font List (page 3-63).
AUG-CH04 Page 9 Black,Cyan Saturday, January 21, 1995 6:33 PM Adding Fonts Adding Fonts PostScript Utilizing fonts in addition to resident fonts can add new dimensions to your work. Additional fonts are available through the following: • PostScript option. See “PostScript” (page 4-9). • Font cards for PCL fonts. See “Font Cards” (page 4-10). • Software applications. See “Fonts within Software Applications” (page 4-11).
AUG-CH04 Page 10 Black,Cyan Saturday, January 21, 1995 6:33 PM Adding Fonts Font Cards The 4505/4505ps and 4510/4510ps printers are equipped with two font card slots. See page 1-3 for the physical location of the slots. See Chapter 5: Adding Printer Options for font card installation. Font cards for the 4505/4505ps and 4510/4510ps contain PCL fonts only. In addition, font cards may contain one or more scalable fonts or bitmapped fonts. However, bitmapped and scalable fonts are not mixed on the same card.
AUG-CH04 Page 11 Black,Cyan Saturday, January 21, 1995 6:33 PM Adding Fonts Fonts within Software Applications Certain software applications offer additional fonts to those supplied with your printer. These fonts are stored on the host and then downloaded into printer memory by the software application when printing.
AUG-CH04 Page 12 Black,Cyan Saturday, January 21, 1995 6:33 PM Selecting a Font Selecting a Font How is a font selected for printing? The general answer is that you select a font within the application you are running. For example, if you are using a word processing application, you will select a font from the font list within the application. If desired, you may select a font (PCL fonts only) from the Control Panel or Remote User Interface (RUI).
AUG-CH04 Page 13 Black,Cyan Saturday, January 21, 1995 6:33 PM Downloading Fonts Downloading Fonts Whether you do or do not use additional fonts, it is helpful to know a few facts about how the printer uses fonts either resident in the printer or downloaded (transferred) from the host. Each time you specify a font in a document to be printed, the font is downloaded to printer, unless the font is already: • Resident in the printer’s ROM (read-only memory)—PCL only.
AUG-CH04 Page 14 Black,Cyan Saturday, January 21, 1995 6:33 PM Downloading Fonts For optimal performance, use resident fonts whenever applicable since they do not require downloading time. Note Permanently downloaded fonts are PCL fonts downloaded in the same way temporary fonts are, but they remain downloaded for all print jobs until the printer is powered off. They are permanent only as long as the printer is on.
AUG-CH04 Page 15 Black,Cyan Saturday, January 21, 1995 6:33 PM Downloading Fonts In general, it is not recommended that you permanently download fonts. Even if unused, permanent fonts occupy printer memory that cannot be used for other purposes. Note In a networked environment, carefully coordinate the use of permanently downloaded fonts. Avoid allowing multiple users to specify permanently downloaded fonts since printer memory may be consumed rapidly and may cause printer faults.
AUG-CH04 Page 16 Black Saturday, January 21, 1995 6:33 PM 4-16 ❖ 4505/4505ps or 4510/4510ps User’s Guide
AUG-CH05 Page 1 Black,Red,Cyan Saturday, January 21, 1995 6:40 PM Chapter 5 Adding Printer Options 5 r e tpahC Overview ............................................................................... 5-2 Installing a SIMM .................................................................. 5-4 Installing a Font Card .........................................................
AUG-CH05 Page 2 Black,Red,Cyan Saturday, January 21, 1995 6:40 PM Overview Overview The following printer options are available for the 4505/4505ps and 4510/4510ps printers: • 4 MB or 16 MB SIMM. One 4 MB SIMM is factory-installed on the 4505ps and 4510ps printers. SIMMs (single in-line memory modules) are small circuit boards with memory chips that can be installed on the printer controller board. Up to two SIMMs can be installed in the printers.
AUG-CH05 Page 3 Black,Red Saturday, January 21, 1995 6:40 PM Overview • Ethernet card The Xerox Network Interface Card – Ethernet (XNIC-E’NET) supports the Novell, TCP/IP, EtherTalk, DecLat, and LAN Manager protocols and is equipped with both BNC and RJ-45 connectors. See Chapter 3: Using the Control Panel, “Ethernet Menu Options” (page 3-51). • LocalTalk card The Xerox Network Interface Card – LocalTalk (XNIC-L’TALK) supports the AppleTalk protocols and is equipped with a DIN-8 connector.
AUG-CH05 Page 4 Black,Red,Cyan Saturday, January 21, 1995 6:40 PM Installing a SIMM Installing a SIMM Since SIMMs are available from manufacturers other than Xerox and might not contain installation instructions for the 4505/4505ps and 4510/4510ps printers, installation instructions are provided here. The 4505/4505ps and 4510/4510ps printers are equipped with 2 MB of resident base memory. To expand printer memory capacity, install up to two 4 MB or 16 MB SIMMs on the printer controller board.
AUG-CH05 Page 5 Black,Red,Cyan Saturday, January 21, 1995 6:40 PM Installing a SIMM Be sure you have a ream of paper on hand before you begin this procedure. 1 Power OFF [0] the printer. 2 Disconnect the power cord and remove all cables.
AUG-CH05 Page 6 Black,Red,Cyan Saturday, January 21, 1995 6:40 PM Installing a SIMM 5-6 ❖ 3 Remove any installed font cards. 4 Release the rear cover latches.
AUG-CH05 Page 7 Black,Red,Cyan Saturday, January 21, 1995 6:40 PM Installing a SIMM 5 Remove the rear cover to expose the thumb screws. 6 With your fingers, loosen the thumbscrews. Thumbscrews are not removable.
AUG-CH05 Page 8 Black,Red,Cyan Saturday, January 21, 1995 6:40 PM Installing a SIMM ! Caution SIMMs and controller boards are sensitive to static electricity. Before installing a SIMM, discharge static electricity from your body by touching something metal, such as the metal back plate on the printer. If you walk around before finishing the installation, again discharge any static electricity. Never remove the printer controller board while the printer is plugged in.
AUG-CH05 Page 9 Black,Red,Cyan Saturday, January 21, 1995 6:40 PM Installing a SIMM 8 Place the controller board on a ream of paper. This is required to properly support the board during installation of the SIMM. 9 Locate the SIMM slots on the printer controller board. If you need to replace a currently installed SIMM, continue with Step 10. If you do not need to replace a SIMM, skip to Step 12 (page 5-11).
AUG-CH05 Page 10 Black,Red,Cyan Saturday, January 21, 1995 6:40 PM Installing a SIMM ! Caution 10 11 5-10 ❖ When removing a SIMM, be careful not to damage the locking clips located at each end of the SIMM slot. They may break if too much pressure is applied. Carefully release the clips of the SIMM you are replacing. Lift the SIMM out of the slot.
AUG-CH05 Page 11 Black,Red,Cyan Saturday, January 21, 1995 6:40 PM Installing a SIMM 12 ! Caution 13 Insert the new SIMM into either SIMM slot. Be careful not to damage the locking clips located at each end of the SIMM slot. They may break if too much pressure is applied. Press the SIMM down until the clips lock it in place. The SIMM will sit at an angle. Install additional SIMMs in the same manner.
AUG-CH05 Page 12 Black,Red,Cyan Saturday, January 21, 1995 6:40 PM Installing a SIMM 14 Replace the printer controller board. Align the edge of the board in the guide rails and seat the controller board firmly. 15 5-12 ❖ Push the controller board firmly into place.
AUG-CH05 Page 13 Black,Red,Cyan Saturday, January 21, 1995 6:40 PM Installing a SIMM 16 Inspect this area to verify that there is no gap between the printer controller board and the chassis. ! Caution Ensure that the controller board is touching the rear of the printer chassis. There must be no space between the controller board and the chassis. Use only finger pressure to tighten the thumbscrews. Do not use a screwdriver because the threads will be stripped if excessive torque is applied.
AUG-CH05 Page 14 Black,Red,Cyan Saturday, January 21, 1995 6:40 PM Installing a SIMM 17 Tighten the thumbscrews using only your fingers. Do not use tools. Note 18 5-14 ❖ If the thumbscrews do not easily turn, reseat the controller board and try again. Replace the rear cover.
AUG-CH05 Page 15 Black,Red,Cyan Saturday, January 21, 1995 6:40 PM Installing a SIMM 19 Reinstall any font cards removed in Step 3. cables and 20 Reconnect the power cord. At this point, you need to print a Configuration Sheet to verify that you have properly installed the SIMMs.
AUG-CH05 Page 16 Black,Red,Cyan Saturday, January 21, 1995 6:40 PM Installing a SIMM 1 Power ON [1] the printer. If the printer does not turn on: • Power OFF [0]. • Check all connections and the electrical supply outlet. • Power ON [1]. If the printer still does not turn on, reseat the controller board. 2 On the Control Panel, you may briefly see some messages. Then you will see the message: Online Ready 3 ___ Press Online You will see: Offline _/_ Press a key...
AUG-CH05 Page 17 Black,Red,Cyan Saturday, January 21, 1995 6:40 PM Installing a SIMM 6 Press Enter You will see: Test Menu Config. Sheet 7 Press Enter again to start printing a Configuration Sheet. You will see: Config. Sheet Printing... The Configuration Sheet requires a minute or so to print.
AUG-CH05 Page 18 Black,Red,Cyan Saturday, January 21, 1995 6:40 PM Installing a SIMM 8 On your Configuration Sheet, the “Total system memory” value should match the amount of memory you just installed plus the RAM resident on the printer. Xerox 4510 Desktop Laser Printer Configuration Sheet Total prints = 0 Total system memory = 0 KB Software version = 00.00.00 - 00.00.00 Installed options: None Total system memory = nnnn KB Main Menu Verify the SIMM has been correctly installed.
AUG-CH05 Page 19 Black,Red,Cyan Saturday, January 21, 1995 6:40 PM Installing a Font Card Installing a Font Card Online Ready To install a font card in the printer, follow the steps below: 1 Press Online to take the printer offline. 2 Insert a font card into either font card slot. 3 Press Online to put the printer online. ___ Offline ___ Press a key...
AUG-CH05 Page 20 Black,Red,Cyan Saturday, January 21, 1995 6:40 PM Installing a Font Card 4 Note 5-20 ❖ To verify that the printer recognizes the font card as installed, print a PCL Font List (see page 3-63). When installing PCMCIA font cards, printing a PCL Font List will verify that the cards have been inserted correctly and are recognized by the printer.
AUG-CH06 Page 1 Black,Red,Cyan Friday, February 3, 1995 12:29 AM Chapter 6 Maintaining the Printer 6 r e tpahC Overview ............................................................................... 6-2 Replacing the EP Cartridge .................................................. 6-3 Fuser Cleaning Cycle ............................................................. 6-9 Adjusting the Print Density ............................................... 6-12 Cleaning the Printer ..................................
AUG-CH06 Page 2 Black,Red,Cyan Friday, February 3, 1995 12:29 AM Overview Overview Maintaining the printer in good operating condition is essential to having a reliable, well-running machine.
AUG-CH06 Page 3 Black,Red,Cyan Friday, February 3, 1995 12:29 AM Replacing the EP Cartridge Replacing the EP Cartridge An EP (electronic printing) cartridge will print approximately 4,000 pages of A4 or 8.5 x 11 (Letter) paper, under average operating conditions (5% area coverage). The number of prints per one EP cartridge will decrease if you routinely: • Print dense text and graphics. • Set Print Density (page 3-59) to a dark setting. • Exceed five percent area coverage.
AUG-CH06 Page 4 Black,Red,Cyan Friday, February 3, 1995 12:29 AM Replacing the EP Cartridge To replace the EP cartridge, follow the steps below: 1 ! Caution 2 6-4 ❖ Remove the Multipurpose (MP) tray, if installed. To avoid damaging the hinge, support the front cover with your hands while opening it. Do not allow the cover to fall open. Press the side latches down to release and open the front cover.
AUG-CH06 Page 5 Black,Red,Cyan Friday, February 3, 1995 12:29 AM Replacing the EP Cartridge ! Caution Follow these guidelines to make sure the EP cartridge is properly installed: • Do not expose the EP cartridge to direct sunlight or fluorescent light for more than 15 minutes. Overexposure will permanently damage the photosensitive imaging drum. • Do not open the drum shutter or touch the imaging drum. • Complete the EP cartridge installation within 15 minutes of removing it from its package.
AUG-CH06 Page 6 Black,Red,Cyan Friday, February 3, 1995 12:29 AM Replacing the EP Cartridge 4 ! Caution 5 Unwrap, then shake the new EP cartridge 6 to 8 times to evenly distribute the toner. To avoid breaking the tab or tape, pull the tab out, not up. If the tab separates from the tape, continue to pull the tape. Place the EP cartridge on a flat surface; pull the tab and tape from the EP cartridge. You may have to pull firmly. Dispose of the tab and tape.
AUG-CH06 Page 7 Black,Red,Cyan Friday, February 3, 1995 12:29 AM Replacing the EP Cartridge 6 Insert the EP cartridge into the guide channels marked by yellow arrows. The cartridge fits securely inside the printer. 7 Close the front cover. Be sure the cover is completely closed and latches locked. If the front cover does not close, reseat the EP cartridge.
AUG-CH06 Page 8 Black,Red,Cyan Friday, February 3, 1995 12:29 AM Replacing the EP Cartridge 8 9 If needed, reinstall the Multipurpose (MP) tray. Perform the Fuser Cleaning Cycle. See “Fuser Cleaning Cycle” (page 6-9) for the fuser cleaning procedure.
AUG-CH06 Page 9 Black,Red,Cyan Friday, February 3, 1995 12:29 AM Fuser Cleaning Cycle Fuser Cleaning Cycle To run the fuser cleaning cycle, follow the steps below. Whenever you replace an EP cartridge, run the fuser cleaning cycle. This will prevent paper jams caused by dirty fuser components. Note 1 On the Control Panel, press Online You will see: Offline _/_ Press a key... The fuser cleaning process uses three sheets of A4 or 8.5 x 11 (Letter) paper.
AUG-CH06 Page 10 Black,Red,Cyan Friday, February 3, 1995 12:29 AM Fuser Cleaning Cycle 5 Press Up or Down until you see: Test Menu Fuser Cleaning 6 Press Enter You will see: Fuser Cleaning Printing... Three sheets of paper—called the cleaning sheets—will be printed with a black band across the page. 7 Wait for the Control Panel to display: Fuser Cleaning Waiting... All three cleaning sheets will have been printed.
AUG-CH06 Page 11 Black,Red,Cyan Friday, February 3, 1995 12:29 AM Fuser Cleaning Cycle 11 On the Control Panel, press Online You will see: Online Ready ___ Chapter 6: Maintaining the Printer ❖ 6-11
AUG-CH06 Page 12 Black,Red,Cyan Friday, February 3, 1995 12:29 AM Adjusting the Print Density Adjusting the Print Density The print density was adjusted at the factory to provide optimum print quality. However, should you desire to darken or lighten the print density, follow the steps below. 1 2 Select the System Menu (see page 3-57). Select Print Density. The print choices are from 0 to 4. 0 is the lightest and 4 is the darkest.
AUG-CH06 Page 13 Black,Red,Cyan Friday, February 3, 1995 12:29 AM Cleaning the Printer Cleaning the Printer For optimum performance, the printer should not be placed near vents or dust-producing equipment. Particles in the air may enter the printer and cause failures in internal mechanisms For best results, clean the outside of the printer with a damp cloth. Do not use detergents. ! Make sure the printer is powered OFF [0] before you clean it.
AUG-CH06 Page 14 Black,Red,Cyan Friday, February 3, 1995 12:29 AM Transporting the Printer Transporting the Printer When transporting the printer more than a short distance, follow the guidelines shown in Figure 6.1. Figure 6.1 Hints for transporting the printer Helpful Hints for Moving the Printer Use the original shipping box and materials. If the original box or materials are not available or are unusable, use a sturdy packing box and a generous amount of cushioning or packing material. 1.
AUG-CH07 Page 1 Black,Cyan Friday, February 3, 1995 12:34 AM Chapter 7 Troubleshooting 7 r e tpahC Overview ............................................................................... 7-2 Before Calling for Service 7-2 Locating Your Printer’s Serial Number 7-4 Displayed Control Panel Messages ..................................... 7-5 Paper Jams ..........................................................................
AUG-CH07 Page 2 Black,Cyan Friday, February 3, 1995 12:34 AM Overview Overview This chapter lists some problems you might encounter while using your 4505/4505ps or 4510/4510ps, and provides some possible solutions to these problems.
AUG-CH07 Page 3 Black Friday, February 3, 1995 12:34 AM Overview — Serious Printer is operational but production capability is seriously degraded – inability of a major application (job) to run – failure requires frequent operational intervention to maintain productivity – non-critical integrity defect — Moderate Printer is operational, but production capability is reduced – a non-critical application (job) can not be printed – continuing, but infrequent failure requiring operational intervention – a non-
AUG-CH07 Page 4 Black,Cyan Friday, February 3, 1995 12:34 AM Overview Also have available: • Any error code or message displayed on the Control Panel • A copy of the Configuration Sheet • A copy of the output with the problem • A copy of the print job as it was input If possible, be near the printer when you call so you can perform any suggested corrective actions. Locating Your Printer’s Serial Number Your printer’s serial number is located on the printer frame behind the rear cover.
AUG-CH07 Page 5 Black,Cyan Friday, February 3, 1995 12:34 AM Displayed Control Panel Messages Displayed Control Panel Messages Control Panel messages are listed in alphabetical order in Figure 7.2, preceded by numerical diagnostic error codes. Not listed are the Control Panel menu options, settings, or functions covered in Chapter 3: Using the Control Panel. Some two-line messages are separated by the top line and bottom line. In these instances, look up each line of the message separately.
AUG-CH07 Page 6 Black,Cyan Friday, February 3, 1995 12:34 AM Displayed Control Panel Messages Figure 7.2 Control Panel messages (continued) Message Description/Action 0101† SIMM in slot 1 has failed. † ACTION: Move the SIMM to Slot 0; see “Installing a SIMM” (page 5-4). If a memory error (0100) occurs again, replace the SIMM. If there is no error, the main controller board has failed. Contact your dealer or Xerox / Rank Xerox. Appears in the top left side of the display.
AUG-CH07 Page 7 Black,Cyan Friday, February 3, 1995 12:34 AM Displayed Control Panel Messages Figure 7.2 Control Panel messages (continued) Message Config. Sheet Printing... Description/Action The Configuration Sheet is printing. See Config. Sheet, page 3-62. ACTION: None Ethernet Fail The Ethernet card (XNIC-E’NET) has failed and cannot be used. ACTION: Press Enter to allow the printer to continue as if the Ethernet card were not installed. This error is not subject to Auto Continue (page 3-59).
AUG-CH07 Page 8 Black,Cyan Friday, February 3, 1995 12:34 AM Displayed Control Panel Messages Figure 7.2 Control Panel messages (continued) Message Install EP Cartridge IOT NVM Fail Service Required Description/Action The EP cartridge is missing or not installed correctly. ACTION: Reseat existing cartridge or install a new cartridge. See “Replacing the EP Cartridge” (page 6-3). If problem continues, contact your dealer or Xerox / Rank Xerox.
AUG-CH07 Page 9 Black,Cyan Friday, February 3, 1995 12:34 AM Displayed Control Panel Messages Figure 7.2 Control Panel messages (continued) Message Description/Action Load Legal ACTION: Load Legal paper into the tray(s) indicated on the top line of the display. Load Letter ACTION: Load Letter paper into the tray(s) indicated on the top line of the display. Load Monarch ACTION: Load Monarch envelopes into the tray(s) indicated on the top line of the display.
AUG-CH07 Page 10 Black,Cyan Friday, February 3, 1995 12:34 AM Displayed Control Panel Messages Figure 7.2 Control Panel messages (continued) Message Description/Action Lower-Standard Paper needs to be added to the lower or standard tray. ACTION: The message on the bottom line advises what type of paper or envelope to load. Either load that size, or press Enter The printer is requesting paper in the MP tray. MP Tray ACTION: The message on the bottom line advises what size paper to insert.
AUG-CH07 Page 11 Black,Cyan Friday, February 3, 1995 12:34 AM Displayed Control Panel Messages Figure 7.2 Control Panel messages (continued) Message Offline Description/Action _/_ Printer is offline, not in menu mode, and without any fault conditions. Offline does not mean the printer is disconnected from the computer. It means page formatting and printing are halted.
AUG-CH07 Page 12 Black,Cyan Friday, February 3, 1995 12:34 AM Displayed Control Panel Messages Figure 7.2 Control Panel messages (continued) Message Description/Action Page Too Complex In PCL, the printing on a page is broken up into horizontal bands. When Page Protection is Off, as a page is processed, each band has a limited time to be composed and imprinted on the page. Page Too Complex means the current page cannot print because there is not enough time to compose it.
AUG-CH07 Page 13 Black,Cyan Friday, February 3, 1995 12:34 AM Displayed Control Panel Messages Figure 7.2 Control Panel messages (continued) Message Description/Action PS Font List Printing... List of PostScript fonts (page 3-63) is printing. Ready Printer is online and waiting for data to print. ACTION: None ACTION: None Reset Menus Please Wait... Reset Menus has been invoked from the Reset Menu (page 3-65).
AUG-CH07 Page 14 Black,Cyan Friday, February 3, 1995 12:34 AM Displayed Control Panel Messages Figure 7.2 Control Panel messages (continued) Message Description/Action Std. Tray Empty The standard tray does not contain paper. ACTION: Add paper to the standard tray. Std. Tray Out The standard tray has been removed or is not properly inserted. ACTION: Insert the standard tray.
AUG-CH07 Page 15 Black,Cyan Friday, February 3, 1995 12:34 AM Displayed Control Panel Messages Figure 7.2 Control Panel messages (continued) Message Upper Card Out Replace Original Description/Action Upper font card was removed while the printer was offline, but the card was still being used by the application. ACTION: To clear the error message, take the printer offline and return the card to its slot. Then press Online to resume printing.
AUG-CH07 Page 16 Black,Cyan Friday, February 3, 1995 12:34 AM Displayed Control Panel Messages Figure 7.2 Control Panel messages (continued) Message Description/Action Warning 300/B5 This message appears in PCL when the printer has changed resolution to 300 or page protection to B5; appears in PostScript when the page size is B5 and the printer has changed resolution to 300.
AUG-CH07 Page 17 Black,Cyan Friday, February 3, 1995 12:34 AM Displayed Control Panel Messages Figure 7.2 Control Panel messages (continued) Message Warning 300/EXE Description/Action This message appears in PCL when the printer has changed resolution to 300 or page protection to Executive; appears in PostScript when the page size is Executive and the printer has changed resolution to 300.
AUG-CH07 Page 18 Black,Cyan Friday, February 3, 1995 12:34 AM Displayed Control Panel Messages Figure 7.2 Control Panel messages (continued) Message Description/Action Warning 300/MON This message appears in PCL when the printer has changed resolution to 300 or page protection to Monarch; appears in PostScript when the page size is Monarch and the printer has changed resolution to 300.
AUG-CH07 Page 19 Black,Cyan Friday, February 3, 1995 12:34 AM Paper Jams Paper Jams Your printer has been designed to provide reliable, trouble free operation. However, it is not unusual to experience an occasional paper jam. Paper jams occur most often when: • The paper stock does not meet specification. See “Paper Specifications” (page 2-6). • The paper stock is in poor condition. • The paper stock has been improperly loaded into the paper trays. See “Loading Paper” (page 2-14).
AUG-CH07 Page 20 Black Friday, February 3, 1995 12:34 AM Paper Jams The paper path is depicted in Figure 7.3. (The figure includes the optional lower base.) Figure 7.3 Printer paper path The following section provides detailed step-by-step procedures for clearing paper jams as well as some tips to help troubleshoot reoccurring jams.
AUG-CH07 Page 21 Black,Cyan Friday, February 3, 1995 12:34 AM Paper Jams Clearing Paper Jams from the Standard Tray or Lower Base 1 If the MP Tray is installed, remove it before opening the Front Cover. 2 Open the front cover by pressing down on the release latches on both sides of the front cover. ! Caution The area inside the printer near the fuser may be hot.
AUG-CH07 Page 22 Black,Cyan Friday, February 3, 1995 12:34 AM Paper Jams 3 ! Caution 4 Note 7-22 ❖ Remove any paper visible in the paper transportation area inside the printer by gently pulling it upward. Paper removed from this area may have unfused toner on it which will soil your hand or clothing if touched. Remove any paper entering the fuser area by gently pulling the paper toward the front of the printer.
AUG-CH07 Page 23 Black,Cyan Friday, February 3, 1995 12:34 AM Paper Jams 5 Remove any paper exiting the fuser area by gently pulling it toward the rear of the printer. 6 Close the Front Cover. Note When the Lower Base is in use when a jam occurs, the standard tray may need to be removed to clear a paper jam. Check for paper that may be jammed between the Lower Base and the standard tray slot.
AUG-CH07 Page 24 Black,Cyan Friday, February 3, 1995 12:34 AM Paper Jams 7 Remove the paper tray(s) in use and remove any paper that may have been misfed out of the paper tray(s). 8 Ensure that the paper is loaded correctly into the tray(s) with the lead edges under the metal corners tabs. If a universal tray is being used, ensure that the paper guides are adjusted against the paper stock. See “Loading the Standard or Lower Paper Tray” (page 2-14).
AUG-CH07 Page 25 Black,Cyan Friday, February 3, 1995 12:34 AM Paper Jams Clearing Paper Jams from the MP tray 1 When the multi-purpose (MP) tray is being used and a jam occurs, remove all the paper in the tray. 2 Remove any paper that has partially fed into the MP slot. 3 4 Remove the MP tray. 5 6 7 Close the front cover. Note Open the front cover and remove any paper that is in the paper transport areas.
AUG-CH07 Page 26 Black,Cyan Friday, February 3, 1995 12:34 AM Printer Operational Problems Printer Operational Problems Figure 7.4 Figure 7.4 lists common operational problems and recommended actions. Printer Operational Problems Problem Action Printer will not print 1. 2. Power printer OFF, then ON. Print a Configuration Sheet (see page 3-62 ). • If Configuration Sheet prints, printer is OK. Check your software application and your printer connection. See below.
AUG-CH07 Page 27 Black,Cyan Friday, February 3, 1995 12:34 AM Printer Operational Problems Figure 7.4 Printer Operational Problems (continued) Problem Action D. If garbled data, check Configuration Sheet to confirm that the correct emulation is selected or Language Sensing is ON. Also, check that data transfer matches host configuration (i.e., Transfer Rate, Baud Rate, Handshake, Data Bits, etc.). If not, correct configuration on printer and try again. A printed page does not look like it should 1.
AUG-CH07 Page 28 Black,Cyan Friday, February 3, 1995 12:34 AM Printer Operational Problems Figure 7.4 Printer Operational Problems (continued) Problem Action The text printed is a listing of the PostScript commands instead of the PostScript job 1. 2. 3. Make certain that the software application you are using to create your job is configured properly. Refer to your software documentation.
AUG-CH07 Page 29 Black,Cyan Friday, February 3, 1995 12:34 AM Print Quality Problems Print Quality Problems Figure 7.5 Figure 7.5 lists common print quality problems, the likely cause, and recommended actions. Print Quality Problems Problem Light/faint prints Overall image is lighter than normal. Possible Causes Toner level low/empty Print Density adjustment set too low Damp paper stock 1. 2. Replace EP cartridge. Adjust Print Density (see Chapter 6). 3. Replace paper stock. 4.
AUG-CH07 Page 30 Black,Cyan Friday, February 3, 1995 12:34 AM Print Quality Problems Figure 7.5 Print Quality Problems (continued) Problem Possible Causes Background/black prints 1. 2. Overall darkness or localized dark bands in the non-image areas. 3. 4. Spot deletions Areas of the print are extremely light or missing. 7-30 ❖ 1. 2. 3. Corrective Actions Defective EP cartridge Print Density adjustment set too high Contaminated Bias Transfer Roll Defective Laser, Controller, Fuser Assembly 1.
AUG-CH07 Page 31 Black,Cyan Friday, February 3, 1995 12:34 AM Print Quality Problems Figure 7.5 Print Quality Problems (continued) Problem Possible Causes Vertical line deletions Localized print deletions forming narrow lines running in the direction of paper movement. Horizontal line deletions Localized print deletions appearing as bands running across the page perpendicular to the direction of paper movement. 1. 2. 3. 1. 2. 3.
AUG-CH07 Page 32 Black,Cyan Friday, February 3, 1995 12:34 AM Print Quality Problems Figure 7.5 Print Quality Problems (continued) Problem Possible Causes Vertical dark streaks Black lines running across the print in the direction of paper movement. Horizontal dark streaks Black lines running across the page perpendicular to the direction of paper movement. 7-32 ❖ Corrective Actions 1. 2. Defective EP cartridge Contaminated paper path 1. 2. 3. Contaminated Bias Transfer Roll 3. 1. 2.
AUG-CH07 Page 33 Black,Cyan Friday, February 3, 1995 12:34 AM Print Quality Problems Figure 7.5 Print Quality Problems (continued) Problem Possible Causes Dark spots/marks Residual image Ghost images of previous pages is produced along with the current page. Corrective Actions 1. 2. Defective EP cartridge Contaminated paper path 1. 2. 3. Contaminated Bias Transfer Roll 3. 1. Defective EP cartridge 1. Replace EP cartridge. Clean paper path to remove any toner accumulations.
AUG-CH07 Page 34 Black,Cyan Friday, February 3, 1995 12:34 AM Print Quality Problems Figure 7.5 Print Quality Problems (continued) Problem Possible Causes Corrective Actions Unfused or partially fused image 1. 2. Damp paper stock Heavy or unusual paper stock 1. 2. The printed image is not fully fused to the paper and easily rubs off. 3. 4. Light image density Defective Fuser Module 3. 4. Skewed prints 1. 1. Printed image is not parallel to the edge of the paper. 2.
AUG-CH07 Page 35 Black,Cyan Friday, February 3, 1995 12:34 AM Print Quality Problems Figure 7.5 Print Quality Problems (continued) Problem Possible Causes Image misregistration 1. The printed image is mispositioned on the page. 2. Paper improperly loaded into paper tray Wrong paper size for application Corrective Actions 1. 2. 3. Check trays for proper paper loading (see Chapter 2). Check paper stock and printer configuration.
AUG-CH07 Page 36 Black,Cyan Friday, February 3, 1995 12:34 AM Print Quality Problems Figure 7.5 Print Quality Problems (continued) Problem Possible Causes Corrective Actions TrueRes Smoothing problems TrueRes Smoothing is a technology that smooths the jagged edges of curved or near vertical/horizontal lines. Produce Test Prints (see Chapter 3) with TrueRes switched both ON and OFF. Inspect the TrueRes target on the Test Print. If: 1.
AUG-APPA Page 1 Black,Cyan Saturday, January 21, 1995 7:07 PM Appendix A Printer and Cable Specifications A x i dneppA 4505 and 4505ps Printer Specifications ............................. A-2 4510 and 4510ps Printer Specifications ............................. A-4 Cable Specifications ............................................................. A-7 Parallel Interface A-7 RS-232C Serial Interface (CCITT V.
AUG-APPA Page 2 Black,Cyan Saturday, January 21, 1995 7:07 PM 4505 and 4505ps Printer Specifications 4505 and 4505ps Printer Specifications Imaging method Electro-Photography Exposure system Semiconductor laser beam (laser diode) scanning Image resolution 600 x 600 dpi and 300 x 300 dpi Warm up time Less than 60 seconds after power on Continuous print speed 5 ppm (pages per minute) Processor 16 MHz AMD 29200 RISC Maximum Monthly Duty Cycle Nominal voltage Nominal frequency Power consumption N
AUG-APPA Page 3 Black,Cyan Saturday, January 21, 1995 7:07 PM 4505 and 4505ps Printer Specifications Factory-provided features 2 MB printer memory One 250-sheet universal paper tray Multipurpose (MP) paper tray EP (electronic printing) cartridge Power cord (110 volt printers only) Document Services for Printing software diskettes User documentation On the 4505ps printer: Additional 4 MB SIMM (for a total of 6 MB) PostScript option Options 4 MB SIMM 16 MB SIMM 250-sheet Base with universal tray 500-shee
AUG-APPA Page 4 Black,Cyan Saturday, January 21, 1995 7:07 PM 4510 and 4510ps Printer Specifications 4510 and 4510ps Printer Specifications Imaging method Electro-Photography Exposure system Semiconductor laser beam (laser diode) scanning Image resolution 600 x 600 dpi and 300 x 300 dpi Warm up time Continuous print speed Processor Maximum Monthly Duty Cycle Nominal voltage Nominal frequency Power consumption Noise level Temperature Humidity Dimensions Less than 60 seconds after power on 10 ppm (p
AUG-APPA Page 5 Black,Cyan Saturday, January 21, 1995 7:07 PM 4510 and 4510ps Printer Specifications Factory-provided features 2 MB printer memory One 250-sheet universal paper tray Multipurpose (MP) paper tray EP (electronic printing) cartridge Power cord (110 volt printers only) Document Services for Printing software diskettes User documentation On the 4510ps printer: Additional 4 MB SIMM (for a total of 6 MB) PostScript option Options 4 MB SIMM 16 MB SIMM 250-sheet Base with universal tray 500-shee
AUG-APPA Page 6 Black,Cyan Saturday, January 21, 1995 7:07 PM 4510 and 4510ps Printer Specifications Figure A.1 PCL and PostScript printable area dimensions Printable Area Width Printable Area Length Determined by the formula: W – 8.5 mm (or W – .33 inch) where W = physical paper width Determined by the formula: L – 8.5 mm (or L – .33 inch) where L = physical paper width A4 200 mm 7.89 inches 289 mm 11.36 inches 8.5 x 11 (Letter) 207 mm 8.11 inches 271 mm 10.67 inches Executive 175 mm 6.
AUG-APPA Page 7 Black,Cyan Saturday, January 21, 1995 7:07 PM Cable Specifications Cable Specifications Figure A.2 Figure A.2 shows parallel and serial interface information to help you obtain the correct printer cable.
AUG-APPA Page 8 Black,Cyan Saturday, January 21, 1995 7:07 PM Cable Specifications The FAULT signal goes false (high) when all the above conditions are corrected. The Centronics bidirectional parallel interface is designed to provide plug-to-plug compatibility with a 36 pin Amphenol 57-40360 (or equivalent) connector that connects to an Amphenol 57-30360 (or equivalent) connector. The cable length has been certified at 6 feet, and will be the twisted pair type 22AWG -15 pairs.
AUG-APPA Page 9 Black,Cyan Saturday, January 21, 1995 7:07 PM Cable Specifications Figure A.
AUG-APPA Page 10 Black,Cyan Saturday, January 21, 1995 7:07 PM Cable Specifications RS-232C Serial Interface (CCITT V.24) The RS-232C Serial Interface complies with the EIA 232C standard which defines the interconnect of Data Terminal Equipment (DTE) and Data Communication Equipment (DCE). Data Rates The user may select line speeds of 300, 600, 1200, 2400, 4800, 9600, 19200 and 38400 baud. Default setting is for 9600 baud.
AUG-APPA Page 11 Black,Cyan Saturday, January 21, 1995 7:07 PM Cable Specifications The interface signals and their associated pin assignments are identified in the Figure A.4. Figure A.
AUG-APPA Page 12 Black,Cyan Saturday, January 21, 1995 7:07 PM Cable Specifications RS-422A Serial Interface (CCITT V.11 and X.27) The RS-422A Serial Interface is hardware compatible with the EIA RS-422 standard which defines the interconnect of Data Terminal Equipment (DTE) and Data Communication Equipment (DCE). Data Rates The user may select line speeds of 300, 600, 1200, 2400, 4800, 9600, 19200 and 38400 baud. Default setting is for 9600 baud.
AUG-APPA Page 13 Black,Cyan Saturday, January 21, 1995 7:07 PM Cable Specifications The interface signals and their associated pin assignments are identified in the Figure A.5. Figure A.
AUG-APPA Page 14 Black,Cyan Saturday, January 21, 1995 7:07 PM Cable Specifications Null Modem A null modem is a device that eliminates both a modem and a telephone line. When the printers are used with an asynchronous serial interface connected to a DTE host (such as a PC-compatible), a modem, modem eliminator, or a null modem is required. Figure A.6 shows null modem wiring. Figure A.
AUG-APPB Page 1 Black,Red,Cyan Saturday, January 21, 1995 7:10 PM Appendix B Printer Commands (Escape Sequences) B x i dneppA Xerox-Unique Settings ......................................................... B-2 PCL Printer Commands ......................................................... B-3 HP-GL/2 Context Printer Commands ................................. B-21 Control Codes .....................................................................
AUG-APPB Page 26 Black,Red Saturday, January 21, 1995 7:10 PM Xerox-Unique Settings B-2 ❖ 4505/4505ps or 4510/4510ps User’s Guide
AUG-APPB Page 3 Black,Red,Cyan Saturday, January 21, 1995 7:10 PM PCL Printer Commands PCL Printer Commands Figure B.1 PCL printer commands—also called escape sequences—are used by software applications to control how fonts and graphics are printed on the page. Figure B.1 lists the PCL printer commands for the 4505/4505ps and 4510/4510ps printers.
AUG-APPB Page 4 Black,Red,Cyan Saturday, January 21, 1995 7:10 PM PCL Printer Commands Figure B.
AUG-APPB Page 5 Black,Red,Cyan Saturday, January 21, 1995 7:10 PM PCL Printer Commands Figure B.1 PCL printer commands (continued) Function Parameter Command Decimal Value Hexadecimal Value Margins and Text Length Top Margin # of Lines E C&l#E 027 038 108 # ... # 069 1B 26 6C # ... # 45 Text Length # of Lines E C&l#F 027 038 108 # ... # 070 1B 26 6C # ... # 46 Left Margin # of Columns E C&a#L 027 038 097 # ... # 076 1B 26 61 # ...
AUG-APPB Page 6 Black,Red,Cyan Saturday, January 21, 1995 7:10 PM PCL Printer Commands Figure B.1 PCL printer commands (continued) Function Parameter Command Decimal Value Hexadecimal Value Vertical Line Spacing Vertical Motion Index (VMI) # of 1/48” Increments E C&l#C 027 038 108 # ... # 067 1B 26 6C # ...
AUG-APPB Page 7 Black,Red,Cyan Saturday, January 21, 1995 7:10 PM PCL Printer Commands Figure B.
AUG-APPB Page 8 Black,Red,Cyan Saturday, January 21, 1995 7:10 PM PCL Printer Commands Figure B.
AUG-APPB Page 9 Black,Red,Cyan Saturday, January 21, 1995 7:10 PM PCL Printer Commands Figure B.1 PCL printer commands (continued) Function Parameter Command Decimal Value Hexadecimal Value Pi Font E C(15U 027 040 049 053 085 1B 28 31 35 55 PC-852 E C(17U 027 040 049 055 085 1B 28 31 37 55 Windows 3.
AUG-APPB Page 10 Black,Red,Cyan Saturday, January 21, 1995 7:10 PM PCL Printer Commands Figure B.
AUG-APPB Page 11 Black,Red,Cyan Saturday, January 21, 1995 7:10 PM PCL Printer Commands Figure B.
AUG-APPB Page 12 Black,Red,Cyan Saturday, January 21, 1995 7:10 PM PCL Printer Commands Figure B.
AUG-APPB Page 13 Black,Red,Cyan Saturday, January 21, 1995 7:10 PM PCL Printer Commands Figure B.1 PCL printer commands (continued) Function Parameter Command Decimal Value Hexadecimal Value Soft Symbol Set Management / Creation Set Symbol Set ID # E C*c#R 027 042 099 # ... # 082 1B 2A 63 # ... # 52 Define Symbol Set # of Bytes E C(f#W[Data] 027 040 102 # ... # 087 1B 28 66 # ...
AUG-APPB Page 14 Black,Red,Cyan Saturday, January 21, 1995 7:10 PM PCL Printer Commands Figure B.
AUG-APPB Page 15 Black,Red,Cyan Saturday, January 21, 1995 7:10 PM PCL Printer Commands Figure B.1 PCL printer commands (continued) Function Parameter Adaptive compression Command Decimal Value Hexadecimal Value E C*b5M 027 042 098 053 077 1B 2A 62 35 4D E C*b#W[Data 027 042 098 # ... # 087 1B 2A 62 # ...
AUG-APPB Page 16 Black,Red,Cyan Saturday, January 21, 1995 7:10 PM PCL Printer Commands Figure B.1 PCL printer commands (continued) Function Parameter Command Decimal Value Hexadecimal Value Rectangle Dimensions Rectangle Width (Horizontal Size) # of dots E C*c#A 027 042 099 # ... # 065 1B 2A 63 # ... # 41 # of decipoints E C*c#H 027 042 099 # ... # 072 1B 2A 63 # ... # 48 Rectangle Height (Vertical Size) # of dots E C*c#B 027 042 099 # ... # 066 1B 2A 63 # ...
AUG-APPB Page 17 Black,Red,Cyan Saturday, January 21, 1995 7:10 PM PCL Printer Commands Figure B.1 PCL printer commands (continued) Function Pattern Parameter Command Decimal Value Hexadecimal Value 100% Gray E C*c100G 027 042 099 049 048 048 071 1B 2A 63 31 30 30 47 1 Horiz. Line E C*c1G 027 042 099 049 071 1B 2A 63 31 47 2 Vert.
AUG-APPB Page 18 Black,Red,Cyan Saturday, January 21, 1995 7:10 PM PCL Printer Commands Figure B.1 PCL printer commands (continued) Function Parameter Command Decimal Value Hexadecimal Value MACROS Macro ID Macro ID # E C&f#Y 027 038 102 # ... # 089 1B 26 66 # ... # 59 Macro Control Start Macro Def. E C&f0X 027 038 102 048 088 1B 26 66 30 58 Stop Macro Def.
AUG-APPB Page 19 Black,Red,Cyan Saturday, January 21, 1995 7:10 PM PCL Printer Commands Figure B.
AUG-APPB Page 20 Black,Red,Cyan Saturday, January 21, 1995 7:10 PM PCL Printer Commands Figure B.
AUG-APPB Page 21 Black,Red,Cyan Saturday, January 21, 1995 7:10 PM HP-GL/2 Context Printer Commands HP-GL/2 Context Printer Commands Figure B.2 In Figure B.2, parameters in brackets [] are optional.
AUG-APPB Page 22 Black,Red,Cyan Saturday, January 21, 1995 7:10 PM HP-GL/2 Context Printer Commands Figure B.2 HP-GL/2 Context Printer Commands (continued) Command Mnemonic Parameters Bezier Relative BR x1_control_pt_increments, y1_control_pt_increments, x2_control_pt_increments, y2_control_pt_increments x3_control_pt_increments, y3_control_pt_increments . . .
AUG-APPB Page 23 Black,Red,Cyan Saturday, January 21, 1995 7:10 PM HP-GL/2 Context Printer Commands Figure B.
AUG-APPB Page 24 Black,Red,Cyan Saturday, January 21, 1995 7:10 PM HP-GL/2 Context Printer Commands Figure B.2 HP-GL/2 Context Printer Commands (continued) Command Mnemonic Parameters LINE AND FILL ATTRIBUTES GROUP Line Type LT [line_type [,pattern_length [,mode]]]; Line Attributes LA [kind, value . . .
AUG-APPB Page 25 Black,Red,Cyan Saturday, January 21, 1995 7:10 PM Control Codes Control Codes Figure B.3 Control Codes Function Symbol Decimal Value Backspace BS 8 Move one column left unless at left margin, in which case no action is taken. Horizontal Tab HT 9 Move to next horizontal tab stop. The tab stops are at the left margin, and every eight columns to the right of the left margin. Line Feed LF 10 Move to next print line while maintaining current column position.
AUG-APPB Page 26 Black,Red Saturday, January 21, 1995 7:10 PM B-26 ❖ 4505/4505ps or 4510/4510ps User’s Guide
AUG-APPC Page 1 Black,Cyan Saturday, January 21, 1995 7:14 PM Appendix C I/O Port Polling Appendix C: I/O Port Polling C x i dneppA ❖ C-1
AUG-APPC Page 2 Black Saturday, January 21, 1995 7:14 PM The 4505/4505ps printers provide a parallel port, serial port, and one additional network interface port option, all of which may be active at the same time. The 4510/4510ps printers provide a parallel port, serial port, and three additional network interface port options, all of which may be active at the same time.
AUG-APPC Page 3 Black,Cyan Saturday, January 21, 1995 7:14 PM For the 4510/4510ps printers: When print jobs are pending on all five ports (parallel, serial, and the network interface ports), the port polling sequence is: 1 Parallel 2 Serial 3 Ethernet 4 Token Ring 5 Back to Parallel LocalTalk is not a part of this sequence. When a print job is detected on the LocalTalk port, the print job is put in the queue immediately after any current job finishes.
AUG-APPC Page 4 Black Saturday, January 21, 1995 7:14 PM You may set the Port Timeout period and Auto Job End on the Control Panel or with the RUI. For additional information on Port Timeout or Auto Job End, either see Chapter 3: Using the Control Panel, or refer to the Document Services for Printing Guide.
AUG-APPD Page 1 Black,Red,Cyan Saturday, January 21, 1995 7:15 PM Appendix D Ordering Information D x i dneppA Printer Options .................................................................... D-2 Additional Order Items .......................................................
AUG-APPD Page 2 Black,Red,Cyan Saturday, January 21, 1995 7:15 PM Printer Options Printer Options Note Figure D.1 Contact your dealer or Xerox / Rank Xerox to order any of the printer options listed in Figure D.1. 4505ps and 4510ps Users: The 4505ps and 4510ps come with these options pre-installed: • 4 MB SIMM (for a total of 6 MB memory) • PostScript card Printer options Option/Part No. Description Printer Memory (SIMM) 97K15280 97K15300 Comments TO INSTALL, go to: Chapter 5.
AUG-APPD Page 3 Black,Red,Cyan Saturday, January 21, 1995 7:15 PM Printer Options Figure D.1 Printer options (continued) Option/Part No.
AUG-APPD Page 4 Black,Red,Cyan Saturday, January 21, 1995 7:15 PM Printer Options Figure D.1 Printer options (continued) Option/Part No.
AUG-APPD Page 5 Black,Red,Cyan Saturday, January 21, 1995 7:15 PM Printer Options Figure D.1 Printer options (continued) Option/Part No. PAPER HANDLING OPTIONS Description Comments (For paper sizes, refer to the Chapter 2: Handling Paper.) Paper Trays TO INSTALL, go to: Chapter 2. 109R00029 English (Xerox) English (Rank Xerox) French German Italian Spanish (Xerox) Spanish (Rank Xerox) 250-sheet Universal Tray† Adjustable to: • A4 • 8.
AUG-APPD Page 6 Black,Red,Cyan Saturday, January 21, 1995 7:15 PM Printer Options Figure D.1 Printer options (continued) Option/Part No. Description Lower Base Comments TO INSTALL, go to: Installation instructions packaged with the option.
AUG-APPD Page 7 Black,Red,Cyan Saturday, January 21, 1995 7:15 PM Additional Order Items Additional Order Items Figure D.2 Additional order items Type/Part No. EP Cartridge 113R5 Cables Figure D.2 shows additional items for the 4505/4505ps or 4510/4510ps you may order from your dealer or Xerox / Rank Xerox. English (Xerox) English (Rank Xerox) French German Italian Spanish (Xerox) Spanish (Rank Xerox) Description Comments See Chapter 6: Maintaining the Printer for installation instructions.
AUG-APPD Page 8 Black,Red,Cyan Saturday, January 21, 1995 7:15 PM Additional Order Items Figure D.2 Additional order items (continued) Type/Part No. Description Software Diskettes 300E62150 300E62150 300E62360 300E62210 300E62460 300E62410 300E62410 English (Xerox) English (Rank Xerox) French German Italian Spanish (Xerox) Spanish (Rank Xerox) DS/P Windows 3.
AUG-APPD Page 9 Black,Red,Cyan Saturday, January 21, 1995 7:15 PM Additional Order Items Figure D.2 Additional order items (continued) Type/Part No.
AUG-APPD Page 10 Black,Red,Cyan Saturday, January 21, 1995 7:15 PM Additional Order Items Figure D.2 Additional order items (continued) Type/Part No.
AUG-APPD Page 11 Black,Red,Cyan Saturday, January 21, 1995 7:15 PM Additional Order Items Figure D.2 Additional order items (continued) Type/Part No.
AUG-APPD Page 12 Black,Red Saturday, January 21, 1995 7:15 PM D-12 ❖ 4505/4505ps or 4510/4510ps User’s Guide
AUG-APPE Page 1 Black,Cyan Saturday, January 21, 1995 7:22 PM Appendix E Environmental Specifications Appendix E: Environmental Specifications E x i dneppA ❖ E-1
AUG-APPE Page 2 Black,Cyan Saturday, January 21, 1995 7:22 PM The Xerox Commitment to Environmental Quality Xerox Corporation is committed to an international program to safeguard our environment by diverting certain products and materials from the solid waste stream. We do this by reusing serviceable components and remanufacturing selected products. To support this effort we have made it easy for you to return selected printer equipment and empty print cartridges to Xerox.
AUG-APPE Page 3 Black,Cyan Saturday, January 21, 1995 7:22 PM FCC Compliance Statement for United States Users Class B: This equipment has been tested and found to comply with the limits for a Class B digital device, pursuant to Part 15 of the FCC Rules. These limits are designed to provide reasonable protection against harmful interference in a residential installation.
AUG-APPE Page 4 Black,Cyan Saturday, January 21, 1995 7:22 PM Operational Safety Your Xerox equipment and supplies were designed and tested to meet strict safety requirements. These include safety agency examination, approval, and compliance with established environmental standards. Attention to the following notes ensures the continued safe operation of your equipment. Always connect the equipment to a properly grounded power source receptacle.
AUG-APPE Page 5 Black Saturday, January 21, 1995 7:22 PM WARNING: Use of controls, adjustments or performance of procedures other than those specified herein may result in a hazardous radiation exposure. This product will produce ozone during normal operation. The ozone produced is dependent on copy volume and is heavier than air. Providing the proper environmental parameters as specified by Xerox will ensure that concentration levels meet safe limits.
AUG-APPE Page 6 Black,Cyan Saturday, January 21, 1995 7:22 PM Laser Safety WARNING: Use of controls or adjustments or performance of procedures other than those specified herein may result in hazardous light exposure. This equipment complies with appropriate safety standards. With specific regard to lasers, the equipment complies with laser product performance standards set by governmental, national, and international agencies as a Class 1 laser product.
AUG-GLOS Page 1 Black,Red,Cyan Saturday, January 21, 1995 7:29 PM Glossary Accounting File The file SMS generates for storing printer and job statistics. An accounting file is created for each Service Coordinator when DS/P Authorization is set ON in SETUP. “PRINTER.LOG” is the name of the SMS accounting file. Alert Message A message SMS sends to the client that notifies user of an event at the printer. Attach The term used in SMS for logging into a file server.
AUG-GLOS Page 2 Black,Red Saturday, January 21, 1995 7:29 PM Bindery A data structure on each file server that shows the existence and status of printers on a Novell network. Bit Binary digit. The smallest unit of information in a digital computer. A bit can take on the value of either 1 or 0. Bitmap A pattern of bits representing the dots in a printed image. Bitmapped fonts Digitized images of each character in a font. Bitmapped fonts generally require more memory than scalable fonts.
AUG-GLOS Page 3 Black,Red Saturday, January 21, 1995 7:29 PM Context saving See State Saving. Controller board The printer’s system controller, with firmware to direct all printer operations and slots for adding optional cards. The controller board is accessed through the back panel of the printer. Control Panel An LCD display to show status messages, prompts, and menu items; indicator lights to show the condition and status of the printer; and keys for accessing the printer settings.
AUG-GLOS Page 4 Black,Red Saturday, January 21, 1995 7:29 PM Downloading The process of transferring fonts or other data from computer to the printer memory. Permanently downloaded data will be stored in the printer until it is turned off. Dpi Dots per inch. A measure of the resolution of a printed image. Laser printers use dots to form images. The greater the dpi, the finer the resolution. DS/P Document Services for Printing.
AUG-GLOS Page 5 Black,Red Saturday, January 21, 1995 7:29 PM tells the printer to execute, rather than print, the character sequence following it. Escape sequence A sequence of characters beginning with an escape code and comprising a printer command. Factory-set default The settings that are programmed into the Xerox printer before it is shipped from the manufacturer. These settings are in use unless you permanently override them using either the printer Control Panel or the Remote User Interface.
AUG-GLOS Page 6 Black,Red Saturday, January 21, 1995 7:29 PM Host The source of data or the input device for the printer. It may be a personal computer or network device. Hot Key Keystroke combinations used to activate and exit the DOS version of SMS. I/O (Input/Output) The communication between the printer and the host computer. I/O port Input/Output port, where data is received and transmitted.
AUG-GLOS Page 7 Black,Red Saturday, January 21, 1995 7:29 PM Manual tray See MP tray. Menu Choices of settings and controls. There are menus for the printer’s Control Panel, RUI (Remote User Interface), SMS (Status & Management Services), and for many software applications. Memory The space in a device where information is stored, or the ability of a device to keep information until needed. (See also RAM, ROM.) MP tray Multipurpose tray.
AUG-GLOS Page 8 Black,Red Saturday, January 21, 1995 7:29 PM NLM See NetWare Loadable Module. NOS See Network Operating System. NVM Nonvolatile Memory. Memory that is not corrupted when power is removed, usually due to battery backup; used to store printer settings while the printer is powered off. NVRAM Nonvolatile Random Access Memory. Offline When the printer is offline, it does not accept data from the computer. Online When the printer is online, it is able to accept data from the computer.
AUG-GLOS Page 9 Black,Red Saturday, January 21, 1995 7:29 PM PCL 5e Hewlett Packard Printer Control Language Level 5e. PCONSOLE A Novell utility that provides, for example, the user with the ability to create and delete queues, or to display a list of jobs currently in the print queue. PDL Page Description Language. The set of rules that describe a fully formatted page, independent of the device used for printing. PCL and PostScript are examples of page description languages.
AUG-GLOS Page 10 Black,Red Saturday, January 21, 1995 7:29 PM Print queue A subdirectory on the server to which print jobs are redirected. Jobs are released from the queue and sent to the printer when the printer is ready to accept jobs. Print server A computer system attached to a local area network that provides shared printing among network clients. The print server draws files from print queues on the file server.
AUG-GLOS Page 11 Black,Red Saturday, January 21, 1995 7:29 PM Radio button A type of feature selection device found in the RUI and SMS Client Software. The radio button is used for selecting one option among a group of mutually exclusive options. RAM Random Access Memory—read and write memory. This is commonly referred to as just “memory.” RAM is available on RAM chips and holds information that is used by the printer.
AUG-GLOS Page 12 Black,Red Saturday, January 21, 1995 7:29 PM the Motorola 68000 CPU) that is connected to the local area network and controls shared peripherals (PCs, printers, etc.). Service Coordinator The NLM portion of SMS that obtains job and status information from direct-connect printers and reports it to users running SMS Client Software. The Service Coordinator also acquires and stores accounting data generated by the printer assigned to it during SETUP.
AUG-GLOS Page 13 Black,Red Saturday, January 21, 1995 7:29 PM return. SMS accounting export data files are stored in SDF format. State Saving A PCL Menu option that enables you to save permanent fonts and macros when jobs switch between PCL and PostScript. String See Data String. Supervisor See NetWare Supervisor. Temporary fonts These are PCL fonts downloaded with a particular print job and cleared from memory when the job is finished. Toner A dry powdered substance used in the printing process.
AUG-GLOS Page 14 Black,Red Saturday, January 21, 1995 7:29 PM Universal paper tray Called “universal” because it adjusts to a variety of paper sizes. User chargeback An SMS accounting term defining the ability to generate user printing costs typically calculated by multiplying the number of pages printed by the cost-per-page value. Valid printer name A printer name that does not begin with the letters “DSP” and that terminates with the characters “_1”. XNIC-E’NET Xerox Network Interface Card-Ethernet.
AUG-IX Page 1 Black,Cyan Friday, February 3, 1995 12:39 AM Index A Adjusting print density 6-12 Auto Continue option System Menu 3-59 Auto Job End option also see Port Timeout option Ethernet Menu 3-53 Parallel Menu 3-43 Serial Menu 3-47 Token Ring Menu 3-56 B Baud Rate option Serial Menu 3-48 Bidirectional option Parallel Menu 3-44 Bitmapped fonts 4-3 C Cable specifications A-7 Config.
AUG-IX Page 2 Black,Cyan Friday, February 3, 1995 12:39 AM D Control Panel keys 3-6 to 3-7 Down 3-7 Enter 3-7 Esc 3-7 Form Feed 3-6 Menu 3-6 Online 3-6 Reset 3-6 Up 3-7 Copies option PCL Menu 3-19 PostScript Menu 3-32 Esc key 3-7 Español option Language 3-14 Ethernet Menu 3-51 to 3-53 Options 3-51 to 3-53 Auto Job End 3-53 Frame Type 3-53 Lang.
AUG-IX Page 3 Black,Cyan Friday, February 3, 1995 12:39 AM H Fuser cleaning cycle Procedure 6-9 to 6-10 Handshake option Serial Menu 3-48 Language Options Deutsch 3-14 English 3-14 Español 3-14 Français 3-14 Français canad.
AUG-IX Page 4 Black,Cyan Friday, February 3, 1995 12:39 AM N Multipurpose (MP) tray 2-11 to 2-12 Default Source option 3-21 Feeding paper 2-18 to 2-19 Location 1-3, 2-8 Manual Size option 3-34 MP Tray Size option 3-23 Tray Switching option 3-33 Paper loading Drilled paper 2-20 Envelopes 2-21 Labels 2-20 Letterhead 2-20 Lower tray 2-14 to 2-17 Standard tray 2-14 to 2-17 N Paper Size option PCL Menu 3-23 Network interface A-14 Network ports Location 1-3 Null modem A-14 O Online indicator 3-5 Online key
AUG-IX Page 5 Black,Cyan Friday, February 3, 1995 12:39 AM R PCL language, see System Language option PCL Menu 3-15 to 3-28 Options 3-18 to 3-28 Copies 3-19 Default Source 3-21 Font Number 3-20 Font Source 3-19 Form Length 3-24 Jam Recovery 3-26 MP Tray Size 3-23 Orientation 3-23 Page Protection 3-26 Paper Size 3-23 Pitch 3-20 Point Size 3-21 Resolution 3-27 Source Mapping 3-22 State Saving 3-28 Symbol Set 3-25 TrueRes 3-27 Pitch option PCL Menu 3-20 Point Size option PCL Menu 3-21 Port Enable option Para
AUG-IX Page 6 Black,Cyan Friday, February 3, 1995 12:39 AM S Reset Menu 3-65 to 3-66 Functions 3-65 to 3-66 Cancel PS Job 3-66 Reset All 3-66 Reset I/f Cards 3-66 Reset Menus 3-66 Reset Printer 3-66 Specifications, cable A-7 Reset Menus function Reset Menu 3-66 State Saving option Effect on memory 3-68 PCL Menu 3-28 PostScript Menu 3-36 Reset Printer function Reset Menu 3-66 Resolution option Effect on memory 3-68 PCL Menu 3-27 PostScript Menu 3-35 RUI 1-4 S Scalable fonts 4-3 Serial interface RS-232
AUG-IX Page 7 Black,Cyan Friday, February 3, 1995 12:39 AM U Token Ring Menu 3-54 to 3-56 Options 3-54 to 3-56 Auto Job End 3-56 Lang.
AUG-IX Page 8 Black Friday, February 3, 1995 12:39 AM IX-8 ❖ 4505/4505ps and 4510/4510ps User’s Guide