Paper type: Wood Free 80g/m2, Paper Thickness=100 µm // Pages in book=36 // Print scale=81% Gap (when printed at 81% scale) = Pages in book × Paper thickness / 2 = 0 mm PRINTER Controller Infotec 4151 4181 4182 PRINTER Controller Type 1018 Operating Instructions Printer Reference 1 Printed in The Netherlands EE GB B405-8850A Operating Instructions Printer Reference 1 (option) For safety, please read this manual carefully before you use this product and keep it handy for future reference.
Paper type: Wood Free 80g/m2, Paper Thickness=100 µm // Pages in book=36 // Print scale=81% Gap (when printed at 81% scale) = Pages in book × Paper thickness / 2 = 0 mm Introduction This manual contains detailed instructions on the operation and maintenance of this machine. To get maximum versatility from this machine all operators should carefully read and follow the instructions in this manual. Please keep this manual in a handy place near the machine.
KirC-P1DXP-GB_F_FM.book Page i Friday, February 8, 2002 2:13 PM Manuals for This Machine Manuals for This Machine The following manuals separately describe the operational procedures for the operation and maintenance of the machine. To enhance safe and efficient operation of the machine, all users should read and follow the instructions contained in the following manuals. ❖ Copy Reference Describes the procedures and functions for using this machine as a copier.
KirC-P1DXP-GB_F_FM.book Page ii Friday, February 8, 2002 2:13 PM ENERGY STAR Program As an ENERGY STAR Partner, we have determined that this machine model meets the ENERGY STAR Guidelines for energy efficiency. The ENERGY STAR Guidelines intend to establish an international energy-saving system for developing and introducing energy-efficient office equipment to deal with environmental issues, such as global warming.
KirC-P1DXP-GB_F_FM.
KirC-P1DXP-GB_F_FM.book Page iv Friday, February 8, 2002 2:13 PM How to Read This Manual Symbols In this manual, the following symbols are used: R WARNING: This symbol indicates a potentially hazardous situation which, if instructions are not followed, could result in death or serious injury. R CAUTION: This symbol indicates a potentially hazardous situation which, if instructions are not followed, may result in minor or moderate injury or damage to property.
KirC-P1DXP-GB_F_FM.book Page v Friday, February 8, 2002 2:13 PM TABLE OF CONTENTS 1. Getting Started Features of This Machine .......................................................................... 1 Printer Drivers for This Machine..................................................................... 2 Software and Utilities Included on the CD-ROM ............................................ 3 Guide to This Machine ...............................................................................
KirC-P1DXP-GB_F_FM.
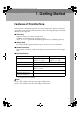
KirC-P1DXP-GB_F_FM.book Page 1 Friday, February 8, 2002 2:13 PM 1. Getting Started Features of This Machine This machine is designed especially for office workgroups, both for shared usage within a network environment, and for one-to-one usage by being connected directly to the computer. ❖ Time Saving Superior features save time on print tasks. Continuous Printing Speed : 15 ppm, 18 ppm. A4 K, 81/2" × 11" K, maximum printing speed from a standard paper tray.
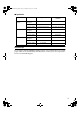
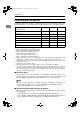
KirC-P1DXP-GB_F_FM.book Page 2 Friday, February 8, 2002 2:13 PM Getting Started Printer Drivers for This Machine Printing requires installation of a printer driver for your operating system. The following drivers are included on the CD-ROM that comes with this machine. 1 Printer Language PCL 6 PCL 5e PS2 Windows 95 *1 √ √ √ *2 √ √ √ √ √ √ √ √ √ √ √ √ √ √ √ *8 Operating system Windows 98 Windows Me *3 Windows 2000 Windows XP *4 *5 Windows NT 4.
KirC-P1DXP-GB_F_FM.book Page 3 Friday, February 8, 2002 2:13 PM Features of This Machine ❖ PostScript Printer Description (PPD) files for a Macintosh PPD files, in combination with the LaserWriter driver, allow the computer to communicate with the printer. The printer specific functions can be used by installing a PPD file. You can use the LaserWriter printer driver that comes with the Macintosh. Use the appropriate printer driver that comes with the Macintosh operating system you are using.
KirC-P1DXP-GB_F_FM.book Page 4 Friday, February 8, 2002 2:13 PM Getting Started ❖ Printer Utility for Mac This utility allows users to download and manage a variety of fonts as well as to manage their printers. For more information about this utility, see the Type 1018 PostScript level2 Compatible Kit Operating Instructions Supplement which is provided as a PDF file on the CD-ROM labeled “Operating Instructions for Printer”.
KirC-P1DXP-GB_F_FM.book Page 5 Friday, February 8, 2002 2:13 PM Guide to This Machine Guide to This Machine Control Panel 1 This panel display is for the installed Printer and Facsimile feature. 1. Printer Mode key 7. 01 keys Press to use printer functions. Press to select an item on the panel display. 2. {Job Reset}} key 8. {OK}} key 9. {User Tools/Counter}} key When the printer is online, press this key to cancel any ongoing print job. 3.
KirC-P1DXP-GB_F_FM.book Page 6 Friday, February 8, 2002 2:13 PM Getting Started Panel Display The panel display shows operational status, error messages, and function menus. 1 Important ❒ Do not apply a strong shock or force of more than about 30N (about 3kgf) to the panel display or it may be damaged. Online and Offline Press {Printer Mode} } on the control panel. ZENS510E “Ready” appears on the panel display.
KirC-P1DXP-GB_F_FM.book Page 7 Friday, February 8, 2002 2:13 PM Guide to This Machine Online When the printer is online, it can receive data from the computer. 1 1 2 ZENS520E 1. {Online/Offline}} key 2. Online indicator Press this key to switch the printer online. “Ready” appears on the panel display. Is on while the printer is online. Offline When the printer is offline, it cannot receive data from the computer. 1 2 ZENS530E 1. {Online/Offline}} key 2.
KirC-P1DXP-GB_F_FM.book Page 8 Friday, February 8, 2002 2:13 PM Getting Started Connecting the Machine Confirm that the shape and the position of the connector are as shown in the illustration. 1 ZENS540E 1. 10BASE-T/100BASE-TX (option) 2. Parallel Port Requirements Requirements Before using this machine, confirm that all the environmental and electrical requirements have been met. Connect the machine to the host computer using the parallel port, optional Network Interface Board Type 1018, or both.
KirC-P1DXP-GB_F_FM.book Page 9 Friday, February 8, 2002 2:13 PM Connecting the Machine Network cable requirements Optional Network Interface Board Type 1018 can be installed to allow direct connection to a network. The optional Network Interface Board supports 10BASE-T or 100BASE-TX connections. You can use the machine in the following network environments: • Using the appropriate network management software and printer driver. • Attaching the machine to a network (computer) set up as a server.
KirC-P1DXP-GB_F_FM.book Page 10 Friday, February 8, 2002 2:13 PM Getting Started Connecting the Network Interface Cable to the Network Connect the machine to the network using optional Network Interface Board Type 1018. Follow these steps to connect the machine. 1 A Confirm that you have the correct cable. B Confirm that the machine is turned off. C Loop the network cable. The loop should be about 15cm (6”) from the end of the cable on the end closest to the printer.
KirC-P1DXP-GB_F_FM.book Page 11 Friday, February 8, 2002 2:13 PM Connecting the Machine Indicators on the optional Network Interface Board 1 ZENS550E 1. Indicator (green) 2. Indicator (orange) Is on when the power of the machine is on and on while the machine is in a network environment. Is blinking while the machine is receiving print jobs over the network environment and off when the print jobs have been sent to the controller.
KirC-P1DXP-GB_F_FM.book Page 12 Friday, February 8, 2002 2:13 PM Getting Started Connecting the Machine to the Host Using the Parallel Interface Cable 1 Connect the machine to the host computer using a parallel interface cable compliant with IEEE 1284 (supplied by you). Follow these steps to connect the machine to the host computer. A Confirm that you have the correct cable. B Confirm that both the machine and the host computer are turned off.
KirC-P1DXP-GB_F_FM.book Page 13 Friday, February 8, 2002 2:13 PM 2. Configuring the Printer for the Network Configuring the Printer for the Network with the Control Panel After installing the optional Network Interface Board, configure it for the network using the printer's control panel. If you use TCP/IP, you should assign the IP Address and Subnet Mask. You can also set the Gateway Address using the printer's control panel.
KirC-P1DXP-GB_F_FM.book Page 14 Friday, February 8, 2002 2:13 PM Configuring the Printer for the Network G Set the IP Address with the 0 or 1key and the number keys. 2 B Press {OK} }. The following screen appears on the panel display for two seconds. The setting of the IP Address is completed. Then return to the previous screen. H Press the 0 or 1key to display Note ❒ To get the IP Address for the printer, contact your network administrator.
KirC-P1DXP-GB_F_FM.book Page 15 Friday, February 8, 2002 2:13 PM 3. Installing the Printer Driver and Software This manual assumes that you are familiar with general Windows procedures and practices. If you are not, see the documentation that comes with Windows for details. Installation Method The following table shows how to install the printer drivers and software.
KirC-P1DXP-GB_F_FM.book Page 16 Friday, February 8, 2002 2:13 PM Installing the Printer Driver and Software Quick Install Auto Run starts the installer automatically when you load the CD-ROM in the CD-ROM drive. By selecting Quick Install, you can install the necessary software easily. TCP/IP requires the following: • This machine must be connected to the network through the network interface cable. • This machine must be turned on. • The TCP/IP protocol must be configured.
KirC-P1DXP-GB_F_FM.book Page 17 Friday, February 8, 2002 2:13 PM Quick Install F Click to select a model name you want to use when the "Select Printer" dialog box appears. Note ❒ For a network connection with TCP/IP, select the printer whose IP address is displayed in [Connect To]. ❒ For parallel connection, select the printer whose printer port is displayed in [Connect To]. G Click [Install]. H Follow the instructions on the screen.
KirC-P1DXP-GB_F_FM.book Page 18 Friday, February 8, 2002 2:13 PM Installing the Printer Driver and Software Installing the PCL 6/5e Printer Driver Installing the PCL 6/5e Printer Driver Two kinds of PCL printer drivers, PCL 6 and PCL 5e, are provided with this printer. We recommend PCL 6 as your first choice. Limitation ❒ If your system is Windows 2000, Windows XP, or Windows NT 4.0, installing a printer driver by Auto Run requires Administrators permission.
KirC-P1DXP-GB_F_FM.book Page 19 Friday, February 8, 2002 2:13 PM Installing the PCL 6/5e Printer Driver Setting up options Important ❒ If the printer is equipped with certain options (e.g. the Paper Feed Unit or the Memory Unit), you should set up the options with the printer driver. Limitation ❒ Under Windows 2000 or Windows XP, changing the printer settings requires Manage Printers permission. Members of the Administrators and Power Users groups have Manage Printers permission by default.
KirC-P1DXP-GB_F_FM.book Page 20 Friday, February 8, 2002 2:13 PM Installing the Printer Driver and Software Installing the PostScript Printer Driver This section describes basic instructions for installing the PostScript printer driver. The actual procedure may differ depending on the operating system. Follow the appropriate procedures below. Important ❒ When updating the printer driver by installing the latest version, you should uninstall that of former version if any.
KirC-P1DXP-GB_F_FM.book Page 21 Friday, February 8, 2002 2:13 PM Installing the PostScript Printer Driver Setting up options Important ❒ If the printer is equipped with certain options (e.g. the Paper Feed Unit or the Memory Unit), you should set up the options with the printer driver. A Click [Start] on the taskbar, point to [Settings], and then click [Printers]. The [Printers] window appears. B Click to select the icon of the printer you want to use. C On the [File] menu, click [Properties].
KirC-P1DXP-GB_F_FM.book Page 22 Friday, February 8, 2002 2:13 PM Installing the Printer Driver and Software E Click [Next]. F Check [Local Printer] and then click [Next]. A dialog box for selecting the printer port appears. Note ❒ Under Windows XP, click [Local printer attached to this computer] , and then confirm that [Automatically detect and install my Plug and Play printer] is unchecked. And then click [Next]. G Select the check box of the port you want to use, and then click [Next].
KirC-P1DXP-GB_F_FM.book Page 23 Friday, February 8, 2002 2:13 PM Installing the PostScript Printer Driver Windows NT 4.0 - Installing the PostScript Printer Driver Installing the printer driver Limitation ❒ Installing a printer driver requires Administrators permission. When you install a printer driver, log on using an account that has Administrators permission. Important ❒ The CD-ROM containing the Windows NT Server operating system version 4.
KirC-P1DXP-GB_F_FM.book Page 24 Friday, February 8, 2002 2:13 PM Installing the Printer Driver and Software Setting up options Limitation ❒ Changing the printer settings requires Manage Printers permission. Members of the Administrators and Power Users groups have Manage Printers permission by default. When you set up options, log on using an account that has Manage Printers permission. Important ❒ If the printer is equipped with certain options (e.g.
KirC-P1DXP-GB_F_FM.book Page 25 Friday, February 8, 2002 2:13 PM Installing the SmartNetMonitor for Client/Admin Installing the SmartNetMonitor for Client/Admin Limitation ❒ If your system is Windows 2000, Windows XP or Windows NT 4.0, installing software by Auto Run requires Administrators permission. When you install a printer driver by Auto Run, log on using an account that has Administrators permission. A Close all applications that are running. B Insert the CD-ROM into the CD-ROM drive.
KirC-P1DXP-GB_F_FM.book Page 26 Friday, February 8, 2002 2:13 PM Installing the Printer Driver and Software Installing the Agfa Monotype Font Manager 2000 Limitation ❒ If your system is Windows 2000, Windows XP or Windows NT 4.0, installing software by Auto Run requires Administrators permission. When you install a printer driver by Auto Run, log on using an account that has Administrators permission. A Close all applications that are running. B Insert the CD-ROM into the CD-ROM drive.
KirC-P1DXP-GB_F_FM.book Page 27 Friday, February 8, 2002 2:13 PM Macintosh Macintosh Macintosh - Installing the PPD File You can use the LaserWriter printer driver that comes with a Macintosh when printing from a Macintosh. However, if you use the LaserWriter printer driver alone, you cannot use the printer specific functions. The printer specific functions can be used by installing the PPD file. Note ❒ The LaserWriter printer driver for a Macintosh does not come with this printer.
KirC-P1DXP-GB_F_FM.book Page 28 Friday, February 8, 2002 2:13 PM Installing the Printer Driver and Software Setting up the PPD file Preparation Confirm that the printer is connected to an AppleTalk network before performing the following procedure. A On the Apple menu, select [Chooser]. B Click the [LaserWriter 8] icon. C In the [Select a PostScript Printer] list, click to select the name of the printer 3 you want to use. D Click [Create].
KirC-P1DXP-GB_F_FM.
KirC-P1DXP-GB_F_FM.book Page 30 Friday, February 8, 2002 2:13 PM W Windows 2000 PostScript, installing, setting up options, 22 Windows 95/98/Me PostScript, installing, setting up options, 21 Windows NT 4.
Paper type: Wood Free 80g/m2, Paper Thickness=100 µm // Pages in book=36 // Print scale=81% Gap (when printed at 81% scale) = Pages in book × Paper thickness / 2 = 0 mm Introduction This manual contains detailed instructions on the operation and maintenance of this machine. To get maximum versatility from this machine all operators should carefully read and follow the instructions in this manual. Please keep this manual in a handy place near the machine.