Version 1.
Xerox Corporation Global Knowledge & Language Services 800 Phillips Road Building 845 Webster, New York 14580 ©Copyright 2007 by Xerox Corporation. All Rights Reserved. Copyright protection claimed includes all forms and matters of copyrighted material and information now allowed by statutory or judicial law or hereinafter granted, including without limitation, material generated from the software programs that are displayed on the screen such as styles, templates, icons, screen displays, looks, etc.
Table of contents 1. Introduction 1-1 About this guide . . . . . . . . . . . . . . . . . . . . . . . . . . . . . . . . . . . . Introducing your new Xerox 4112/4127 . . . . . . . . . . . . . . . . . . System components . . . . . . . . . . . . . . . . . . . . . . . . . . . . . . The User Interface (UI) . . . . . . . . . . . . . . . . . . . . . . . . . . . . Powering on and off . . . . . . . . . . . . . . . . . . . . . . . . . . . . . . . . . Power on. . . . . . . . . . . . . . . . . . . . . . . . . . . . .
Tab l e o f c on te n ts ii Xe r o x 4112 /4 1 27 Co p ie r / P r in t er Q u i c k Star t G ui d e
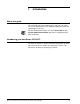
1. Introduction About this guide This guide will help you to quickly begin using your new Xerox 4112 / 4127 Copier/Printer. Get started by reading this guide and completing the exercises. For more detailed information, refer to the User Guide and the System Administration Guide, which were supplied with your Xerox 4112/4127. Introducing your new Xerox 4112/4127 The Xerox 4112/4127 is a black and white copier/printer or copier only. The 4112/4127 110 prints at 110 pages per minute.
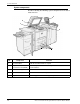
1. I n tr o du c ti o n System components Be able to identify the following system components for the Quick Start exercises. 3 2 1 4 5 No. Component Function 1 Document Glass Holds the document while it is copied. 2 Duplex Automatic Document Feeder (DADF) Automatically feeds 1 and 2-sided original documents to the Document Glass. 3 User Interface (UI) Control Panel and Touch Screen used to enter and view information. 4 Power Switch Switches on/off the machine power.
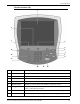
1 . I n tr o du c ti o n The User Interface (UI) 3 2 1 4 15 5 6 7 8 14 9 13 12 No. Component 11 10 Function 1 Services Displays the job features on the touch screen. 2 Control Panel Select features with buttons and the keypad. 3 Touch Screen Select the available programming by touching the screen. 4 Job Status Displays the Job Status feature screens. 5 Machine Status Displays the current status of the machine on the touch screen.
1. I n tr o du c ti o n No. Component Function 9 Stop Temporarily stops the current job. Follow the message to cancel or resume your job. 10 Start Starts the job. 11 Numeric Keypad Enter the number of copies, a password, and other numerical values. 12 Clear Deletes numeric values or the last digit entered. 13 Language Changes text to an alternative language.
2. Using basic features You will now use some of the basic features of your new Xerox 4112/4127. As you perform the exercises in this section, you will learn how to: • Load paper in paper trays 1 and 3 • Copy documents with basic copy features • Check job status • Check machine status • Call for service Print the Quick Reference for Administrators document Before you begin the exercises: 1. Locate the customer documentation CD that came with your Xerox 4112/4127. 2.
2. U s i ng b a s i c fe a tu r e s Exercise 1: Loading paper For this exercise, you will load 8.5 X 11 inch or A4 paper in tray 1 and load 11 X 17 inch or A3 paper in tray 3. Loading paper into Tray 1 1. Slowly pull out the tray towards you until it stops. WARNING: If you pull the tray out using too much force, it can hit and injure your knees. 2. Load 8.5 x 11 inch or A4 paper and align the edge of the paper against the left edge of the tray.
2 . Us i n g b a si c fe a tu r e s Loading Paper into Tray 3 1. Slowly pull out the tray towards you until it stops. WARNING: If you pull the tray out using too much force, it can hit and injure your knees. 2. Load 11 x 17 inch or A3 paper and align the edge of the paper against the left edge of the tray. NOTE: Do not load paper exceeding the maximum fill line.
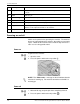
2. U s i ng b a s i c fe a tu r e s 2- 4 3. Squeeze the paper guide levers (2) and adjust the guides to match the size of your paper. 4. Push the tray in gently until it comes to a stop.
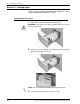
2 . Us i n g b a si c fe a tu r e s Exercise 2: How to copy from the document glass 1. Open the document feeder. 2. Place the document face down on the document glass. 3. Close the document feeder. 4. Press the Services button. 5. Select the Copy tab, which displays the standard features of a copy job. Select a More... button to see additional options for the feature. More...
2. U s i ng b a s i c fe a tu r e s 2- 6 6. Enter the copy quantity. 7. Press Start.
2 . Us i n g b a si c fe a tu r e s Exercise 3: How to copy from the document feeder 1. Place a multiple page document, face up, in the document feeder. 2. Adjust the document guides so they just touch the edges of the paper. 3. The indicator lights to show that the document is loaded correctly. 4. Press the Services button. 5. On the Copy screen, select Paper Tray 1, which is loaded with 8.5 x 11 inch or A4 paper 6. On the same screen, select a 2-Sided Copying option.
2. U s i ng b a s i c fe a tu r e s 7. Select the Copy Output button. 8. Select a Staple option (your choice). 9. Select a Hole Punch option (your choice). 10.Select Save. 11.Enter the copy quantity 2.
2 . Us i n g b a si c fe a tu r e s 12.Press Start. 13.Check the output for the options you selected (2-Sided, stapled, punched). Exercise 4: How to check the status of your job 1. Press Job Status on the Control Panel. 2. Select the Active Jobs tab, which displays jobs that are printing or waiting to print. 3. If there is a job on the Active Jobs tab, touch the job on the touch screen. Notice that a pop-up menu allows you to delete the job, promote it, or display job details. 4.
2. U s i ng b a s i c fe a tu r e s 2- 1 0 5. Open the View menu, which is used to filter the list. 6. Select All Jobs. 7. Locate the copy jobs that you completed and touch one of them to display a report. 8. Select Print This Job Report to print a hard copy. 9. Select Close.
2 . Us i n g b a si c fe a tu r e s Exercise 5: How to check the machine status 1. Press the Machine Status button. 2. Read the following tab descriptions. • The Machine Information tab displays the serial number, current system software version, and IP address. Buttons provide access to other information, including the Machine Configuration, Software Versions, and Paper Tray Status.
2. U s i ng b a s i c fe a tu r e s • • 2- 1 2 The Faults tab provides access to information about faults and machine messages. • Select Current Faults and Instruction to get instructions for clearing a fault. • Select Current Messages to view actions that are needed to keep the copier/printer operating properly. • Select Fault History to see a list of fault codes. The Supplies tab provides status information about the supplies that are used in the copier/printer.
2 . Us i n g b a si c fe a tu r e s • The Billing Information tab displays the serial number of the copier/printer, the names of counters, and current counts. Select Usage Counters to view individual counters. • The Tools tab provides access to setup features. Regular users have limited access to basic features. System Administrators have access to a full set of features.
2. U s i ng b a s i c fe a tu r e s Exercise 6: How to call for service Refer to the User Interface when you have a problem with the copier/printer. A status code and suggested solutions may be displayed on the screen. Follow all steps in the suggested solutions until the problem is corrected. If the problem persists, call for assistance. Before calling Xerox for assistance, gather the following information: 1. A complete description of the problem.
3. Quick Reference for Users Getting Help For information/assistance, check the following: • • User Guide for information on how to use the Xerox 4112/4127. For online assistance go to: www.xerox.com • • • • • Click the Support and Drivers link. In Product Name, type 4112/4127 and click Search. From the list presented, locate your model (4112 or 4127). Click the appropriate link for the desired information: Support, Drivers & Download, or Documentation You may also call for technical assistance.
3. Q ui c k R e fe r en c e f or U s e r s User Interface Components Table 2: User Interface Components Component Function Component Function Control Panel Allows keypad selection of features. Touch Screen Allows selections by touching the screen. Services Press this button to access the services screens, such as Copy, Scan to Mailbox, etc. Numeric Keypad Press these buttons to enter numeric values, such as the number of copies.