Version 3.
© 2010 Xerox Corporation. All rights reserved. Xerox, the sphere of connectivity design, and Xerox 4112/4127 Enterprise Printing Systems, are trademarks of Xerox Corporation in the United States and/or other countries. Microsoft, MS-DOS, Windows, Microsoft Network, and Windows Server are either trademarks or registered trademarks of Microsoft Corporation in the United States and/or other countries. Novell, NetWare, IntranetWare and NDS are registered trademarks of Novell, Inc.
Table of Contents 1 Product overview. . . . . . . . . . . . . . . . . . . . . . . . . . . . . . . . . . . . . . . 1-1 Machine components. . . . . . . . . . . . . . . . . . . . . . . . . . . . . . . . . . . . . . . . . . . . . . . . . . . . . . 1-1 User Interface (UI) . . . . . . . . . . . . . . . . . . . . . . . . . . . . . . . . . . . . . . . . . . . . . . . . . . . . . . . . 1-5 Common UI touch-screen controls . . . . . . . . . . . . . . . . . . . . . . . . . . . . . . . . . . . . . . . . .
Table of Contents Printing a job with tabs . . . . . . . . . . . . . . . . . . . . . . . . . . . . . . . . . . . . . . . . . . . . . . . . 3-7 Network printing on tabs . . . . . . . . . . . . . . . . . . . . . . . . . . . . . . . . . . . . . . . . . . . . . . 3-8 Using the PS print drivers . . . . . . . . . . . . . . . . . . . . . . . . . . . . . . . . . . . . . . . . . . 3-8 Using the PCL print drivers . . . . . . . . . . . . . . . . . . . . . . . . . . . . . . . . . . . . . . . . 3-10 4 Job Status . .
Table of Contents Emptying the Punch Scrap Container . . . . . . . . . . . . . . . . . . . . . . . . . . . . . . . . . 6-14 Cleaning the Machine . . . . . . . . . . . . . . . . . . . . . . . . . . . . . . . . . . . . . . . . . . . . . . . . . . . . 6-15 7 Problem Solving. . . . . . . . . . . . . . . . . . . . . . . . . . . . . . . . . . . . . . . . 7-1 Initial Troubleshooting Procedures . . . . . . . . . . . . . . . . . . . . . . . . . . . . . . . . . . . . . . . . . 7-1 Machine Troubleshooting . . . . .
Table of Contents Curled Output Solutions . . . . . . . . . . . . . . . . . . . . . . . . . . . . . . . . . . . . . . . . . . . . . . . . . . 7-57 De-curl button Mode and function . . . . . . . . . . . . . . . . . . . . . . . . . . . . . . . . 7-58 8 Specifications. . . . . . . . . . . . . . . . . . . . . . . . . . . . . . . . . . . . . . . . . . .8-1 Print Specifications . . . . . . . . . . . . . . . . . . . . . . . . . . . . . . . . . . . . . . . . . . . . . . . . . . . . . . . .
Table of Contents Temperature and humidity. . . . . . . . . . . . . . . . . . . . . . . . . . . . . . . . . . . . . . . 9-21 High Capacity Stacker . . . . . . . . . . . . . . . . . . . . . . . . . . . . . . . . . . . . . . . . . . . . . . . . . . . . 9-22 Identifying the Components . . . . . . . . . . . . . . . . . . . . . . . . . . . . . . . . . . . . . . . . . . 9-23 Control Panel . . . . . . . . . . . . . . . . . . . . . . . . . . . . . . . . . . . . . . . . . . . . . . . . . . . . . . . .
Table of Contents vi Xerox 4112/4127 EPS User Guide
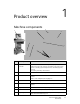
1 Product overview Machine components 2 1 3 4 5 8 7 No. 6 Component Function 1 FreeFlow Print Server Controller The FreeFlow Print Server software provides a graphical user interface (GUI) to the printer for setting up and printing jobs, setting up the printer, controlling system-level preferences, and managing fonts, security, accounting, and many other activities. 2 Power Switch Switches on/off the machine power.
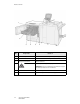
Product overview 1 6 5 No. 4 3 2 Component Function 1 Toner Cartridge Provides toner for transferring the image to the paper. 2 Waste Toner Container cover Open this cover when removing the waste toner bottle. 3 Waste Toner Container Collects used toner. 4 Fuser Fuses the printed image on the paper. WARNING: The Fuser is extremely hot and will cause injury if jam clearing instructions are not followed. 5 Lever Use in order to pull out the transfer module.
Product overview Finisher 1 2 3 4 5 14 13 12 6 11 10 9 8 7 No. Component Function 1 Post-process Inserter (Cover/Transparency separator tray) / Tray 8 Load paper for preprinted tabs, covers or transparency separators. (This tray is also known as the Interposer) 2 Decurl button When you press this button, it activates a decurling feature for the output material.
Product overview No. Component Function 10 Punch Scrap Container Collects the scraps from the puncher. Open to remove the scraps. 11 Tri-Fold Output Tray (optional) Receives copies when you select Tri-Fold In or Tri-Fold out. 12 Tri-Fold Output Tray button Press this button to open tri-Fold output tray. 13 Left Cover Open this cover to access the machine and to clear paper jams.
Product overview User Interface (UI) The User Interface (UI) consists of the Control Panel and Touch Screen.The following describes the names and functions of components on the control panel / Touch Screen. 2 1 3 15 4 5 6 7 14 13 8 12 11 No. Component 10 9 Function 1 Control panel Allows keypad selection of features. 2 Touch Screen Allows selections to be made simply by touching the screen. 3 Job Status Use to view the various Job Status feature screens.
Product overview No. Component Function 6 Clear All Clears all programming and returns the machine to its default settings. 7 Interrupt Interrupts the printing process to promote another job a higher priority. The Interrupt indicator lamp lights. Press the Interrupt button after the job is completed to resume the previous operation. 8 9 Press this button to stop the current print job or communications. Stop Press this button to start the print process.
Product overview Common UI touch-screen controls A majority of the Touch Screens use various controls, buttons, text boxes, etc. that are common with other screens The following information describes the names and functions of the various common components on the touch panel screens. Screen Component / Control Function Use this button to decrease a specific value by one increment or to display the next screen in a series of screens, such as a listing.
Product overview Optional accessories Optional feeding accessories Description Where to find information 2-drawer High Capacity Feeder (HCF/ Trays 6 and 7) The two-tray HCF provides an extra 4,000 sheet capacity of either 8.5 x 11 in. or A4 paper. Each drawer holds 2,000 sheets (16 lb Bond to 80 lb Cover/52 gsm to 216 gsm). Information on the HCF (Trays 6 and 7) can be found throughout this user guide. Refer to the table of contents and the Index for specific page locations.
Product overview Optional finishing accessories Finishing accessory Standard Finisher (with or without optional C/Z Folder) Description Where to find information The Standard Finisher (with or without the optional C/Z Folder) allows you to staple or hole-punch your output. The Top Tray holds of 500 sheets (20lb/80gsm), while the Stacker Tray holds 3,000 sheets (20 lb/80 gsm). Information on the Standard Finisher (and otpional C/Z Folder) can be found throughout this user guide.
Product overview Finishing accessory SquareFold Trimmer Module Note: The SquareFold Trimmer Module requires a finishing device that has a booklet maker. GBC AdvancedPunch Interface Module 1-10 Xerox 4112/4127 EPS User Guide Description Where to find information The optional SquareFold Trimmer Module is used in conjunction the Booklet Maker Finisher.
Product overview Power on/off WARNING Never touch a labeled area indicating High Temperature. Coming in contact with these areas can lead to burns. After turning the power on, the machine takes approximately 5 minutes to warm up before you can start making copies. KeyPoint It is recommended to turn the machine off at the end of the day or when it is not in use for a long period of time. Also, to reduce the power consumption, use the Power Saving feature when the machine is not in use for a while.
Product overview About the circuit breaker Off Position Normally On In the event of a current leakage, the circuit breaker automatically turns off the machine power to prevent any damage or fire. If the breaker is in the Off ( ) position, contact your Customer Support Center, as some abnormal conditions may exist. Power Saver Mode The Power Saver feature has two modes; Low Power Mode and Sleep Mode.
2 Paper and other Media Overview KeyPoint The User Interface (UI) screens shown in this guide may or may not reflect the screens displayed on your system. The UI screens vary from system to system and from marketplace to marketplace. Therefore, the UI screens in this guide are a representation of the type of screens that may be seen on your particular system. Note Use Xerox recommended paper to avoid: paper jams, reduced print quality, malfunctions and other printer problems.
Paper and other Media Additional information • For a description of how to make copies on non-standard size paper, information about setting Paper Type, Paper Type Priority, Paper Tray Priority, paper quality, and setting the paper substitute feature refer to. “Paper Tray Settings” in the System Administration Guide. • The machine automatically detects the size and orientation of loaded paper in trays. The paper type, however, must be set.
Paper and other Media 2. Load and align the edge of the paper against the left edge of the tray. Note Do not load paper exceeding the maximum fill line. 3. Push the tray in gently until it comes to a stop. Note If you need to change the paper size for Trays 1 and 2, contact the Xerox Customer Support Center. Loading Paper into Trays 3 and 4 1. Slowly pull out the tray towards you until it stops. WARNING If you pull the tray out using too much force, it can hit and injure your knees.
Paper and other Media 2. Load and align the edge of the paper against the left edge of the tray. Note Do not load paper exceeding the maximum fill line. 3. Squeeze the paper guide levers (2) and adjust the guides to match the size of your paper. 4. Push the tray in gently until it comes to a stop.
Paper and other Media Loading Paper into Tray 5 (Bypass) When using Tray 5 (Bypass): • You must manually enter the paper size • If you use a non-standard paper size often, you can preset the paper size in the device. The preset size then displays under Standard Sizes in the Tray 5 (Bypass) screen. For information about setup, refer to “Tray 5 (Bypass) - Paper Size Defaults” in the System Administration Guide.
Paper and other Media 3. Lightly insert the paper along the paper guide until it comes to a stop. 4. Select printing. Loading Paper into Trays 6 and 7 (optional High Capacity Feeder) 1. Slowly pull out the tray towards you until it stops. WARNING If you pull the tray out using too much force, it can hit and injure your knees.
Paper and other Media 2. Fan, load and align the edge of the paper against the right edge of the tray. To change the paper size follow steps 3, 4, and 5. If you are not changing the paper size, go to step 6. 3. First remove any paper loaded in the tray. 4. Loosen the screws (2) to remove the guides.
Paper and other Media 5. Reattach the guides to fit the new paper size and tighten the screws (2). 6. Push the tray in gently until it comes to a stop. Loading Paper into Tray 6 (optional 1-drawer Oversized High Capacity Feeder) Note If your machine is equipped with the optional 2-drawer Oversized High Capacity Feeder (OHCF), refer to the section entitled Optional 2-drawer Oversized High Capacity Feeder (Trays 6 and 7) on page 9-1 for specific information.
Paper and other Media 2. Fan and load the paper, then squeeze and slide both paper guides so they just touch the paper stack. drilled edge tabbed Note When loading drilled stock, place the paper with its drilled side to the right. When loading tab stock, place the tabs to the left. 3. Move the Paper Weight Switches to match the weight of the paper stock in the tray. Note For paper heavier than 256 gsm, slide the Paper Weight Switches to the heavier weight position (257 - 300 gsm).
Paper and other Media 4. Push the tray in gently until it comes to a stop. Note When the loaded tray is closed, the tray position is automatically adjusted in the front/back direction based on the paper size. Loading paper into Tray 8 (Post-Process Inserter) The Post-Process Inserter is designed for loading paper that will be used as separators and covers. You cannot make copies using the Post-Process Inserter media. Note Remove any paper that remains loaded into the Inserter. 1.
Paper and other Media Loading Tab Paper into Trays The following describes the procedures used for loading tab paper into Trays 3 and 4 (below), Tray 5 (Bypass) on page 2-12, and Tray 8 (Post-Process Inserter) on page 2-13. KeyPoint Do not load paper exceeding the maximum fill line. Doing so may cause paper jams and other printer problems. Loading Tab Paper into Trays 3 and 4 1. Slowly pull out the tray towards you until it stops.
Paper and other Media Loading Tab Paper into Tray 5 (Bypass) 1. Gently extend Tray 5 (Bypass) as necessary to accommodate the paper. 2. Hold the center of the paper guides and slide them to the desired paper size.
Paper and other Media 3. Place the tab paper: • • • With the side to be printed facing up. The bottom side to be fed first. Lightly along the paper guide until it comes to a stop Tab edge Note To print a tab stock job, see; Network printing on tabs on page 3-8 Loading Tab Paper into Tray 8 (Post-Process Inserter) 1. Hold the center of the paper guides and slide them to the desired paper size. 2.
Paper and other Media Change/Confirm the Tray Settings If you change paper types, the tray settings must be modified to reflect the paper type that is loaded in the tray. The following describes how to change or confirm the attributes of the paper loaded in the trays. Change/confirm the tray settings from the All Services screen Note User Interface (UI) screens vary from system to system and from marketplace to marketplace.
Paper and other Media 3. Select the: desired paper tray, and then select the Change Settings button Note For this example, we selected Tray 3 because Trays 1 and 2 do not allow custom paper size entries. 4. Select the Change Settings button.
Paper and other Media 5. 2-16 Select paper options and: • Auto Size Detect: If you select Auto Size Detect, select the Save button to save and close the window. • a. Custom Size: The width and height of the paper by selecting the arrow buttons b.
Paper and other Media 6. Review the paper settings and press Confirm. 7. Select Close on the next screen. 8. Press Start to print your job. Change/confirm the DEFAULT tray settings (System Administration) 1. Press the Log In/Out button on the Controller.
Paper and other Media 2. Enter the System Administrator Login ID (password) with the numeric keypad, and select Enter. Note The default User ID value is 11111. When using the Authentication feature, a password is required. The default password is x-admin. See the System Administrator Guide for additional information. 3. 2-18 Select the following: a. Tools tab b. System Settings button c. Common Service Settings button d.
Paper and other Media 4. Select Paper Tray Attributes. 5. Select the desired paper tray and select Change Settings Note For this example, we selected Tray 3 because Trays 1 and 2 do not allow custom paper size entries.
Paper and other Media 6. Select the Change Settings button. 7. Select paper options and: • 2-20 Auto Size Detect: If you select Auto Size Detect, select the Save button to save and close the window.
Paper and other Media • a. Custom Size: Select the following: The width and height of the paper by selecting the arrow buttons. b. Select Save. Note If the optional OHCF (Tray 6) is attached, an additional Paper Type option called Coated Stock is available. 8. Once you have selected and reviewed your paper options, press the Confirm button. 9. Select Close on the next two screens to return to the Tools tab.
Paper and other Media Loading Tab Paper when the optional GBC AdvancedPunch is connected When the optional GBC AdvancedPunch is attached to your machine, tab paper is loaded differently into the paper trays. For information on how to load paper into the paper trays (when a GBC AdvancedPunch is attached), refer to the GBC AdvancedPunch customer documentation.
3 Computer operations Note The screens shown in this chapter may or may not reflect your print driver screens. The screens may vary depending on your drivers configuration and marketplace. The screens shown here are a representation only. Network Printing Print procedures vary depending on the application software you are using. For more information, refer to the documentation provided with each application.
Computer operations 7. Select the appropriate Paper Tray, Paper Size, and Paper Type. 8. Select the Advanced tab and select any Advanced Features. 9. Select OK to save and close the Properties window. 10. Select the desired copies/quantity and OK to print the job. Note For additional information, review your print driver documentation. Printing with the PCL print drivers 1. Load the paper in the tray. See the Paper and other Media chapter in the User Guide. 2.
Computer operations 5. Ensure that Auto-Rotate and Center and Choose Paper Source by PDF page size are unchecked. Note These options may not be available with your version of Adobe Acrobat or Adobe Reader. 6. Select Properties and select the Paper/Output tab.
Computer operations 7. Click the Paper Select button. 8. If Tray 3 or Tray 4 is being used, then select Paper Settings for Auto Tray and choose the appropriate paper type. 9. Select OK twice to return to the Properties screen. 10. Select the Advanced tab and select any Advanced Features. 11. Select OK to save and close the Properties window. 12. Select the desired copies/quantity and OK to print the job. Note For additional information, review your print driver documentation.
Computer operations CentreWare Internet Services CentreWare Internet Services requires a TCP/IP environment, and enables you to view the status of the machine and its jobs, as well as submit jobs for printing. Print a job from CentreWare Internet Services Note Only print ready files (*.ps, *.pcl, *.jpeg, *.tiff, *.pdf, etc.) may be submitted to the device from the CentreWare Internet Services web page. 1. Start your computer and open the browser. 2.
Computer operations 3. From the CentreWare Internet Services screen, select the Print tab. 4. Select a file to print by clicking the Browse button and navigating to the desired file. 5. Select your desired print options. 6. Select the Submit Job button to print the job.
Computer operations Printing on Tabs Printing a job with tabs 1. Load the tab stock in Tray 5 (Bypass). See, Loading Tab Paper into Tray 5 (Bypass) on page 2-12. 2. The Tray 5 (Bypass) screen opens automatically. Use the controller to confirm or change the paper size. a. Select Confirm if the paper size and type displayed are correct. b. Select Change Settings to select the correct paper settings.
Computer operations 3. Select the tab stock: • • Paper Type Paper Size: Select Standard Size (8.5 x11 in./A4). 4. Select Save/Confirm/Close until you return to the Tools tab. 5. Select Start to begin printing. 6. Proceed to the next section entitled Network printing on tabs on page 3-8. Network printing on tabs Using the PS print drivers 1. Load the tab stock in Tray 3, Tray 4, or Tray 5 (Bypass). Refer to Loading Tab Paper in Trays in the Paper and Other Media chapter. 2.
Computer operations 7. Select the appropriate Paper Tray, Paper Size, and Paper Type (Select Tab Stock if using the Tray 5 manual tray, otherwise select Printer Default Type). 8. Select the Advanced tab and select Advanced Features. 9. Select Shift tab from the Tab Margin Shift feature.
Computer operations 10. Set the desired shift margin. 11. Select OK to save and close the Tab Margin Shift window. 12. Select OK to save and close the Properties window. 13. Select the desired copies/quantity and OK to print the job. Note For additional information, review your print driver documentation. Using the PCL print drivers 1. Load the tab stock in Tray 3, Tray 4, or Tray 5 (Bypass). Refer to Loading Tab Paper in Trays in the Paper and Other Media chapter. 2.
Computer operations 6. Select Properties and select the Paper/Output tab. 7. Click the Paper Select button. 8. If Tray 3 or Tray 4 is being used for the tab stock, then select Paper Settings for Auto Tray and choose Tab Stock for the paper type. 9. If Tray 5 (Bypass) is being used for the tab stock, then select Tray 5 (Bypass) Settings and choose Tab Stock for the paper type. 10. Select OK twice to return to the Properties screen.
Computer operations 11. Select the Advanced tab and select the Tab Margin Shift item. 12. From the Tab Margin Shift pull-down menu, select the Shift Tab option.
Computer operations 13. Set the desired Tab margin Shift. 14. Select OK to save and close the Tab Margin Shift window. 15. Select OK to save and close the Properties window. 16. Select the desired copies/quantity and OK to print the job. Note For additional information, review your print driver documentation.
Computer operations 3-14 Xerox 4112/4127 EPS User Guide
4 Job Status KeyPoint The User Interface (UI) screens shown in this guide may or may not reflect the screens displayed on your system. The UI screens vary from system to system and from marketplace to marketplace. Therefore, the UI screens in this guide are a representation of the type of screens that may be seen on your particular system. Job Status overview The Job Status feature lets you check active, pending, and completed jobs. You can also cancel printing or print pending-print jobs.
Job Status Active Jobs tab You can check active jobs, cancel jobs, or view job details. 1. Press the Job Status button on the control panel. 2. Select the Active Jobs tab. 3. Select the applicable job to view from the displayed list. Use the up or down button on the scroll bar to navigate the list. 4. If required, select Display Time to display the time required to process the job.
Job Status Note For more information about the time settings, refer to "Estimated Time for Single or All Jobs" in the System Administration Guide or contact your System Administrator for help. 5. Select the job from the list. 6. From the pop-up menu, select: • • • Delete - Cancels the current or pending job. Details - Shows the details of the selected document. Close Menu - Closes the pop-up menu. Completed Jobs tab You can check whether a job has completed successfully.
Job Status 3. To check the details of a job, select the job from the displayed lis. Use the scroll bar to navigate the list. 4. After checking the job details, select Close. Printing Waiting Print Jobs You can print all the pending print jobs. Note If there are no pending print jobs, then you cannot select Print Waiting Jobs. 1. Press the Job Status button. 2. Select Print Waiting Jobs.
5 Machine Status KeyPoint The User Interface (UI) screens shown in this guide may or may not reflect the screens displayed on your system. The UI screens vary from system to system and from marketplace to marketplace. Therefore, the UI screens in this guide are a representation of the type of screens that may be seen on your particular system. Overview The Machine Status button is used to access machine status information and features.
Machine Status The Machine Information tab The Machine Information tab provides general information about the printer and has buttons that allow you to access other machine information features. Serial Number The Machine Serial Number is displayed in the General Information area on the Machine Information tab. You will need this number when calling Xerox for technical information or assistance.
Machine Status Note Select to display the previous screen and to display the next screen. Software Version... Select the Software Version button to check the software versions for machine components.
Machine Status Paper Tray Status.... Select the Paper Tray Status button to view the current status information for each paper tray. Print Reports... The Print Reports button must be enabled by a System Administrator before reports can be printed. Some features on the Print Reports screen are only available in System Administrator mode. Select the various buttons to identify the desired report criteria, then press Start to print the report.
Machine Status Refer to the following table for information about the various reports. Report Category Job Status Report Name Description Job History Report Lists data for the last 200 jobs recorded on the machine. Jobs can be filtered by job type. Error History Report Lists the most recent errors that occurred in the machine. Configuration Report Lists common settings, such as the hardware configuration, network information, and current feature settings.
Machine Status Overwrite Hard Disk Note This is an optional feature that may not be available on your copier/printer; it is part of the optional Data Security Kit. It overwrites information on the hard disk to ensure the highest level of security. This option must be enabled by the System Administrator. The Overwrite Hard Disk feature prevents the document image and registered data recorded on the hard disk from being illegally retrieved. 1.
Machine Status 3. When Standby appears next to the button on the Machine Information tab, the overwriting operation has finished. Refer to the Overwrite Hard Disk section in the System Administration Guide for more information. Print Mode... This feature allows you to change the default printer mode and emulation parameter settings. Note Some of the following Print Mode features may not be available on your system. When On-line is selected on the Print Mode window, the printer can accept data.
Machine Status PCL Emulation Select the PCL Emulation button to set parameter values for printing jobs with PCL emulation. 1. Select PCL Emulation on the Print Mode screen. 2. Enter the 3 digit item number for the parameter that you want to change. The item numbers are shown in the following table. 3. Select Change Value. 4. Enter the required value. 5. Select Save.
Machine Status Parameter Item Default Font 207 Value 0: CG Times 1: CG Times Italic 2: CG Times Bold 3: CG Times Bold Italic 4: Univers Medium 5: Univers Medium Italic 6: Univers Bold 7: Univers Bold Italic 8: Univers Medium Condensed 9: Univers Medium Condensed Italic 10:Univers Bold condensed 11: Univers Bold Condensed Italic 12: Antique Olive 13: Antique Olive Italic 14: Antique Olive Bold 15: CG Omega 16: CG Omega Italic 17: CG Omega Bold 18: CG Omega Bold Italic 19: Garamond Antiqua 20: Garamond K
Machine Status Parameter Item Symbol Set 208 Roman 8 (Default) 1: ISO 8859-1 Latin 1 2: ISO 8859-2 Latin 2 3: ISO 8859-9 Latin 5 4: ISO 8859-10 Latin 6 5: PC-8 6: PC-8 DN 7: PC-775 8: PC-850 9: PC-852 10: PC-1004 (QS/2) 11: PC Turkish 12: Windows 3.1 Latin 1 13: Windows 3.1 Latin 2 14: Windows 3.1 Latin 5 15: DeskTop 16: PS Text 17: MC Text Font Size 209 400-5000 (Default: 1200): Specify the point size of a font in increments of 25. The value of 100 represents 1 point.
Machine Status HP-GL/2 Emulation Select HP-GL/2 Emulation on the Print Mode screen to set parameter values for HP-GL/2 emulation. You can store and retrieve up to 20 emulation settings. HP-GL/2 - Retrieve Programming On the Retrieve Programming screen, select Factory Defaults to use the default settings, or select Custom Settings to use user-programmed emulation mode settings.
Machine Status HP-GL/2 - Programming The Programming option allows you to set emulation parameter values. 1. Select Programming on the Emulation window. 2. Using the numeric keypad, enter the three digit Item Number for the feature to be set. The item numbers and their values are shown in the following table. 3. Select Change Value. 4. Enter a New Value, using the numeric keypad. 5. Select Save. 6. Select Close to leave this screen.
Machine Status Parameter Paper Size Item 102 Value 99: Auto 101: A Size (Default) 3: A3 4: A4 5: A5 14: B4 15: B5 Set the paper size. When Auto is selected, the document size is determined by the Scale Mode (Item 160). Paper Tray 103 0: Auto (Default) 1: Tray 1 2: Tray 2 3: Tray 3 4: Tray 4 5: Tray 5 (Bypass) 6: Tray 6 (HCF) 7: Tray 7 (HCF) Coordinate Rotation 104 0: 0 degrees 1: 90 degrees Set the paper orientation.
Machine Status Parameter Alpha-numeric Characters Item 112 Value 0: Stroke 1: Roman 2: Sans-serif Set the output style for 1-byte characters. Vertical Image Shift 113 0: None (Default) 1-250: -1 to -250 mm 251-500: +1 to +250 mm Set the vertical image shift. Horizontal Image Shift 114 0: None (Default) 1-250: -1 to -250 mm 251-500:” +1 to +250 Set the horizontal image shift. Print Quantity Setup 115 0: Protocol (Default) 1: Panel 2: Command Set the method for specifying the print quantity.
Machine Status Parameter Eject Command PG Item 156 Value 0: Off (Default) 1: On Set whether the command is processed as an eject command. Eject Command AF 157 0: Off (Default) 1: On Set whether the command is processed as an eject command. Eject Command AH 158 0: Off (Default) 1: On Set whether the command is processed as an eject command. Scale 159 0: Off 1: On (Default) Set whether scaling is performed to enlarge or reduce the document size to fit the paper size.
Machine Status Parameter Image Enhance Item 163 Value 0: Off 1: On (Default) Set whether to artificially enhance the resolution and smooth edges. Staple 164 0: None (Default) 1: Top left 2: Top double 3: Top right 4: Left double 5: Right double 6: Bottom left 7: Bottom double 8: Bottom right 9: Center Set the stapling position. Manual Feed Tray Check Indicator 165 0: None 1: Yes (Default) Set the manual feed tray indicator. Pen Width (No. 0-15) 800815 0-255: 0 to 25.
Machine Status HP-GL/2 - Store/Delete Programming You can save up to 5 print modes for the HP-GL/2 emulation. To store the current selections: 1. Select Store/Delete Programming. 2. Select Store Current Selections. 3. Select the memory number in which you want to store the current selections. 4. Select Close. KeyPoint If you select a number in which information is already stored, the information is overwritten and cannot be restored. To delete current programming: 1.
Machine Status HP-GL/2 - Default Programming The default settings for your printer can be either the factory default settings or you can specify custom default settings. 1. Select Default Programming. 2. Select Factory Defaults to use the factory default settings or select Custom Settings. 3. If you select Custom Settings, select a memory number to specify which saved settings should be used. 4. Select Save.
Machine Status Programming 1. Select PDF on the Print Mode screen. 2. Select Programming. 3. Enter the 3-digit item number in the Item Number field. Refer to the following table for parameters, item numbers, and values. 4. Select Change Value. 5. Enter the required value in the New Value field. 6. Select Save. Parameter Print Sets Item 401 Value 1-999 (Default: 1) Specify the number of print sets.
Machine Status The Faults tab The Faults tab provides access to fault information and messages. Current Faults Select the Current Faults button to view a list of machine faults that are currently affecting the printer. 1. Select Current Faults on the Faults screen. 2. Select a fault message from the list. 3. Select Instructions. 4. Follow the instructions to fix the error.
Machine Status Current Messages Select the Current Messages button on the Faults tab to view a list of machine messages. These messages indicate actions that need to be taken to continue or resume the proper operation of the printer. For example, messages in the following graphic indicate that the drum cartridge needs to be replaced. Fault History Select the Fault History button on the Faults tab to display a list of fault codes. This information is used to diagnose and solve machine problems.
Machine Status The Supplies tab The Supplies tab provides status information about the supplies (consumables) that are used in the printer. The remaining toner is displayed on a gauge and as the percent full from 100% to 0%. The status of other consumables is shown as OK, Replace Soon, or Replace Now. Refer to Chapter 6, Maintenance, for information about replacing consumables.
Machine Status The Billing Information tab Note The screens shown in this document may or may not reflect your machine’s User Interface (UI). The screens may vary depending on your machine’s configuration and marketplace. The screens shown here are a representation only. Accessing Billing Information 1. On the machine’s User Interface (UI), press the Machine Status button. Machine Status button 2.
Machine Status 3. Select the Billing Information tab. Billing Information 1 2 The Billing Information feature displays the total number of prints made by the machine and also allows you to view specific billing meter information. The main Billing Information screen displays: 1. The Machine Serial Number 2. Total Impressions: this is the total number of prints made on the machine.
Machine Status Usage Counters Select the Usage Counters button to view individual counters and their current count status. From the drop-down list you can select the desired counter to view; select from: • Impression Counters: This view provides total impression amount information. “Impression” is the image on one side of one sheet of media. This counter shows the total impression amount for printed impressions and large impressions.
Machine Status The Tools tab If enabled by the System Administrator, you can access Paper Tray Attributes on the Tools tab.
6 Maintenance KeyPoint The User Interface (UI) screens shown in this guide may or may not reflect the screens displayed on your system. The UI screens vary from system to system and from marketplace to marketplace. Therefore, the UI screens in this guide are a representation of the type of screens that may be seen on your particular system. Replacing Consumables Consumables are any parts or supplies that need replacing periodically in order for the printer system to perform all of its functions properly.
Maintenance Checking the status of consumables Check the status of consumables using the Supplies tab. • The status of consumables is indicated by "Ready," "Order New," "Replace Now," or other indications. • An indication from 0 to 100% displays the remaining amount of toner. Note For information about confirming the status of consumables, refer to The Supplies tab on page 5-22. Handling Consumables • Before using consumables, carefully read the instructions and precautions on the packaging.
Maintenance Replacing Toner Cartridges Toner Cartridge Replacement Guidelines Be aware of the following warnings and guidelines when handling and replacing Toner cartridges: WARNING Never throw a Toner cartridge into an open flame since the toner remaining in the cartridge can cause an explosion. CAUTION Do not use warm water or cleaning solvents to remove Toner (Dry Ink) from your skin or clothing. This will set the Toner and make it difficult to remove.
Maintenance Toner Cartridge Replacement Procedure A message displays on the Touch Screen when it is time to replace the Toner cartridge. If you continue copying or printing without replacing the Toner cartridge, the machine stops after copying or printing approximately 5,000 sheets. 1. Open the left cover of the machine. 2. Rotate the toner cartridge to the left until it aligns with the unlock indicator. 3. Pull out the toner cartridge slowly and then lift to remove it.
Maintenance 4. Remove the new cartridge from the box. Before removing it from the bag, gently shake the toner cartridge a couple times to the left and right to mix any dry ink that may have settled. 5. Hold the toner cartridge with the arrow (Ç) mark facing up. 6. Push the cartridge slowly into the machine, then rotate the cartridge to the right until it aligns with the lock indicator. 7. Close the left cover of the machine. Note The number of pages stated in the messages dialog refers to using 8.
Maintenance Replacing the Waste Toner Container Waste Toner Container Replacement Guidelines Be aware of the following warnings and guidelines when handling and replacing Waste Toner Containers: WARNING Never throw a Toner cartridge into an open flame since the toner remaining in the cartridge can cause an explosion. CAUTION Do not use warm water or cleaning solvents to remove Toner (Dry Ink) from your skin or clothing. This will set the Toner and make it difficult to remove.
Maintenance Waste Toner Container Removal Procedure A message displays on the Touch Screen when the Waste Toner Container is full. If you continue copying or printing without replacing the Waste Toner Container, the machine stops after copying or printing approximately 18,000 sheets. 1. Make sure that the machine has stopped copying / printing, then open the Front Cover on the machine. 2. Open the Waste Toner Container cover and push the lever down. 3.
Maintenance 5. Hold the used container firmly with both hands and put it into the plastic bag, which is provided with the new container. Close the bag and dispose of the container according to your local regulations. WARNING Never throw a toner cartridge into an open flame since the toner remaining in the cartridge can cause an explosion. 6. Remove the new container from its packaging. 7. Do not grip the container handle.
Maintenance Replacing the Staple Cartridge A message displays on the Touch Screen when it is time to replace a staple cartridge. Basic Finisher Staple Cartridge Replacement 1. Make sure that the machine has stopped copying and printing, then open the Right Cover on the Basic Finisher. 2. Grasp the Staple Cartridge handle located at R1 and lift it slightly and pull out the staple cartridge. 3.
Maintenance 4. Push a new staple case into the staple cartridge. 5. Push the removed cartridge back to the original position until it clicks into place. 6. Close the Right Cover on the Basic Finisher. Note A message will display and the machine will not operate if the right cover is open even slightly.
Maintenance Replacing the Staple Waste Container on the Basic Finisher The machine displays a message indicating that the Staple Waste Container is full. To replace the container: 1. Make sure that the machine has stopped copying and printing, then open the Right Cover on the finisher. 2. Locate the Staple Waste Container (R5) in the finisher. 3. Grip the container and move the lever to the right; the Unlock position. 4. Remove the container from the finisher. 5.
Maintenance 6. Insert the new container into the finisher. 7. Move the lever to the left; the lock position. 8. Close the Right Cover of the finisher. Replacing the Booklet-Maker Staple Cartridge The Control Panel displays a message indicating that the Booklet-Maker staple cartridge needs to be replaced. Use the following procedure to replace the cartridge on this optional finisher. 1. Make sure that the machine has stopped copying and printing, then open the Right Cover on the finisher. 2.
Maintenance 3. Hold the tabs of the Booklet-Maker staple cartridge and then lift to remove it. 4. While holding the tabs of a new Booklet-Maker staple cartridge, return the cartridge to the original position and gently push it until it clicks. 5. Return the unit to its original position. 6. Close the Right Cover of the finisher. Note A message will display and the machine will not operate if the right cover is open even slightly.
Maintenance Emptying the Punch Scrap Container The Touch Screen displays a message indicating when it is time to empty the Punch Scrap Container. The punch counter resets to 0 each time you open the Punch Scrap Container, so empty the container each time it is opened. KeyPoint Remove the Punch Scrap Container while the system is powered ON. If you switch off the power when emptying the Punch Scrap Container, the machine cannot detect that the scraps have been removed and reset the punch count. 1.
Maintenance 4. ReInsert the empty Punch Scrap Container. 5. Close the Right Cover of the finisher. Note A message will display and the machine will not operate if the right cover is open even slightly. Cleaning the Machine WARNING Before you start to clean the machine, be sure to switch off the power and unplug the machine. Cleaning the machine without switching off the power may cause an electric shock.
Maintenance 6-16 Xerox 4112/4127 EPS User Guide
7 Problem Solving Tip The User Interface (UI) screens shown in this guide may or may not reflect the screens displayed on your system. The UI screens vary from system to system and from marketplace to marketplace. Therefore, the UI screens in this guide are a representation of the type of screens that may be seen on your particular system. Initial Troubleshooting Procedures To use the following machine troubleshooting procedures: 1. Begin by reading the first Symptom at the left side of the page. 2.
Problem Solving Symptoms Display is dark. Causes and Actions YES If NO, go to next symptom. Cause Is power of the correct voltage being supplied? Action Make sure that the power supply is 200 -240 V (volts), 15 A (amperes). Make sure that power of capacity compatible with the specified maximum power consumption of the machine (2.8 - 3.1 KVA) is being supplied. Cause Is the Power Saver button on? Action The machine is in the Power Saver mode.
Problem Solving Machine Troubleshooting Check the machine status for machine troubleshooting. WARNING Precision components and high-voltage power supplies are used on the machine. Never open or remove machine covers that are screwed shut unless specifically instructed in the User Guide. A high-voltage component can cause electric shocks. When opening the panels and covers that are screwed shut to install or detach optional accessories, be sure to follow instructions in the User Guide.
Problem Solving Symptoms Online indicator does not light even though you instructed it to print. Check Remedy Is the interface cable disconnected? Turn the power switch off, unplug the power cord from the power outlet, and check the interface cable connection. For information about network settings, refer to the System Administration Guide. Is the environment correctly set on the personal computer? Check the print driver and other environment settings on the personal computer.
Problem Solving Symptoms Paper is often jammed or wrinkled. Paper is often jammed or wrinkled. (continued) Check Remedy Is paper loaded properly in the paper tray? Load paper correctly. Refer to Loading Paper into Trays on page 2-1. Is the paper tray set properly? To ensure tray closure, Firmly push it in as far as possible. Refer to Loading Paper into Trays on page 2-1. Is the paper damp? Replace with paper from a new ream. Refer to Loading Paper into Trays on page 2-1.
Problem Solving Image Quality Problems When output image quality is poor, review the following table for solutions. If image quality is not improved after performing the relevant remedy, contact the Customer Support Center. Symptoms Check Remedy The print shifts slightly. Is the paper shifting or is the leading edge of the paper not loaded flush with the tray corners? Load the paper so it is flush against the paper tray corners. Refer to Loading Paper into Trays on page 2-1.
Problem Solving Symptoms Check Remedy Black lines are printed. The drum cartridge is depleted or damaged. Contact the Customer Support Center. Dirt appears at equal intervals. Dirt on the paper feed path. Print a few pages. The drum cartridge is depleted or damaged. Contact the Customer Support Center. White dots appear in black filled areas. The paper in use is unsuitable. Load suitable paper. Refer to Loading Paper into Trays on page 2-1. The drum cartridge is depleted or damaged.
Problem Solving Symptoms The entire paper area is printed black. Nothing is printed. White areas or stripes appear. The entire page is printed faint. 7-8 Check The drum cartridge is depleted or damaged. Contact the Customer Support Center. High-voltage power supply malfunction. Contact the Customer Support Center. Two or more sheets of paper are being fed simultaneously (double-feed). Fan the paper and reset. Refer to Loading Paper into Trays on page 2-1. High-voltage power supply malfunction.
Problem Solving Symptoms Paper becomes wrinkled. Text is blurred. Check The paper in use is unsuitable. Paper is being added while it is being fed. Remedy Replace with paper from a new ream. Refer to Loading Paper into Trays on page 2-1. Is the paper damp? Outline characters on a colored background longwise. The drum cartridge is depleted or damaged. Contact the Customer Support Center. Text or images are printed at an angle. The paper guide in the paper tray is not set at the correct position.
Problem Solving Print Troubleshooting This section describes solutions for problems encountered during printing. • Unable to Print • The Printed result is not what was expected on page 7-11 Unable to Print Symptoms Data remains in the printer icon If NO, go to next symptom. Causes and Actions YES Cause The printer is not powered on. Action Turn the power on. If problem is not solved, go to next Cause/Action. Cause The network cable is disconnected from the computer.
Problem Solving Symptoms Causes and Actions Cause The port is not enabled. Action Enabled the port in use. For information about network settings, refer to the System Administration Guide. If problem is not solved, go to next Cause/Action. Cause Insufficient space available on the hard disk. Action Delete unnecessary data to increase free space. If problem is not solved, go to next Cause/Action. YES Sent to printer Cause The printer is connected to multiple computers.
Problem Solving Symptoms Printing performed with a different paper size Causes and Actions YES If NO, go to next symptom. The image is cut off on the edge of the paper YES If NO, go to next symptom. The printed font differs from the font specified on the computer YES If NO, go to next symptom. Cause Paper size provided is different from the specified tray size. Action Change the paper size set in the tray, or change print options to specify a tray that contains the appropriate size.
Problem Solving Error Codes If an error caused the printing to end abnormally or a malfunction occurred in the printer, then an error message code (***-***) is displayed. Refer to the following table for error codes and information on how to rectify the problem. If an error code not described in the following tables is displayed, or the problem persists even after you have tried the following solutions, contact the Customer Support Center.
Problem Solving Category Error Code Cause and Remedy Print/Other 012-248 012-250 012-251 012-252 012-253 012-254 012-255 012-260 012-264 012-265 012-282 012-283 012-284 012-285 012-291 O 012-400 O Cause: Staple Waste Container Near Full. Remedy: Follow the procedures to remove and replace the staple waste container in the finisher. 012-949 O Cause: Finisher Punch Scrap Container is not attached. Remedy: Check that the punch scrape container is installed in the finisher and inserted correctly.
Problem Solving Category Error Code Cause and Remedy Print/Other 016-721 P, O Cause: An error occurred during print processing. Probable cause is: Printing was instructed by Automatic Tray Selection when Paper Type Priority is set to Automatic Tray switching Off for all paper in the Common Settings. Remedy: When printing by Automatic Tray Selection, set one of the paper types to a setting other than Automatic Tray switching Off in Paper Type Priority.
Problem Solving Category Error Code Cause and Remedy Print/Other 016-762 P Cause: A print language not installed on the machine was specified. Remedy: In Specify Print Mode under Port Settings, specify a print language. 016-774 O Cause: Compression conversion is not possible due to insufficient hard disk space. Remedy: Remove unnecessary data from the hard disk to increase free disk space. 016-775 O Cause: Image conversion is not possible due to insufficient hard disk space.
Problem Solving Category Error Code Cause and Remedy Print/Other 024-974 O Cause: Designated paper size and the size of paper in the tray differs when feeding paper from the inserter. Remedy: Reset the paper or cancel the job. 024-976 O Cause: Finisher staple status is NG. Remedy: Check staples and reset correctly. 024-977 O Cause: Finisher staple feeding is not ready. Remedy: Check staples and reset correctly. 024-978 O Cause: Booklet Finisher staple operation is not ready.
Problem Solving Category Error Code Cause and Remedy Print/Other 071-210 O Cause: Paper Tray 1 malfunctioned. Remedy: Contact the Customer Support Center. Trays other than Paper Tray 1 can be used. 072-210 O Cause: Paper Tray 2 malfunctioned. Remedy: Contact the Customer Support Center. Trays other than Paper Tray 2 can be used. 073-210 O Cause: Paper Tray 3 malfunctioned. Remedy: Contact the Customer Support Center. Trays other than Paper Tray 3 can be used.
Problem Solving Category Error Code Cause and Remedy Print/Other 078-260 078-261 078-262 078-263 078-264 078-265 078-266 078-267 078-268 078-269 078-270 078-271 078-272 078-273 078-274 078-275 078-276 078-277 078-278 078-279 078-280 O Cause: Paper Tray 6 malfunctioned. Remedy: Check the paper loaded in Tray 6. Power off and then power on the machine. If the tray errors are not fixed by performing the relevant remedy, contact the Customer Support Center.
Problem Solving Category Error Code Cause and Remedy Print/Other 116-714 P Cause: An HP-GL/2 command error occurred. Remedy: Check the print data. 116-720 P Cause: An error occurred during printing as there was insufficient memory. Remedy: Stop unnecessary ports and remove unnecessary data from the hard disk to increase free disk space. 116-740 P Cause: Numerical value operation error occurred as a value exceeding the value limit of the printer was used in the print data.
Problem Solving Category Error Code Cause and Remedy Print/Other 127-212 P, O Cause: Detected an internal print check error by the FreeFlow Print Services Controller. Remedy: Remove and reinsert the command/video cable between the FreeFlow Print Services Controller and the printer. Power off and on both the printer and the FreeFlow Print Services Controller. If the problem persists, call the Customer Support Center.
Problem Solving Paper Jams Review the following list to address paper jams: • When paper jams inside the machine, the machine stops and an alarm sounds. • Follow the instructions displayed on the controller to remove the jammed paper. • Gently remove the paper taking care not to tear it. If paper is torn, be sure to remove all torn pieces. • If a piece of jammed paper remains inside the machine, the paper jam message will remain on the display.
Problem Solving 2. Remove the jammed paper and any torn pieces. 3. Push the tray in gently until it comes to a stop. Paper Jams in Transport Unit 4 Tip Always ensure that all paper jams, including any small ripped pieces of paper, are cleared before proceeding with your copy/print jobs. 1. Make sure that the machine has stopped printing before opening the front cover. 2. Pull out Tray 1. 3. Pull out Transport Unit 4. Tray 2 will come out as you pull out Transport Unit 4.
Problem Solving 4. Lift up lever 4a and then remove the jammed paper. Note If paper is torn, check inside the machine and remove it. 5. Return lever 4a to the original position. 6. Push Tray 2 in gently until it comes to a stop. Transport Unit 4 will be inserted simultaneously. 7. Push Tray 1 in gently until it comes to a stop. 8. Close the front cover completely. The machine will not operate if the front cover is open even slightly.
Problem Solving 3. Move the release lever 3a to remove the jammed paper. Note If paper is torn, check inside the machine and remove it. 4. Move lever 3b to the right and then remove the jammed paper. Note If paper is torn, check inside the machine and remove it. 5. Push the duplex module in gently until it comes to a stop. 6. Return all levers to their starting positions. 7. Close the front cover completely. The machine will not operate if the front cover is open even slightly.
Problem Solving Paper Jams in Tray 5 (Bypass) Tip Always ensure that all paper jams, including any small ripped pieces of paper, are cleared before proceeding with your copy/print jobs. 1. When optional high capacity feeder tray is not installed, open the top cover of paper Tray 5 (Bypass). 2. Remove the jammed paper and all paper loaded in paper Tray 5 (Bypass). Note If paper is torn, check inside the machine and remove it. 3.
Problem Solving Paper Jams in optional Trays 6 and 7 (High Capacity Feeder Tray) Tip Always ensure that all paper jams, including any small ripped pieces of paper, are cleared before proceeding with your copy/print jobs. 1. Pull out the tray where the paper jam occurred. Note To avoid tearing paper, review where the paper jam occurred before pulling out a tray. Torn paper remaining inside the machine can cause machine malfunction. 2. Remove the jammed paper.
Problem Solving Paper jams in optional Tray 6 (1-drawer Oversized High Capacity Feeder) Note If your machine is equipped with the optional 2-drawer Oversized High Capacity Feeder (OHCF), refer to the section entitled Optional 2-drawer Oversized High Capacity Feeder (Trays 6 and 7) on page 9-1 for specific information. The optional 2-drawer OHCF may not be available in your market area.
Problem Solving Paper Jams in Tray 8 (Post-Process Inserter) Tip Always ensure that all paper jams, including any small ripped pieces of paper, are cleared before proceeding with your copy/print jobs. 1. Press the Cover button. 2. Open cover 1e and then remove the jammed paper and all paper loaded in the Post-Process Inserter. Note If paper is torn, check inside the machine and remove it. 3. Fan the paper you removed, making sure that all four corners are neatly aligned, and then load them again. 4.
Problem Solving Paper Jams in Lower Left Cover Tip Always ensure that all paper jams, including any small ripped pieces of paper, are cleared before proceeding with your copy/print jobs. Note This procedure shows how to clear a jam without the HCF (Trays 6 and 7) being present. If you have an HCF, open the Front Cover to optional Trays 6 and 7 to access this area. 1. Open the lower left cover while gripping the release lever. 2. Remove the jammed paper.
Problem Solving Paper Jams inside body Tip Always ensure that all paper jams, including any small ripped pieces of paper, are cleared before proceeding with your copy/print jobs. 1. Make sure that the machine has stopped printing before opening the front cover. 2. Turn the green lever at the center of the transfer module to the right until it is in the horizontal position and then pull the transfer module out to the end. 3. Lift up lever 2b to remove jammed paper.
Problem Solving e. Lift up lever 2c and remove the jammed paper. WARNING Never touch the six Fuser Stripper Fingers which are visible when you lift up the lever 2c. Fuser Stripper Fingers are HOT can lead to burns if touched. WARNING Never touch a labeled area (found on the fuser unit or nearby) indicating “High Temperature” and “Caution.” Contact can lead to burns. 5. Lift up the lever 2c as necessary, shift the lever 2d, and then remove the jammed paper. 6.
Problem Solving 7. Shift lever 3b on the right of the fuser unit as necessary and then remove the jammed paper. Tip If the jammed paper remains inside and it is difficult to remove, pull out the duplex module after returning the transfer module to the original position. Then try again. 8. Insert the transfer module completely and turn the green lever 2 to the left. Note If the lever cannot be turned, pull the transfer module to the middle and insert it again. 9. Close the front cover completely.
Problem Solving Paper Jams Inside Finisher Left Cover Paper jams at lever 1a and knob 1c Tip Always ensure that all paper jams, including any small ripped pieces of paper, are cleared before proceeding with your copy/print jobs. 1. Make sure that the machine has stopped and then open the left cover on the finisher. 2. Move lever 1a downwards and turn knob 1c left. Remove the jammed paper. Note If paper is torn, check inside the machine and remove it. 3. Return lever 1a to the original position. 4.
Problem Solving Paper jams at lever 1d Tip Always ensure that all paper jams, including any small ripped pieces of paper, are cleared before proceeding with your copy/print jobs. 1. Make sure that the machine has stopped printing and then open the left cover on the finisher. 2. Move lever 1d upwards and remove the jammed paper. Note If paper is torn, check inside the machine and remove it. 3. Return lever 1d to the original position. 4. Close the Finisher left cover completely.
Problem Solving Paper jams at lever 1b Tip Always ensure that all paper jams, including any small ripped pieces of paper, are cleared before proceeding with your copy/print jobs. 1. Make sure that the machine has stopped printing and then open the left cover on the light finisher. 2. Move lever 1b to the right and remove the jammed paper. Note If paper is torn, check inside the machine and remove it. 3. Return lever 1b to the original position. 4. Close the Finisher left cover completely.
Problem Solving Paper Jams Inside Finisher Right Cover Paper jams at lever 3b and 3d Tip Always ensure that all paper jams, including any small ripped pieces of paper, are cleared before proceeding with your copy/print jobs. 1. Make sure that the machine has stopped printing and then open the Right Cover on the light finisher. 2. Move levers 3b and 3d to the left, and remove the jammed paper. Note If paper is torn, check inside the machine and remove it. 3.
Problem Solving Paper jams at lever 3e and knob 3c Tip Always ensure that all paper jams, including any small ripped pieces of paper, are cleared before proceeding with your copy/print jobs. 1. Make sure that the machine has stopped printing and then open the right cover on the light finisher. 2. Move lever 3e, turn knob 3c to the right, and remove the jammed paper. Note If paper is torn, check inside the machine and remove it. 3. Return lever 3e to the original position. 4.
Problem Solving Paper jams at lever 3g and knob 3f Tip Always ensure that all paper jams, including any small ripped pieces of paper, are cleared before proceeding with your copy/print jobs. 1. Make sure that the machine has stopped printing and then open the right cover on the light finisher. 2. Move lever 3g upward and to the left, turn knob 3f to the left, and remove the jammed paper. Note If paper is torn, check inside the machine and remove it. 3. Return lever 3g to the original position. 4.
Problem Solving Paper jams at lever 4b and knob 3a Tip Always ensure that all paper jams, including any small ripped pieces of paper, are cleared before proceeding with your copy/print jobs. 1. Make sure that the machine has stopped printing and then open the right cover on the light finisher. 2. Move lever 4b to the left, turn knob 3a to the right, and remove the jammed paper. Note If paper is torn, check inside the machine and remove it. 3. Return lever 4b to the original position. 4.
Problem Solving Paper Jams at Z Folding Unit Paper jams at lever 2a and knob 3a Tip Always ensure that all paper jams, including any small ripped pieces of paper, are cleared before proceeding with your copy/print jobs. 1. Make sure that the machine has stopped printing and then open the right cover on the light finisher. 2. Move lever 2a up and turn knob 3a to the left. Remove the jammed paper. Note If paper is torn, check inside the machine and remove it. 3. Return lever 2a to the original position.
Problem Solving Paper jams at lever 2b and knob 2c Tip Always ensure that all paper jams, including any small ripped pieces of paper, are cleared before proceeding with your copy/print jobs. 1. Make sure that the machine has stopped printing and then open the right cover on the light finisher. 2. Move lever 2b, turn knob 2c to the right, and remove the jammed paper. Note If paper is torn, check inside the machine and remove it. 3. Return lever 2b to the original position. 4.
Problem Solving Paper jams at knob 2c, levers 2e/2f and tri-fold output tray 2d Tip Always ensure that all paper jams, including any small ripped pieces of paper, are cleared before proceeding with your copy/print jobs. 1. Make sure that the machine has stopped printing and then open the right cover on the light finisher. 2. Pull out the tri-fold output tray 2d, swing lever 2e to the right, and remove the jammed paper. Note If paper is torn, check inside the machine and remove it. 3.
Problem Solving 4. Swing back the opened lever (2f or 2e), and push back the tri-fold output tray 2d. 5. Close the Finisher right cover completely. The machine will not operate if the cover is open even slightly. Paper jams at tri-fold output tray 2d and lever 2g Tip Always ensure that all paper jams, including any small ripped pieces of paper, are cleared before proceeding with your copy/print jobs. 1.
Problem Solving 3. Return lever 2g to the original position and push back the tri-fold output tray 2d. 4. Close the Finisher right cover completely. The machine will not operate if the cover is open even slightly. Paper jams at unit 4 and knob 4a Tip Always ensure that all paper jams, including any small ripped pieces of paper, are cleared before proceeding with your copy/print jobs. 1. Make sure that the machine has stopped printing and then open the right cover on the light finisher. 2.
Problem Solving 3. Turn knob 4a to the left to remove all the jammed paper from the left side of the unit 4. Note If paper is torn, check inside the machine and remove it. 4. If the paper cannot be removed, pull up on the green lever on the right top cover unit 4 and remove all the jammed paper. 5. Return unit 4 to the original position. 6. Close the finisher right cover completely. The machine will not operate if the cover is open even slightly.
Problem Solving Paper Jams at Output Area of Finisher Paper jams at output tray Tip Always ensure that all paper jams, including any small ripped pieces of paper, are cleared before proceeding with your copy/print jobs. 1. Remove jammed paper from the output tray. Note If paper is torn, check inside the machine and remove it. 2. Open and then close the right cover of the finisher completely. The machine will not operate if the cover is open even slightly.
Problem Solving Paper jams at booklet output tray Tip Always ensure that all paper jams, including any small ripped pieces of paper, are cleared before proceeding with your copy/print jobs. 1. Make sure that the machine has stopped printing and then open the right cover on the light finisher. 2. Turn knob 4a to the right to remove the jammed paper at the booklet output tray. Note If paper is torn, check inside the machine and remove it. 3. 7-48 Close the Finisher right cover completely.
Problem Solving Paper Jams at the optional High Capacity Feeder Unit Paper jams in Lower Left Cover Tip Always ensure that all paper jams, including any small ripped pieces of paper, are cleared before proceeding with your copy/print jobs. 1. Open the front cover of the optional high capacity feeder unit. 2. Open the lower left cover while gripping the release lever. 3. Remove the jammed paper. Note If paper is torn, check inside the machine and remove it. 4. Close the lower left cover. 5.
Problem Solving Paper jams at lever 1a and knob 1c Tip Always ensure that all paper jams, including any small ripped pieces of paper, are cleared before proceeding with your copy/print jobs. 1. Open the front cover of the high capacity feeder unit. 2. Move lever 1a to the right and turn knob 1c to the right. Remove the jammed paper. Note If paper is torn, check inside the machine and remove it. 3. Return lever 1a to the original position. 4.
Problem Solving Paper jams at lever 1b Tip Always ensure that all paper jams, including any small ripped pieces of paper, are cleared before proceeding with your copy/print jobs. 1. Open the front cover of the high capacity feeder unit. 2. Move lever 1b to the right and turn knob 1c to the right. Remove the jammed paper. Note If paper is torn, check inside the machine and remove it. 3. Return lever 1b to the original position. 4. Close the front cover of the high capacity feeder unit completely.
Problem Solving Paper jams at lever 1d Tip Always ensure that all paper jams, including any small ripped pieces of paper, are cleared before proceeding with your copy/print jobs. 1. Open the front cover of the high capacity feeder unit. 2. Move lever 1d upwards and remove the jammed paper. Note If paper is torn, check inside the machine and remove it. 3. Return lever 1d to the original position. 4. Close the front cover of the high capacity feeder unit completely.
Problem Solving Stapler Faults Perform the procedures on the following pages when copies are not stapled correctly or when staples are bent. Contact the Customer Support Center if the problem persists. If stapling occurs in the manner shown in the below illustrations, contact the Customer Support Center. Tip Use the staple cartridge cover only when removing bent staples.
Problem Solving Staple jams in the staple cartridge Basic Finisher staple cartridge staple jams 1. Make sure that the machine has stopped printing and then open the front cover on the light finisher. 2. Hold the R1 at the position shown in the diagram and pull straight out of the machine. 3. Pull out the staple cartridge and check the inside of the finisher for any remaining staples. 4. Open the staple cartridge cover and remove the jammed staple.
Problem Solving 6. Push the cartridge back to the original position. 7. Close the Finisher right cover completely. The machine will not operate if the cover is open even slightly. Note If the staples cannot be removed after carrying out the above procedures, contact the Customer Support Center. Booklet staple cartridge staple jams 1. Make sure that the machine has stopped printing and then open the front cover on the light finisher. 2. Pressing the lever to the right, pull out the staple cartridge.
Problem Solving 3. Hold the tabs of the booklet staple cartridge and then lift to remove it. 4. Remove the jammed staples as shown in the illustration. WARNING Be careful when removing jammed staples to avoid cutting and hurting your fingers. 5. Holding the tabs of the booklet staple cartridge, return the cartridge to the original position and gently push it until it clicks into place. 6. Return the unit to its original position. 7. Close the Finisher right cover completely.
Problem Solving Curled Output Solutions You can correct output paper curl by pressing the De-curl button. The De-curl button functions while the machine is running or idled and powered on. 1. Check how the output copy is curled. 2. Check the De-curl lights. 3. Press the De-curl button to the desired setting.
Problem Solving De-curl button Mode and function De-curl button Functions Indicator Mode Auto The curling correction is automatically performed according to the paper size or output orientation. We recommend that the De-curl feature be used in Auto mode. The Auto mode is entered in the following cases: After turning on the machine power After canceling Power Saver mode 7-58 Upward Curling ON Press to correct for upward curling. Down-ward Curling ON Press to correct for downward curling.
8 Specifications Tip The User Interface (UI) screens shown in this guide may or may not reflect the screens displayed on your system. The UI screens vary from system to system and from marketplace to marketplace. Therefore, the UI screens in this guide are a representation of the type of screens that may be seen on your particular system. Print Specifications Type Built-in type Resolution Output resolution: 1200 × 1200 dpi (47.2 × 47.2 dots/mm) Data processing resolution: 1200 × 1200 dpi (47.2 × 47.
Specifications Type Built-in type Paper Size • Max: A3/11 x 17 in., 12.6 × 19.2 in. (330 × 488 mm) • Min: A5/5.75 x 8.25 inch (Postcard for Tray 5 (Bypass)) • Image loss: Lead edge/trail edge: 0.157 in./4 mm or less Front/back 0.157 in./4 mm or less. Paper Trays 1 - 2 • 8.5 x 11 in./A4 Paper Trays 3 - 4 • A5, A4, A4 , A3, B5, B4 • 8.5 × 11 in., 8.5 × 11 in., 8.5 × 13 in., 8.5 × 14 in., 11 × 17 in., 12.6 × 19.2 in., 13 × 18 in. • 8K,16K , tab paper (8.5 x 11 in.
Specifications Type Built-in type Continuous Print Speed 4112 • Continuous 1-sided print/100% reduction/ enlargement • 7 x 10 in./B5 :116 sheets/min • 8.5 x 11 in./A4 : 110 sheets/min Note The speed may be reduced in order to adjust image quality. Note The performance may be reduced depending on the paper type. SEF: • 8.5 x 11 in./A4:78 sheets/min • 7 x 10in./B5:78 sheets/min • 10 x 14 in./B4:69 sheets/min • 11 x 17 in.
Specifications Type Built-in type Paper Feed Method/ Capacity Standard: • Tray 1: 1,200 sheets • Tray 2: 1,800 sheets • Trays 3 and 4: 600 sheets each • Tray 5 / Bypass: 280 sheets • Trays 6 and 7 (optional High Capacity Feeder): 2,300 sheets each. • Maximum paper capacity: 9080 pages (including Trays 6 and 7 (optional High Capacity Feeder) Note The maximum paper capacity (9080) is based on 20 lb.
Specifications Type Built-in type Weight 4112: 591 lbs. (268 kg) 4127: 585 lbs. (266 kg) Note Weight excludes new toner cartridge, papers and options. Minimum Space Requirements (Width and Depth) With Basic Finisher • 90.3” / 2,294 mm (W) × 30.8” / 781 mm (D) - extending Tray 5 (Bypass) completely With Booklet-Maker Finisher • 90.5” / 2,299 mm (W) × 30.
Specifications Tray 6 (1-drawer Oversized High Capacity Feeder) - optional Note If your machine is equipped with the optional 2-drawer Oversized High Capacity Feeder (OHCF), refer to the section entitled Optional 2-drawer Oversized High Capacity Feeder (Trays 6 and 7) on page 9-1 for specific information. The optional 2-drawer OHCF may not be available in your market area. Item Specification Sheet size SEF: • 8.5 x 11 in./A4 • 8.5 x 13 in. • 8.5x14 in. • 10 x 14 in./B4 • 11 x 17 in./A3 • 12 x 18 in.
Specifications Standard Finisher specifications Item Specification Tray Type • • • Supported Paper Size Top Tray: • Maximum: A3, 12.6 x 19.2î (330 x 488 mm) • Minimum: A6 (postcards) Output Tray: Collated/Uncollated Finisher Tray: Collated/Uncollated (Offset available) Booklet Tray: Collated/Uncollated Finisher Tray: • Maximum: 12.6 × 19.2 in. in. (330 x 488 mm) • Minimum: B5 Supported Paper Weight Top Tray and Finisher Tray: 52 - 253 gsm Capacity 500 sheets Note When using Xerox 20 lb.
Specifications Item Specification Hole Punching Supported paper size: • • Maximum: A3, 11 x 17 in. Minimum: B5 (2 holes), A4 (4 holes) Number of holes: 2, 4, 3 (optional) Paper type: 52 - 200 gsm Folding See Booklet-Maker Finisher specifications Interposer (Tray 8) Paper size: • Maximum: A3, 11 × 17 in., • Minimum: B5 Note The machine does not print on paper loaded in the interposer. Capacity: 200 sheets Note When using Xerox 20 lb./75 gsm paper Paper type: 60 - 220 gsm Size/Weight Size: 41.
Specifications Booklet-Maker Finisher specifications Item Specification Tray Type • • • Supported Paper Size Top Tray: • Maximum: A3, 12.6 x 19.2î (330 x 488 mm) • Minimum: A6 (postcards) Output Tray: Collated/Uncollated Finisher Tray: Collated/Uncollated (Offset available) Booklet Tray: Collated/Uncollated Finisher Tray: • Maximum: 12.6 × 19.2 in. (330 x 488 mm) • Minimum: B5 Booklet Tray: • Maximum: A3, 13 × 18 in. • Minimum: A4, 8.5 × 11 in.
Specifications Item Specification Stapling (variable length) Maximum stapled sheets: 100 sheets Note When using paper of size larger than A4 or 8.5 Þ 11 in., the maximum number of sheets that can be stapled is 65. Note Staple nails may bend when using certain paper types. Paper size : • Maximum: A3, 11 x 17 in.
Specifications Item Specification Interposer (Tray 8) Paper size: • Maximum: A3, 11 × 17 in., • Minimum: B5 Note The machine does not print on paper loaded in the interposer. Capacity: 200 sheets Note When using Xerox 20 lb./75 gsm paper Paper type: 60 - 220 gsm Size/Weight Size: 41.3 in. / 1,050 mm (W) x 28.5 in. / 725 mm (D) x 45.9 in. / 1,165 mm (H), (With Staple Cartridge and Staple Cartridge for Booklet are Installed) Weight: 286 lbs / 130 kg Space Requirements 90.5 in. / 2,299 mm (W) x 44.
Specifications Folding unit (Z and C) specifications Item Specification Z-Fold Half Sheet Z paper size 11 x 17 in./A3, 10 x 14 in./B4, 8K Capacity Max: 80 sheets (Basic Finisher) (A3/11 × 17, in. Xerox 20 lb./75 gsm paper Z folding) 20 sheets for 8K and10 x 14 in./B4 Paper type 16-24 lb./60 to 90 gsm Output tray Finisher tray C Fold Paper size A4/8.5 × 11 in. Z Fold Number of sheets to be folded 1 sheet Capacity 40 sheets Note When using Xerox 20 lb./75 gsm paper. Paper type 16-24 lb.
Specifications Printable Area Standard Printing Area The standard area that can be printed leaves a margin of 0.16 inches (0.161 in./4.1 mm) on all four edges of the paper (for SRA3, 12.6 in./320 mm wide, a margin of 0.45 in./11.5 mm left and right). Note The actual printing area may vary depending on the printer (plotter) control language. Extended Printing Area If you choose to extend the printing area in a print, the maximum area for the print is 12.01 × 18.90 inches (305 × 480mm).
Specifications Available Options Product name Description Printer Upgrade Kit Allows a DC (copier only) machine to be updated to a ST (Network Print) enabled system Mobility Plates These plates allow the system to be installed on uneven floor or heavy carpet. Data Security Kit This kit increases the security of data written to the hard disk. Note To purchase and to receive the latest product information, contact the Customer Support Center.
Specifications Network Confidentiality Network confidentiality cannot be guaranteed. Character Code The following shows the character codes that can be printed by the machine. Character codes other than those shown below may not be printed.
Specifications 8-16 Xerox 4112/4127 EPS User Guide
9 Addendum Optional 2-drawer Oversized High Capacity Feeder (Trays 6 and 7) Tip This accessory may not be available in your market area. Overview The optional 2-drawer Oversized High Capacity Feeder (OHCF) provides feeds in a variety of stock sizes, including standard sizes and oversized stock up to 13 x 19.2 in./330.2 x 488 mm paper. Each drawer holds 2000 sheets. Note The OHCF comes equipped from manufacturing with the Post Card Kit.
Addendum Loading media in the OHCF Loading paper in the OHCF Use the following procedure to load paper into either tray of the OHCF. 1. Select the appropriate paper stock for your job. 2. Pull out the tray slowly until it stops. 3. Open the ream of paper with the seam side facing up. 4. Fan the sheets before loading them into the tray. 5. Load paper into the tray. 6.
Addendum Loading tabs in the OHCF Note If the optional GBC AdvancedPunch is attached to your machine, refer to the GBC AdvancedPunch customer documentation for instructions on loading tab stock in the trays. Use the following procedure to load tab stock into either tray of the OHCF. 1. Select the appropriate tab stock for your job. 2. Pull out the tray slowly until it stops. 3. Fan the tab paper before loading them into the tray. 4.
Addendum 8. 9. If enabled by your System Administrator, the Paper Tray settings screen may be displayed on the UI. a. If the tray settings screen displays the correct paper type, weight, and size, select the Confirm button. b. If the tray settings need modification, select the Change Settings button; the tray properties screen is displayed. From the tray properties screen, select the desired option (Paper Size, Paper Type/Paper Weight, etc.). 10.
Addendum Loading transparencies in the OHCF Use the following procedure to load transparencies into either tray of the OHCF. 1. Select the appropriate transparency stock for your job. 2. Pull out the tray slowly until it stops. 3. Fan the transparencies to stop them from sticking together before loading them into the tray. 4.
Addendum 8. 9. If enabled by your System Administrator, the Paper Tray settings screen may be displayed on the UI. a. If the tray settings screen displays the correct paper type, weight, and size, select the Confirm button. b. If the tray settings need modification, select the Change Settings button; the tray properties screen is displayed. From the tray properties screen, select the desired option (Paper Size, Paper Type/Paper Weight, etc.). 10.
Addendum Loading pre-drilled stock in the OHCF for 1-sided or 2-sided jobs Use the following procedure to load paper into either tray of the OHCF. 1. Select the appropriate paper stock for your job. 2. Pull out the tray slowly until it stops. 3. Open the ream of paper with the seam side facing up. 4. Fan the sheets before loading them into the tray. 5. Load and register the pre-drilled paper against the right side of the tray paper as depicted below for either LEF or SEF direction: 6.
Addendum 10. From the tray properties screen, select the desired option (Paper Size, Paper Type/Paper Weight, etc.). 11. Make the appropriate changes to that option (such as Paper Size). 12. Select the Save button to continue. 13. Select the Save button again to continue. 14. Select the Confirm button to save the information and close the Paper Tray settings screen. Skew adjustment levers The skew adjustment levers are found in all paper trays.
Addendum 4. 5. If enabled by your System Administrator, the Paper Tray settings screen may be displayed on the UI. a. If the tray settings screen displays the correct paper type, weight, and size, select the Confirm button. b. If the tray settings need modification, select the Change Settings button; the tray properties screen is displayed. From the tray properties screen, select the desired option (Paper Size, Paper Type/Paper Weight, etc.). 6.
Addendum 21. Run your print job. • • The paper is fed accurately without skew and the printed output is satisfactory; you are finished. The paper is skewed and the printed output is unsatisfactory; proceed to the next step. 22. Pull out the tray slowly until it stops. 23. Return the Right-side Skew Adjustment Lever toward the rear of the paper tray; this is its default position. 24. Gently push in the tray until it comes to a stop. 25.
Addendum 2. Remove the jammed paper. Note If paper is torn, check inside the machine and remove it. 3. Gently push in the tray until it comes to a stop. OHCF paper jams at lever 1a and knob 1c 1. Open the front cover of the OHCF. 2. Move the lever 1a to the rightward and turn the knob 1c to the right. Remove the jammed paper. Note If paper is torn, check inside the machine and remove it.
Addendum 3. Return the lever 1a to the original position. 4. Close the front cover of the OHCF. Note If the front cover of the OHCF is not completely closed, a message will appear and the machine will not operate. OHCF paper jams at lever 1b and knob 1c 1. Open the front cover of the OHCF. 2. Move the lever 1b to the rightward and turn the knob 1c to the right. Remove the jammed paper. Note If paper is torn, check inside the machine and remove it.
Addendum 3. Return the lever 1b to the original position. 4. Close the front cover of the OHCF. Note If the front cover of the OHCF is not completely closed, a message will appear and the machine will not operate. OHCF paper jams at lever 1d and knob 1c 1. Open the front cover of the OHCF. 2. Move the lever 1d upwards and remove the jammed paper. Note If paper is torn, check inside the machine and remove it.
Addendum 3. If the paper cannot be removed, turn the knob 1c clockwise, and then remove the jammed paper. Note If paper is torn, check inside the machine and remove it. 4. Return the lever 1d to the original position. 5. Close the front cover of the OHCF. Note If the front cover of the OHCF is not completely closed, a message will appear and the machine will not operate.
Addendum OHCF fault codes If a jam/fault occurs in the Oversized High Capacity Feeder, the machine’s UI displays a jam/ fault message. The following table provides a list of fault codes for the Oversized High Capacity Feeder and a list of related finisher fault codes. Fault code Possible cause Recommended solution 024 955 024 956 An OHCF tray is empty or out of paper Add paper to correct OHCF Tray. 077 210 An OHCF tray is broken 1. Power Off/On. 2.
Addendum Fault code Possible cause 078 300 078 301 078 500 078 901 078 941 078 942 078 943 An OHCF tray has malfunctioned Recommended solution 1. Check the paper in the malfunctioning tray. 2. Power Off/On the machine. 3. If the errors persist, contact the Customer Support Center. OHCF specifications Oversized High Capacity Feeder (OHCF/Trays 6 and 7) Item Sheet size Specification LEF: • • • • B5 7.25 x 10.5 in. (executive) A4/8.5 x 11 in. 8.0 x 10 in. SEF: • 8.5 x 11 in./A4 • 8.5 x 13 in.
Addendum Interface Module (IM) The Interface Module (IM) is an optional finishing accessory that is used in conjunction with other optional finishing accessories, such as the High Capacity Stacker (HCS), the Standard Finisher, or the Optional Booklet Maker Finisher. The Interface Module (IM) acts as a communication device and paper path between the printer and an optional finishing device such the High Capacity Stacker.
Addendum Control Panel 1 4 2 5 3 The Control Panel consists of the following: 1. 2. 3. 4. 5. Auto Curl button: This button selects the Auto Decurl function. Manual Curl Up button: This button selects the three values of manual up curl. Manual Curl Down button: This button selects the three values of manual down curl. Auto Curl indicator: This indicates the that the Auto Curl Mode is selected. Curl Up/Down Indicators: These indicate the amount of manual curl (up or down) that is selected.
Addendum Paper curl When paper is exposed to heat, the paper loses moisture and curls toward the heat source. High coverage jobs tend to curl more due to the toner plastification effect on the paper surface. The system tries attempts to reduce this by using a mechanical decurling device, located within the IM. Some factors affecting paper curl are: • • • • • The weight of the paper and/or whether it is coated or uncoated. The amount of dry ink/toner and the area being coverage per sheet.
Addendum Jam clearance If a jam occurs, the machine stops printing and a message is displayed on the User Interface (UI). Follow all instructions displayed completely and in the sequence shown. Interface Module jams Perform the following steps to clear the Interface Module jam and resume printing: 1. 2. 3. 4. 5. Open the Interface Module Front Cover. Lift the green handles and/or rotate the green knob and remove all jammed paper and paper scraps. Close the Interface Module Front Cover.
Addendum Fault Codes Fault code Possible cause Recommended solution 048 100 048 102 048 103 048 900 048 901 048 903 Paper jam • A jam occurred during feeding • A jam notification is displayed on the UI • • 048 300 The front door is open. Close the front door.
Addendum High Capacity Stacker The High Capacity Stacker (HCS) is an optional finishing device that provides stacking and offsetting capabilities for output to a Stacker Tray. The HCS connects to the right side of the digital press by way of the Interface Module. The HCS replaces the Offset Catch Tray (OCT).
Addendum Identifying the Components 1 2 1. 2. 3. 4 Provides manual control of the various functions of the HCS. Collated sets (up to a total of 5000 sheets) are transported to the Stacker Tray located on a moveable Stacker Cart. Up to 500 sheets are transported to the Top Tray: • • • 4. 3 When sheets are purged after a paper jam. When the Sample Set button is selected. When selected as an Output Location.Labels must be sent to the Top Tray.
Addendum Control Panel 1 5 7 1. 2. 3. 4. 5. 6. 7. 8. 8 6 4 2 3 Sample indicator: This indicator blinks until a proof set is delivered to the Top Tray. Sample button: Press this button to have the HCS deliver the next collated set to the top tray. Unload button: Press once to lower the Stacker Tray and unlock the front door. Unload indicator: This indicator lights when the Stacker Tray has reached the down position and the front door can be opened.
Addendum The Sample Job On feature delivers specific pages or sets of an output job to the High Capacity Stacker’s Top Tray. The Sample Job allows the user to check the output while continuing to deliver the major portion of the job to the Stacker Cart. • • 4. 5. For Collated output, for example, if the output is 100 sets of a 50-page original document, the user can choose 1-3 output sample sets.
Addendum Jam Clearance If a jam occurs, the machine stops printing and a message is displayed on the User Interface (UI). Follow all instructions displayed completely and in the sequence shown. HCS Entrance Jams (E1, E2, and E3) Perform the following steps to clear the HCS Entrance jam and resume printing: 1. 2. 3. 4. 5. 6. Open the HCS Front Cover. Follow the instructions located inside the Front Cover to clear the E1, E2, or E3 jam.
Addendum HCS Top Tray Jam (E7) Perform the following steps to clear the HCS Top Tray jam and resume printing: 1. 2. 3. 4. 5. Open the HCS Front Cover. Remove the jammed paper from the Top Tray. Close the HCS Front Cover. If the UI indicates there is a jam in the digital press, follow the instructions on the screen to remove any paper in the area indicates. Refer to the Jam Clearance section in the Problem Solving chapter in this manual.
Addendum Hints and Tips for using the HCS 1. Check the paper in the Stack Tray for curl. • • No, curl is not present: Call for service. • If the output acceptable and meets customer satisfaction, you are finished. • If the output is not acceptable, call for service. Yes, curl is present: continue to the next step. 2. Adjust the paper curl by using the Decurler Controls on the top of the Interface Module; refer to page 9-19 for more information on adjusting paper curl. 3. 4.
Addendum Fault code Possible cause Recommended solution 049 222 049 223 049 224 049 225 049 228 049 229 049 232 049 233 049 234 049 235 049 236 049 237 049 238 049 239 049 240 049 241 049 242 049 243 049 244 049 245 049 246 049 247 049 248 049 249 049 250 049 251 049 252 049 253 sensor problem/failure Power off, then power on 049 280 049 281 049 282 049 283 049 284 sensor problem/failure Power off, then power on 049 285 049 286 EEPROM error Power off, then power on 049 287 System error Power
Addendum Fault code 049 941 Possible cause UI indicates the Stacker Cart and/or Tray needs to be reset Recommended solution 1. 2. 3. 4. Press the Unload button. The Wait light blinks until the Stacker Tray has reached the down position. When the Stacker Tray has reached the down position, open the front door. Position the Stacker Cart securely into the HCS. Close the front door. 049 945 The UI displays a message indicating that the Top Tray is full. Remove all the paper from the Top Tray.
Addendum Specifications Paper guidelines • Stacker Tray will accept 64-280 gsm (either coated or uncoated stock) with the possibility of degraded stock quality and increased jam rate • Transparencies may be run to either the Top Tray or the Stack Tray. Stack height should be limited to 100 transparencies. • Coated paper lighter than 100 gsm may not run as reliably as coated paper heavier than 100 gsm. • Non-standard papers longer than 305 mm (12") in the feed direction require 210 mm (8.
Addendum 9-32 Xerox 4112/4127 EPS User Guide
Glossary abort To terminate a program, printing, or non-printing execution before it is completed. account A way to identify a job. An account can consist of a mixture of letters, numbers, and symbols. If an account is not entered, the system will indicate “none specified”. AppleTalk The network communication protocol inherent to the Apple Macintosh operating system. application software software resident on the client workstation used to create print documents.
Glossary command A statement that instructs the system to perform a specific operation. command line A string of statements with possible arguments that you enter to instruct the system to perform an operation or series of operations. controller A primary component of the printing system that manages the queueing and processing of print jobs sent over the network, as well as various other tasks. data stream The format of data passed from one device to another.
Glossary Ethernet The network architecture standard consisting of a coaxial cable and associated components for connecting workstations to each other, file servers, and peripherals. This communication system enables workstation users to share information and services. Exception Pages Pages within a job where special page characteristics are set. Exception Pages can be a different stock size or color, side imaged or other options available on the FreeFlow Print Server.
Glossary GUI See Graphical User Interface. Half Bitting A control that simulates a partial change in position of a pixel by printing every other pixel and allowing the printer to smooth out the ripples. The resulting effect is that peaks and valleys of the pixels are smoothed. halftone screen A tool used in the offset printing, typesetting, and laser printing process to convert a continuous tone (photographic) image to dots. This allows the image to be printed using one of the printing processes.
Glossary job A document file that is associated with a set of printing instructions. Print data, print options data, and other information required for processing and printing a document. job flow The path a job takes from creation to completion at the printer. Job Forwarding A FreeFlow Print Server option that provides you with the ability to forward a job from one system to another. Job Inserts Pages that separate specific pages of a job.
Glossary named stock A particular paper stock which has been assigned a particular name to make it easier to identify the stock and its associated characteristics (color, weight, size, etc.) within the stock list. offset A stacking option that delivers printed output in a manner where the edge of each printed job set is placed a few inches from the edge of the other printed sets.
Glossary PostScript stroke command A PostScript graphic operation in which the length of a path is painted with a color, such as black. power off To shut down the system. power on To start the system. power saver A printer mode which enables you to minimize the printer power consumption during times of no usage. Both manual and automatic power saver activation is available. ppm Pages per minute.
Glossary public net The customer’s main enterprise-wide network, comprising possibly many segments joined by gateways and routers. queue A subdirectory on a print server where jobs are stored until the print server can deliver them to the printer. Queue Manager A component of the software that allows you to create, manage, and modify queues. RAM Random Access Memory. Volatile memory used for temporary storage of data and software commands, used by programs for immediate task processing.
Glossary server In a computer network, a unit that provides a specific service (such as data storage and computer services) to network users. settings The controls used for defining values. Short Edge Feed (SEF) Laser printing in which the paper is fed through the imaging system short-edge first. See also, Long Edge Feed. simplex Printing on one side of the paper. slider A control used to set a value and give a visual indication of the setting.
Glossary subnet mask A series of 4 bytes whose bits identify the corresponding bits in a 4-byte network—host addresses as network versus host addresses. The “1’s” in the mask correspond to the bits used for the network address. The “0’s” in the mask correspond to the bits used for the host address. System Administrator The person generally responsible for configuring, operating, and maintaining network systems and workstations.
Glossary VIPP Variable Data Internet PostScript PrintWare: Setting up and using a “VIPP cache” queue enables you to reuse desired document objects that exist in a post ripped state. virtual printers Logical names for the printer that allow different sets of default attributes to be applied to submitted jobs. The Print Operator and System Administrator define virtual printer names and the associated set of attributes and values. Walk Up User Has the minimum access rights.
Glossary Glossary-12 Xerox 4112/4127 EPS User Guide
Index Index B Built-in fonts, 8-4 C CentreWare Internet Services, 3-5 Checking completed jobs, 4-3 current jobs, 4-2 pending jobs, 4-2 Completed jobs checking, 4-3 Continuous copy pages, 8-4 Copy (sheet) size, 8-5 Current Faults, 5-20 Current jobs checking, 4-2 Current Messages, 5-21 D D, 8-1 Data, 8-1 Deleting programming, 5-17 Dimensions, 8-4 H High Capacity Feeder Feeding / paper capacity, 8-6 sheet size, 8-6 size / weight, 8-6 specifications, 8-6 HP-GL/2 Emulation, 5-11 I Image quality problems, 7-
Index Powering On, 1-11 Preferentially printing pending print jobs, 4-4 Print Mode, 5-7 Print Reports, 5-4 printing, 3-1 Programming deleting, 5-17 storing, 5-17 R Resolution, 8-1 S Serial number, 5-2 Settings at startup, 5-18 Setup, 5-12 Size / Weight, 8-5 Sleep mode, 1-12 Software version, 5-3 Standard Finisher, 1-1 Standard printing area, 8-13 Staple cartridge, 1-3, 1-4 Stapler faults, 7-53 Storing programming, 5-17 Supplies tab, 5-22 Supported OS, 8-4 Supported protocol, 8-4 T Toner cartridges, 6-1,