253106103A_ENG DECT PHONE Instructions
INTRODUCTION Dear customer: Thank you for purchasing a DECT telephone; we appreciate your trust in us. This product was manufactured with the upmost care, should you encounter any difficulties during its use, we recommend that you refer to this user guide. You can also find information on our site.
CONTENTS Your telephone Unpacking Your desk charger Your base (USB-DECT aerial) Your handset Connecting the base (radio base) Handset set-up Handset turning on and off Replacing the batteries Getting started Making a call Receiving a call During a call Handsfree Call transfer During a call Accessing the phonebook or call log Secret mode Ending a call Communication between two handsets Menu structure Your phonebook Viewing the phonebook Creating an entry Using a phonebook entry to place a call Searching
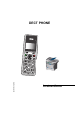
YOUR TELEPHONE Unpacking Place the box in front of you, open it and make sure it contains the following items: • • • • • • • a USB-DECT aerial (the radio transmitter base for your handset), one handset, a charger with its power unit, one battery compartment cover, three rechargeable batteries, a CD ROM with the user guide a Quick Setup Guide. Your desk charger Your base (USB-DECT aerial) Plug into the USB port on your terminal (see “Connecting the base (radio base)”, page 8).
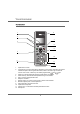
YOUR TELEPHONE Your handset 6 1 2 7 3 8 9 4 10 5 11 12 1. 2. 3. 4. 5. 6. 7. 8. 9. 10. 11. 12. Alphanumeric screen. Context keys (on-screen select keys): depending on the context, these keys are used to validate the options which appear above them, either in the lower right or lower left corners of the screen. These keys are called programmable and Green key: take the call/repeat (press and hold) switch on handset. Hands free key: activates the loud-speaker during a conversation.
YOUR TELEPHONE The navigator key, a rapid selection tool. To confirm or to access a sub-menu Navigating Adjust the volume during a conversation To cancel, delete or go to the previous menu The visual display of your handset Battery indicator I Date 01/01 12:00 Mute Timer Number of handset (according to order of inscription) Time Name of functions activated by pressing context keys and keys. Press the red key to return to the home screen.
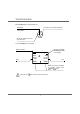
YOUR TELEPHONE Connecting the base (radio base) Before making any connections, please refer to the safety instructions presented at the beginning of this user guide. To install your USB-DECT antenna, follow the steps below: Connect the USB-DECT antenna (radio base), supplied in the pack, to the USB port located at the rear of your multifunction terminal. 0 1. EXT LINE The antenna can also be connected to the USB port located on the front panel of the multifunction terminal. 2.
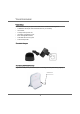
YOUR TELEPHONE Handset set-up Insert the batteries, one by one, making sure they are the right way round, as indicated on the label inside the handset battery compartment. Place the cover back on the handset by pushing upwards until it is completely closed. Remove the protective film on the screen, place the handset on the base to fully charge the batteries. The charging icon appears on the screen, it indicates the charging status. Once the icon is full, your batteries are charged.
YOUR TELEPHONE Replacing the batteries Hold down the red key compartment is accessible. to turn off the handset. Turn it around so that the battery Exert a pressure on the compartment battery and slip the compartment battery downwards. Remove the old batteries, insert the new batteries one by one, making sure they are the right way round as indicated on the label inside the handset battery compartment. Place the cover back on the handset by pushing upwards until it is completely closed.
GETTING STARTED GETTING STARTED During a call A language selection screen is displayed. Press or until the required language is During displayed. Press Valid. . Making a call Enter the number of your contact using the keypad keys. If you enter an invalid digit, press C on the navigator key to erase the incorrect digit. Press the green key handset to make the call. on your numerous options accessible by pressing Menu are .
GETTING STARTED Call transfer This function is only accessible when two handsets or more are registered to the same base. You can now transfer the call in progress to another hand set. During communication, press Menu Select CALL TRANSFER using Press Valid. . . . Press Call . Select SECOND CALL using Valid. or . Press . Select your contact's telephone number in Select the handset you want to call using or Making a second call whilst on line.
GETTING STARTED To set up a 3 way-call (the two parties and yourself) Press Menu . Select 3-PARTY CONF using Valid. or . Press both parties . You can then simultaneously. talk to You can switch to secret mode at any time during your conversation. Your handset microphone will be switched off and the other person will not be able to hear you. To activate secret mode: During a call, press Menu To end the 3 way-call, press the red key Secret mode . Select SECRET using Activ.
GETTING STARTED Select with the desired handset with the or keys. Press Call . The handset rings. Pick up on the second handset using the green key To end the call, press the red key . . You can also easily call another handset if you know its number. From the idle screen, enter the number of the handset. Then press the green key .
MENU STRUCTURE You can navigate through the menus using the navigator key PHONEBOOK VIEW CALL EDIT SEARCH Option RING TONE ADD NUMBER NEW ENTRY DELETE CALLS INCOMING CALLS OUTGOING CALLS EVENTS ACCESSORIES ALARM TIMER BIRTHDAY RING TONE EXTERNAL CALL INTERNAL CALL BEEPS SILENT MODE 15 .
MENU STRUCTURE SETTINGS PROGRAM KEYS DATE/TIME * AUTO HANG UP AUTO PICKUP KEYPAD LOCK LANGUAGE EMERGENCY SECURITY CHANGE CODE ADVANCED SET. SET HANDSET REGISTRATION BASE PRIORITY RESET HANDSET PERSON. REGISTR SET BASE REGISTR. MODE RESET BASE DELETE HANDSET RENAME BASE * The date and time on your DECT handset are automatically displayed and managed on your fax, the fax and DECT handset use the same date and time.
YOUR PHONEBOOK YOUR PHONEBOOK You can store 100 phonebook entries in your phonebook. Each phonebook entry can contain the name of your contact which can be a maximum of 12 characters long (spaces included), your contact's telephone number up to 24 digits and an icon identifying the type of number (work, home, mobile...). Viewing the phonebook On the navigator key , press - SEARCH: to search for another entry.
YOUR PHONEBOOK To enter text press successively on the desired key until the letter is displayed on the screen. Using a phonebook entry to place a call On the navigator key On the navigator key , press or , press or until the PHONEBOOK screen is displayed, press OK to confirm. until the PHONEBOOK screen is displayed, press OK to confirm. Select New. Press Valid. The list of alphabetical phonebook entries appears. . The name input screen appears.
YOUR PHONEBOOK Performing a refined search In the phonebook menu, press Option Select SEARCH using Valid. or . . Press You enter the number input screen. The cursor is at the end of the number. • The information is accurate. Press • . Valid. . To correct the number, press C on the navigator key Using the keypad, enter the first three letters of the contact you are searching for. The phonebook positions itself to the entry which comes closest to those two characters. to delete the numbers.
CALL LOG CALL LOG - DELETE ALL: To delete all calls. This menu enables you to view the call or event lists of your telephone. The dialled call log presents the calls you made. To return to the call view screen, press Return . To exit the menu, press the red key Viewing the received and dialled call log On the navigator key , press or . Calling the last number dialled (Redial) until the CALLS screen is displayed, press OK to confirm.
CALL LOG Calling a number listed in the dialled and received call log On the navigator key , press A summary screen appears. It informs you as to the various events that took place during your absence: • the calls received during your absence. or until the CALLS screen is displayed, press OK to confirm. Choose the event using Select OUTGOING CALLS or INCOMING The event appears on the screen. CALLS, using or . Press Valid. Use or to locate the contact you wish to call.
ACCESSORIES ACCESSORIES This menu offers you numerous additional functionalities: • Alarm clock: to use your handset as an alarm clock. • Timer: to remind you of an event (programmed to sound at the end of a few minutes or a few hours). • Birthday: the handset will ring at the set date and time to remind you of the name of the person to whom you would like to wish happy birthday.
ACCESSORIES The list of ring tones appears. Select the desired ring tone using Press Volume setting screen. or • To launch the timer without changing the • displayed delay, press Start . To change the programmed time, press . to access the volume Edit . A list showing the different settings appears. Press or volume. to increase or decrease the Changing the programmed time of the timer Once the volume is set, press Valid. . Select SET DURATION in the list.
ACCESSORIES Displaying or hiding the programmed time of the timer Viewing a birthday alarm To display (or hide) the time on the screen during its countdown, select VIEW in the Timer menu using or . Press Valid. . A screen appears indicating if you want to show the timer, press Yes Press Return . . To exit the menu, press the red key . You can programme birthday alarms (10 alarms) on your DECT telephone.
RING TONES RING TONES This menu allows you to modify the ring tones and particularly: • to assign different ring tones for incoming calls outsides or intercom (between handsets), • to activate or deactivate tones being sounded when pressing the keypad or when validating the settings information of your handset. • activate or deactivate silent mode. Activating or deactivating the beeps On the navigator key Select BEEPS using Valid. Valid.
RING TONES Activating/deactivating the silent mode When in silent mode, the telephone ringer and keypad beeps are inhibited. On the navigator key , press or until the RING TONE screen is displayed, press OK to confirm. Select SILENT MODE using Valid. or . Press . When you activate the silent mode, your handset is muted for all timer, alarm functions... Press Yes to activate the silent mode. To exit the menu, press the red key .
SETTINGS SETTINGS Once the key is programmed, a screen This menu enables you to change or customise the handset and base parameters. invites you to programme the key • To modify the function, press Edit . Programming a key • To keep the function, press Valid. . This function enables you to programme the To exit the menu, press the red key and keys on your handset giving you direct access to certain functions right from the idle screen.
SETTINGS SECURITY Modifying the language This function enables you to change the screen display language. On the navigator key , press or until the SETTINGS screen is displayed, press OK to confirm. Select LANGUAGE using Valid. or . Press This menu enables you to change or customise the security parameters of your telephone. You can: • lock the keypad, • programme an emergency number, • modify the base code, Locking/unlocking the keypad .
SETTINGS Programming an emergency number This function allows you to define an emergency number which can be enabled or disabled. Once it is activated, the emergency number will be automatically dialled when the green key • is pressed from the idle screen. Once activated, you can however call a different number with pre-dialling by dialling a number and pressing , press Valid. or . Enter the new number using the keypad. You can pick a number from the phonebook. Valid.
SETTINGS Select CHANGE CODE using Valid. or . Press HANDSET SETTINGS . Enter the old base code using the keypad (default is 0000). Press Valid. . Enter the new base code using the keypad. Press Valid. . Confirm by entering the new base code again. Press Valid. . To exit the menu, press the red key Registering a new handset to a terminal To register a new handset to a base you must: • put the handset in registration mode, • put the base in registration mode.
SETTINGS On the multifunction terminal: Put the terminal in registration mode: 891 - ADVANCED FCT / DECT / REGISTER On the machine, press , enter 891 using the keypad and confirm with OK. The machine starts searching for the handset. During the registration process (up to one minute), the LCD screen displays HANDSET REGISTRATION. The message disappears once registration is complete.
SETTINGS Resetting the handset On the navigator key When you reset your handset, all the parameters are reset to their initial value (factory settings) with the exception of the phonebook and alarms (birthdays and organiser). , press or until the SETTINGS screen is displayed, press OK to confirm. Select ADVANCED SET.. Press Valid. . Select SET HANDSET. Press Valid. On the navigator key , press or until the SETTINGS screen is displayed, press OK to confirm. Select ADVANCED SET.. Press Valid. .
SETTINGS During the registration process (up to one minute), the LCD screen displays HANDSET REGISTRATION. The message disappears once registration is complete. If the registration process fails (for example, the handset left the registration mode too soon), the machine emits a 3-beep signal. In this case, repeat the procedure from step 1. The new handset and the base are mutually searching for each other. The registration may take several seconds.
SETTINGS Resetting the base (terminal) On the navigator key When you reset your base, all the base parameters are reset to their initial values (factory settings). On the navigator key , press , press or until the SETTINGS screen is displayed, press OK to confirm. Select ADVANCED SET.. Press Valid. or until the SETTINGS screen is displayed, press OK to confirm. Select SET BASE. Press Valid. . Select DELETE HANDSET using Select ADVANCED SET.. Press Valid. Select SET BASE. Press Valid.
APPENDIX Care and Maintenance Use a slightly damp cloth to wipe the base and handset, do not use a dry cloth as this may cause electrostatic charges. Problems Refer to the table presented below in case of an operational malfunction: Problems Remedies The handset display is blank Make sure the batteries are properly installed. Place the handset on the base and fully charge the batteries. To increase the life of your batteries, you can perform this operation about every two months.
FEATURES Functions Default settings ACCESSORIES Functions Default settings Auto Pick up Off Alarm clock Off Language English Timer Off Security RING TONE Keypad lock Off Ringer (Ext/Int) Flute / Mineral Emergency Off Silent mode Off Base code 0000 Beeps All active Advanced settings SETTINGS •Line settings Program keys Mute / Alarm PABX prefix Date/Time 00:00 // 01/01/05 Auto Hang up On Off •Base settings Base name BASE 1 Telephone features Number of channels 120 Aut
ENVIRONMENT Preservation of the environment is an essential concern of Sagem Communications. The desire of Sagem Communications is to operate systems observing the environment and consequently it has decided to integrate environmental performances in the life cycle of its products, from manufacturing to commissioning, use and elimination.