
User's Manual
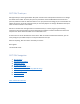

Table Of Contents
- Declaration of Conformity (RED)
- User Manual 认证Dongle
- WARNING
- Getting Started:
- SECTION: Thank you
- SECTION: Navigation
- SECTION 1: Tablet Box Contents
- SECTION 2: Connecting the Tablet
- SECTION 3: Install the Driver
- SECTION 4: Charging the Tablet
- SECTION 5: Key Features of the Tablet
- SECTION 6: Key Features of the Xencelabs Quick Ke
- SECTION 7: Product Registration
- SECTION 8: Video Tutorials
- SECTION 9: More Resources
- Xencelabs Quick Keys Setup
- SECTION: Quick Keys Thank You
- SECTION: Quick Keys Navigation
- SECTION 1: Quick Keys Box Contents
- SECTION 2: Connecting the Xencelabs Quick Keys
- SECTION 3: Install the driver
- SECTION 4: Charging the Quick Keys
- SECTION 5: Key Features of the Quick Keys
- SECTION 6: Pairing the Quick Keys with the Tablet
- SECTION 7: Product registration
- SECTION 8: Tutorial videos
- SECTION 9: More Quick Keys Resources

SECTION 3: Install the Driver
While the tablet will detect the pen location without a driver, to get the full functionality of the
tablet we strongly recommend that you download and install the driver. Note that to install the
driver you may need a user account that has admin rights.
Visit the support section of the Xencelabs website and select the latest driver for the Xencelabs
Pen Tablet Medium. You will find options for Windows, Mac and Linux.
You should download this driver to your computer, run it and follow the instructions on the
screen.
Important note: make sure you connect the tablet (and the Quick Keys if you bought the
bundle) before installing the driver. The installation wizard will only work properly if it can see
your devices during setup.
After installing the driver return to this page (you can keep it open while you install the driver).
Next: Charging the tablet
Return to top