
User's Manual
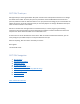

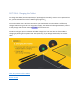
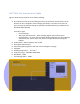
Table Of Contents
- Declaration of Conformity (RED)
- User Manual 认证Dongle
- WARNING
- Getting Started:
- SECTION: Thank you
- SECTION: Navigation
- SECTION 1: Tablet Box Contents
- SECTION 2: Connecting the Tablet
- SECTION 3: Install the Driver
- SECTION 4: Charging the Tablet
- SECTION 5: Key Features of the Tablet
- SECTION 6: Key Features of the Xencelabs Quick Ke
- SECTION 7: Product Registration
- SECTION 8: Video Tutorials
- SECTION 9: More Resources
- Xencelabs Quick Keys Setup
- SECTION: Quick Keys Thank You
- SECTION: Quick Keys Navigation
- SECTION 1: Quick Keys Box Contents
- SECTION 2: Connecting the Xencelabs Quick Keys
- SECTION 3: Install the driver
- SECTION 4: Charging the Quick Keys
- SECTION 5: Key Features of the Quick Keys
- SECTION 6: Pairing the Quick Keys with the Tablet
- SECTION 7: Product registration
- SECTION 8: Tutorial videos
- SECTION 9: More Quick Keys Resources

SECTION 5: Key Features of the Tablet
Figure 4 shows the key features of the tablet including:
A. Three buttons at the top of the tablet give access to commonly used functions. All the
buttons can be re-assigned in driver settings (see below). If you like to use short-cut
keys, you may consider purchasing the optional Xencelabs Quick Keys (included in the
Xencelabs Tablet Bundle).
From left to right:
o Launch Settings
o Adjust pen pressure levels – opens settings page for pen pressure levels.
o Switch displays – for each press the tablet will be mapped to each of the displays
attached to your system. If you only have one display attached, nothing will
happen.
B. Power switch – slide and hold to turn on/off
C. Kensington Nano lock slot
D. Active area lights (brightness and color can be changed in settings)
E. LED lights
F. Working temperature:-10℃-50℃
G. Frequency range:2402MHz-2483.5MHz
H. Bandwidth:1MHz
I. Transmitting power:0dBm
Figure 4