
Instruction manual


XBLUE Networks
141
Advanced Programming
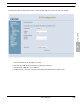
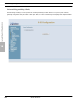
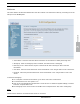
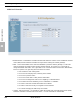
Dynamic DNS
7
• Select the DDNS Provider (DynDNS.org or TSO)
• Enter the name that will be associated to the Dynamic IP Address
• Select Between “WAN/eth0” and “LAN/bro0”
• DynDNS Settings - Enter the User Name and Password associated with the DNS account.
Select Dynamic DNS, and then select “Add” to enable Dynamic DNS. Press “Save” to retain the changes.