RC6 User’s and Installation Guide Xantrex RC6 Remote On/Off Switch and Monitor
RC6 REMOTE ON/OFF SWITCH AND MONITOR 1
XANTREX TECHNOLOGY, INC RC6 User’s and Installation Guide Notice of Copyright Xantrex RC6 Remote On/Off Switch and Monitor © October 2002 Xantrex International. All rights reserved. Xantrex is a registered trademark of Xantrex International. Disclaimer UNLESS SPECIFICALLY AGREED TO IN WRITING, XANTREX TECHNOLOGY INC. (“XANTREX”) (a) MAKES NO WARRANTY AS TO THE ACCURACY, SUFFICIENCY OR SUITABILITY OF ANY TECHNICAL OR OTHER INFORMATION PROVIDED IN ITS MANUALS OR OTHER DOCUMENTATION.
Table of Contents Using the RC6 Remote On/Off and Inverter/Charger Monitor ............................................................................................. 5 Reading the RC6 Remote Control.................................................................... 5 Power On/Off Switch and LED Indicator................................................................................ 6 Battery Voltage Bar Graph...............................................................................................
4
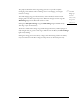
1 Section Using the RC6 Remote On/Off and Inverter/Charger Monitor This section of the guide is designed to help the user interpret and operate the RC6 remote when used with Xantrex RV Series Inverter/Chargers. M ost of the time the remote control will only be used to turn the inverter on and off. However, should you wish, a multitude of information is available about the state of the inverter/charger and battery system.
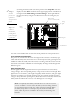
!Voltage is electrical pressure. It is equivalent to (inverting) the battery bank. The lower portion of the Amps DC scale also displays the four Error conditions. In the upper right portion of the RC6 are two lights marked Bulk Charge and Float Charge. These lights indicate the stage the battery charger is in. When the inverter is inverting, they are not lit. Battery current (into or out of battery bank) water pressure in a hose.
Amps DC Bar Graph The Amps DC bar graph functions just like the voltage bar graph, except now you have a choice of two scales to read from. This meter tells you the volume of electricity that is being taken out of or put back into the battery. If the unit is in inverter mode, as indicated by an absence of Bulk or Float charge lights on the RC6, then read the scale on the left side of the Amps DC meter.
"During an overload condition help the inverter out by reducing the Note: If your inverter routinely shuts down due to an overtemperature condition, then call your installer and describe the problem. Routine over-temp shutdowns are indicative of a larger problem, most likely poor ventilation in the inverter compartment. number of electrical loads it must run. "When a low battery condition occurs, provide the inverter/charger with AC power by starting the generator or plugging in to shorepower.
The purpose behind the three-stage charge process is to provide complete recharging of the batteries without damage due to overcharging at too high a current or voltage. "The float The bulk charging stage provides the battery with controlled constant current charging and is the first step in the process. When the charger is in this stage the Bulk Charge light on the RC6 will remain on solid. During the Absorption Charge stage the Bulk Charge light will blink slowly. This stage “tops off” the battery.
2 Section Installation This section describes the basic installation of the Xantrex RC6 Remote On/Off Switch and Monitor. Y ou can install the RC6 easily if you follow a few basic rules and guidelines. • Mount the RC6 in a dry location away from moisture and high humidity. • Clean with a soft cloth dampened with water (you can use a little dish soap if needed). • Use Xantrex connector cable for best results. This cable is tinned its entire length for better corrosion resistance.
3 Section Warranty What does this warranty cover? This Limited Warranty is provided by Xantrex Technology, Inc. ("Xantrex") and covers defects in workmanship and materials in your Xantrex RC6 Remote Control. This warranty lasts for a Warranty Period of 12 months from the date of purchase at point of sale to you, the original end user customer. This Limited Warranty is transferable to subsequent owners but only for the unexpired portion of the Warranty Period.
How do you get service? If your product requires troubleshooting or warranty service, contact your merchant. If you are unable to contact your merchant, or the merchant is unable to provide service, contact Xantrex directly at: Phone: 1-800-670-0707 (toll-free in North America) 1-604-422-2777 (direct) Fax: 1-604-420-2145 Email: CustomerService@xantrex.com Direct returns may be performed according to the Xantrex Return Material Authorization Policy described in your product manual.
Disclaimer Product THIS LIMITED WARRANTY IS THE SOLE AND EXCLUSIVE WARRANTY PROVIDED BY XANTREX IN CONNECTION WITH YOUR XANTREX PRODUCT AND IS, WHERE PERMITTED BY LAW, IN LIEU OF ALL OTHER WARRANTIES, CONDITIONS, GUARANTEES, REPRESENTATIONS, OBLIGATIONS AND LIABILITIES, EXPRESS OR IMPLIED, STATUTORY OR OTHERWISE IN CONNECTION WITH THE PRODUCT, HOWEVER ARISING (WHETHER BY CONTRACT, TORT, NEGLIGENCE, PRINCIPLES OF MANUFACTURER'S LIABILITY, OPERATION OF LAW, CONDUCT, STATEMENT OR OTHERWISE), INCLUDING WITHOUT
Return Material Authorization Policy Before returning a product directly to Xantrex you must obtain a Return Material Authorization (RMA) number and the correct factory "Ship To" address. Products must also be shipped prepaid. Product shipments will be refused and returned at your expense if they are unauthorized, returned without an RMA number clearly marked on the outside of the shipping box, if they are shipped collect, or if they are shipped to the wrong location.
Xantrex Technology Inc. Toll free 1 800 670 0707 Direct 1 604 422 2777 Fax 1 604 420 2145 CustomerService@xantrex.com www.xantrex.com 975-0051-01-01 Rev. 1 Printed in the U.S.A.