
C-Series Meter power Installation Guide C40R/50 Remote, C40R/100 Remote, DVM/C40 Faceplate


975-0123-01-01 Rev A
7
4 Installation
The following sections describe how to install the C-Series Meter
Display. They include detailed instructions for the following steps.
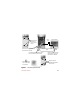
1. Jumper Installation (Step 1): Set the voltage setting on the
faceplate or remote to match the system voltage by installing the
jumper over the appropriate pins. This step is critical to the proper
operation of the unit.
See “Jumper Installation (Step 1)” on page 8 for instructions.
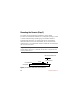
2. Cable Installation (Step 2): Connect the display to the C-Series
controller using the communications cable.
See “Cable Installation (Step 2)” on page 10 for instructions.
3. Faceplate/Remote Installation (Step 3): Determine the location
and mounting method for the remote (if used).
See “Mounting the Remote (Step 3)” on page 14 for instructions.
Important:
The green and red color of the LED only indicates the
particular operating mode and the battery voltage level. It does not
indicate whether the charging source is functioning properly.