xantech® INSTALLATION INSTRUCTIONS ll851 Dinalink™Sudac11 Mount PlasmallCDlllDICll lri11nd/y /88/JCIJiVllr
xantech DESCRIPTION These small lR receivers have been designed for mounting in very small spaces. They may be mounted under shelf edges, cabinet ledges, in wall speakers, etc. - anywhere an inconspicuous appearance is desired. The high sensitivity of these receivers allows placement behind speaker grilles and still receive IR commands up to 80 feet away*. FEATURES • Wire channel for clean installation . • System testing red-talk-back LED.
xantech INSTALLATION QUICK-START A typical system will use an IR receiver, several emitters, and a power supply all connected to a connecting block. 1. Connect the IR receiver to the "IR RCVR" port on the connecting block. The 'red' connector is installed to the 'red' plug. Note: In some extended distances, additional 3-conductor may be required and can be connected to the terminals on the connecting block. 2. Connect the Emitters to the connecting block.
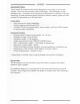
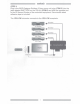
xantech I The 3-conductor inter-room cable (24 gauge up to 200', 22 gauge up to 600', 20 gauge up to 2000', 18 gauge up to 5000'), is run to the main room. 781ERGPS -To 120V AC (unswitched) ' Satellite Receiver =• 283D Emitter Hand Held ~emote j r Ribbon Cable 3-Terminal Block (not included REI IOTE ROOI I Input connections must be made as illustrated. To extend the emitter wires to a more distant location, you may splice in 2-conductor wire, in the wire gauges mentioned before, as needed.
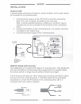
xantech LOCAL SYSTEM APPLICATION Another application is to locate the IR receiver in a central location, such as the TV, video screen and/or a speaker. The audio/video equipment can then be hidden inside a cabinet or located away from the front of a room. This will give the end-user the ability to direct a remote control to one central location and not have to worry about aiming to the respective device to be controlled.
xanta:h 1. Dinky-Link (DL) IR Receiver Kit DESCRIPTION The DL Series Kit comes with everything needed for a complete IR repeater system. With a Xantech IR Kit, equipment can now be concealed for clean room design.-In addition, a centralized IR receiver means there is only one IR target resulting in improved remote control interaction. Featuring color-coded connectors, a Xantech IR Kit is now an easy to install, and allows a worry-free installation.
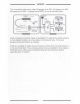
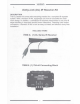
xantech ITEM C: (4) 283D Designer Emitters ITEM D: (1) 781 ERGPS Power Supply ! ' STEP 1: Plug in the 2.1 mm Coaxial power plug of the 781 ERGPS Power Supply (ITEM 0) into the jack labeled 12VDC on the 789-44 Connecting Block (ITEM 8). Plug the AC end of the 781 ERG PS Power Supply (ITEM D) into a 'unswitched' 120V AC Line outlet. STEP 2: Connect the 3.5mm stereo mini plug from the 481 D IR Receiver (ITEM A) to the 'IR RCVR' input located on the 789-44 Connecting Block (ITEM 8).
xantech STEP3: Plug in the 283D Designer Emitters 3.5mm mono mini plug (ITEM C) into the jacks labeled EMITTERS on the 789-44 (ITEMS) and affix the opposite end to the IR Sensor Window of the controlled equipment. Extra double sided adhesive tape is included. The YELLOW connector connects to the YELLOW receptacle. I .
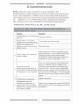
xantech IR Troubleshooting Guide NOTE: Due to the many variables in a given installation, the troubleshooting countermeasures you will have to take may vary from job to job. Each installation is different due to the number of IR receivers in use, length of wire runs, type of wire, amount of ambient IR noise present, etc .... Therefore, your countermeasures for a particular job will range from nothing at all, to any combination of the solutions listed below.
xantech Symptom #2: TB LED on IR Receiver (and/or Emitters) Dimly lit or flickering Cause: Solution Signal and ground wires are 1. reversed or shorted either at the Recheck your wiring. connecting block or IR receiver. 2. Defective emitter. Replace Emitter Relatively high levels of ambient noise. This can be due to any of 3. the following: Sunlight, florescent Lighting or Plasma Displays.
xantech Srazazmm #3: TB LED on IR Receiver (and/or Emitters) on solid Cause: 1. Plasma Interference Solution Use a 85 or 95 series Plasma 'Friendly' Receiver. If already using a this unit, please note the Plasma interference can be reflected off of any item it comes into contact with within approx. 3ft. From the front of the display. Keeping this in mind, make sure that the IR receiver is free from any obstruction that might reflect back into the receiving eye. Voltage and Ground wires are 2.
xantech Symptom tu: TB LED on IR Rec. blinks but 283D or 286D 'Blink' stvle Emitters do not ' Cause: Solution There may be a short, such as a staple driven through the Signal Recheck your wiring. 1. and GND wires of the IR Receiver and/or the emitter. 2. Emitter may be shorted internally Replace Emitter or use TEST EMITTER to check circuit.
xantech Cause: Solution Reposition the Emitter so that it is directly 1. Emitter placement is incorrect. over the components sensor window. Consult the components owners' manual of the unit for the exact location of the IR Sensor Window. Reposition the Emitter to a position that is suitable for the unit. Use a 283 or 286D Blink style emitter (they have a lower output than non-blink emitters 282 and 284M).
xantech Symptom 1,Z: Absolutely No Functlonallty (How to determine which comr,,onent ts at fault) Comaonent to Test Instructions With a Multimeter, measure the DC Voltage of the supply while it is connected to the Connecting Block. Put the Negative lead of the meter on the terminal marked GND and the Positive Lead on the terminal marked 12VDC (or V). You should get a reading between 11.5VDC and 13.0VDC. If not, remove the supply from the Connecting block and measure again 1.
xantech Limited Warranty Xantech® warrants its products to be free of defects in materials or workmanship. This is a Limited Lifetime warranty from the date of purchase by the original consumer. Any products returned to Xantech and found to be defective by Xantech within the warranty period will be repaired or replaced, at Xantech's option, at no charge. Xantech will not be responsible for the actual cost of installation or removal of the product, nor for any incidental or consequential damages.