94m SECURE CLOUD POS TERMINAL INSTALLATION GUIDE MODEL: xCE-200WU-UH xCE-200WU-U 1
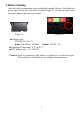
1. Before Starting Open the cable compartment cover behind the terminal (Figure 1) and find the power input on the rear side of the terminal (Figure 2). Connect the plug from the power adapter into the power input. (Figure 1) (Figure 2) ■ Adapter spec: LITEON PA-1061-71 Input: 100-240Vac 50/60Hz Output: 12V DC, 5A ■ Operating Temperature: 0 °C to 40 °C ■ RTC battery spec. : 3V, CR2032 Caution: Risk of explosion if the battery is replaced by an incorrect type.
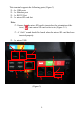
This terminal supports the following ports (Figure 3) 1 - 4 x USB ports 2 - 1 x Ethernet port 3 - 1 x RS232 Port 4 - 1 x micro SD card slot Note: { Ensure that the micro SD card is inserted as the orientation of the icon ( ) into micro SD card socket as in (Figure 3-1). { A “click” sound should be heard when the micro SD card has been inserted properly.
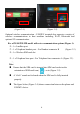
(Figure 3-1) (Figure 3-2) Optional wireless communication – E200WU terminal also supports a variety of wireless communications to host machine including Wi-Fi, Bluetooth and optional 3G communication.
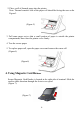
B (Figure 3-3) A A (Figure 3-4) B 2. Powering On Terminal Plug the power cord into the power jack and plug the power adapter into a surge suppressor (recommended) and the device will boot up. 3. Loading Paper 1.Press the button on the left of the printer to open the paper cover (Figure4).
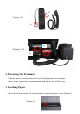
2. Place a roll of thermal paper into the printer. Note: Thermal sensitive side of the paper roll should be facing the user as the Figure5. (Figure 5) 3. Pull some paper out so that a small portion of paper is outside the printer compartment, then close the printer cover firmly. 4. Tear the excess paper. 5. To replace paper roll, open the paper cover and remove the paper roll (Figure6). (Figure6) 4. Using Magnetic Card Reader Secure Magnetic Card Reader is located at the right side of terminal.
5. Guidelines to properly CLEAN your LCD screens Turn your display off and allow it to cool. Make sure your cloth is clean and free of any grit before starting. Spray a liberal amount of the cleaning solution onto one portion of the cloth Using light pressure, wipe the screen to evenly distribute the solution on the screen. Rotating the cloth to a dry portion, wipe the screen until it is dry. You may need to rotate the cloth a second time. Always use light wiping pressure.
Caution: When removing bottom cover for the purposes of cable or SAM card installation, remember to reinstallation the protective cover and make sure to keep it in place. Warning: This is a Class A product. In a domestic environment this product may cause radio interference in which case the user may be required to take adequate measures. Caution: To reduce the risk of fire, use only No. 26 AWG or larger UL Listed or CSA Certified Telecommunication Line Cord.
digits represented by 01B are the REN without a decimal point (e.g., 03 is a REN of 0.3). For earlier products, the REN is separately shown on the label. If your equipment causes harm to the telephone network, the telephone company may discontinue your service temporarily. If possible, they will notify you in advance. But if advance notice is not practical, you will be notified as soon as possible. You will be informed of your right to file a complaint with the FCC.
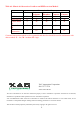
Table A1: Matrix of Observation Corridors and PIN Protection Method Method PED Stand A PED Stand B Check-Stand A Check-Stand B Customer Instruction Cashier M H L Observation Corridors Customers Customers On-Site in Queue Elsewhere Cameras H L L H H L M M L Remote Cameras L M H H H M H H H* H* H* H* H* Customer Instruction methods are less repeatable and therefore should be used in combination with other methods. L = low, M = medium, H = high. XAC Automation Corporation 886-3-577-2738 www.