IconRemote ™ Owner’s Manual Model IR10A
Table of Contents Introduction Introduction ............................................................. 3 Hard Key Functions ................................................. 4 Setup ........................................................................ 6 Battery Installation .............................................. 6 Battery Saver....................................................... 6 Permanent Memory ............................................. 6 Using the Wizard ...........................
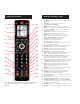
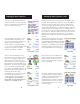
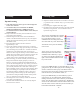
Hard Key Functions Hard Key Functions, cont. 1. 2. 3. 4. 5. 6. 1. 29. 2. 28. 3. 27. 7. 4. 26. 8. 9. 5. 25. 6. 24. 7. 23. 8. 22. 9. 21. 10. 20. 11. 19. 10. 11. 12. 13. 14. 15. 16. 17. 18. 19. 20. 12. 18. 21. 13. 17. 14. 16. 15. Note: blue text on the remote corresponds to DVD functions, green text are Tivo functions, and red text is for audio functions. 4 22. 23. 24. 25. 26. 27. 28. 29. HIS/HERS - Quick access keys for favorites stored under His/ Hers groups.
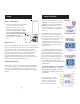
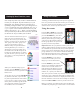
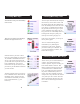
Setup Using the Wizard (1) Battery Installation AA AA AA 1. On the back of the remote, push down on the tab and lift the cover off. 2. Match the batteries to the + and marks inside the battery case, then insert 3 AA Alkaline batteries. Make sure you use new batteries. You can have problems with learning codes if your batteries are old. 3. Press the battery cover back into place. After you insert the batteries the Setup Wizard screen (1) appears.
Setting Up Your Devices Setting Up Your Devices, cont. (5) (1) How to set up a TV After you’ve been through the Wizard for the first time, the screen (1) shown to the right appears. This is the start of the Wizard to set up your devices (TV being the first one). Manually turn on the device(s) to be set up (TV, VCR, etc.). If you know your brand of TV, select Yes which results in a faster search for your TV’s code.
Setting Up Your Favorites Setting Up Your Favorites, cont. (1) Once you’ve gone through the Wizard and set up at least a TV, and set up more devices, or skipped the rest of them, you arrive at screen (1) to the right. (2) Press any digit key, say digit 4, to enter a channel number. This takes you to screen (2). You can enter more digits if desired. The channel number can include a dash (-) for digital channels, e.g., 2-3, or can include ENTER, or OK, if your device requires it to change channels, e.g.
Setting Up Your Favorites, cont. Note: “Triple tap” name entry works in a similar fashion to text entry on a cell phone. Tap each numeric key to cycle through ALL caps, numbers, and lower case letters. E.G., repeatedly pressing the number 2 key cycles through A, B, C, 2, a, b, c. Pressing the 9 key cycles through W, X, Y, Z, 9, w, x, y, z. A “space” can be selected with the 0 (zero) key. The number 1 key selects 1 . @ ? ! - & and : You can backspace an entry with the key to the left of the 0 (zero) key.
QuickPower Sleep QuickPower is a way of quickly turning all your devices on or off from one easy to use screen. Press the HOME Key to go to the Home screen. Then press the Side Key next to QuickPower. Only Devices you’ve previously set up are displayed. The others are grayed out. Press any key that isn’t grayed out to send the “Power” command for that device. Sleep lets you set any device to turn off a preset time from now.
Learning Learning, cont. Tips On Learning a. Some functions from some types of remotes might not be able to be learned. b. No functions may be learned under the HOME, MODE, FAVORITE, HIS, or HERS (hard) keys. c. Use fresh batteries for both the IR10A remote and your Original Remote. d. Keep at least three feet away from incandescent or lowenergy lights when learning. e.
Learning Main Keys Learning Main Keys, cont. At the Home screen press the Side Key next to Learn. You then press and hold (in this example) the Power key on the other remote, until the display shows that the command has been successfully learned. Note for some types of key you might need to hold the key pressed, but for other types a quick press is sufficient. Experiment a bit. If keys you learn are sent multiple times try learning them with just a quick press. (See Tips on Learning on page 16).
Macros - Main Keys, cont. Learning Side Keys Before learning the second key in the Macro, you can if desired, set a delay (1-10 secs) after which the command stored in the Macro will be sent. For example your TV might require a few seconds after turning it on before it will respond to a Channel Up/Down command. (Repeatedly press the Side Key next to Set Delay, or enter the delay directly with the numeric keys, 0-9). At the Home screen press the Side Key next to Learn.
Learning Side Keys, cont. Next point the remote you want to learn commands from at the bottom of the IR10A remote, and press OK when you’re ready. (See Tips on Learning on page 16). Next press the key (on the other remote) Learning Side Keys, cont. key on the remote to enter the letter D. Then we pressed the 8 key repeatedly until the letter V was displayed. Then we waited a second and pressed 3 to select D. Then we pressed the 0 (zero) key twice until we selected a space.
Learning Macros (Side Keys) Learning Macros, cont. A Macro could include the Power key for your TV, followed by the Power key for your Cable box, followed (after a 2 second delay), by digit 4 from your cable remote. Then when you later activate this Macro it will turn on your TV, turn on your cable box, wait 2 seconds then set the cable box to channel 4. At the Home screen press the Side Key next to Learn. Line up the remotes and press OK when you’re ready.
Learning Macros, cont. Setting up more Point your existing remote at the bottom of the IR10A remote and press OK when you’re ready. Then press your next key. Setting up more Devices After adding more keys you can keep the label for the key (in this case L1) or select Change Label, by pressing Side Key K9. If you select Change Label you can change the name to anything you want. For example you could call it My Macro, or Macro 1. After you select Change Label you see the screen below to the right.
Setting up more, cont. Setting up more, cont. Setting up more Favorites Adding/Editing Favorites When you first inserted the batteries in the remote you likely went through the Wizard and set up a few favorites. You could only set up 10 favorites at that time. Here’s how to set up more favorites. Press the HOME key to display the Home screen. Then press the Side Key next to Setup. This lets you add favorites to an existing group, edit favorites in an existing group, or add favorites to a new group.
Setting up more, cont. Setting up more, cont. Reordering Favorites Deleting Favorites This lets you move the favorites that you previously set up in a group, to different locations on the screen, i.e., reorder them. This lets you delete favorites that you previously set up in a group. Press the HOME key, select Setup, and then select Favorites. Then at the screen to the right select Reorder. Press the HOME key, select Setup, and then select Favorites. Then at the screen to the right select Delete.
Setting up more, cont. Setting up more, cont. Renaming Favorite Groups Clearing Settings in the Remote This lets you Rename the groups that you save your favorites in. For example you might want to rename His to Dave, or Hers to Isabel. This lets you clear (erase) various things you’ve set up in the remote. Press the HOME key, select Setup, and then select Favorites. Then at the screen to the right select Rename.
Advanced Settings Advanced Settings, cont. You can also change the device type by pressing the key on screen (1) next to the device that you are editing the code for. Pressing this key repeatedly cycles through all available device types. Press the HOME key, then select Setup, then select Advanced.
Advanced Settings, cont. Advanced Settings, cont. Punchthrough, cont. KidSafe At this screen you set how you want the Volume Up/Down and Mute keys to operate when the remote is in TV mode. Press the HOME key, then select Setup, then select Advanced, then KidSafe. Then you select how you want the Channel Up/Down keys to operate when the remote is in TV mode. Then you select how you want the Play, Stop, Pause REW, FF, and Record keys to operate when the remote is in TV mode.
Troubleshooting, cont. X10 Home Control If you own or purchase an X10 IR Command Console, Model IR543 and X10 Lamp, Appliance, and Wall Switch Modules you’ll be able to control lights and appliances from your IR10A iconRemote. You point the iconRemote at the IR543, it receives IR commands and converts them to X10 commands. Refer to page 34 and set up code 0401 under AUX (or any other mode you prefer).
X10.com, a Division of X10 Wireless Technology, Inc. 3824 North 5th St., Suite C, North Las Vegas, NV 89032 Web Site: http://www.x10.