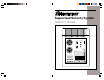
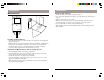
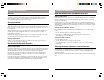
Supervised Security System Owner's Guide 15 • 1 • 3 RECORD • 13 11 • 9 • 7 Install Run 1 5 • • Run 2 ARM UNIT A • O • C BYPASS • • M E • K • I • G • HOUSE AC Power Battery Low zones 1 2 1 2 3 4 5 6 7 8 9 PROG 0 MEM 3 4 5 6 7 8 REC/BUSY ARMED Supervised Security System DS7000
READ THIS FIRST If more than one telephone or other device is connected to the same line, add up all the RENs. If the total is more than five, the telephones might not ring. In rural areas, a total REN of three might impair ringer operation. If ringer operation is impaired, remove one of the devices from the line.
Introduction Installation The X10 Supervised Security System is built around a Security Console with an automatic dialer that calls neighbors or friends in the event of a break in. Battery powered RF Door/Window Sensors and Motion Detectors are used to trigger the alarm, with RF Handheld and Keychain Remote controls for arming and disarming. All sensors and remotes incorporate random digital security coding.
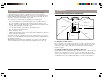
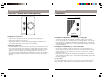
Installation Installation Security Console Security Remote Mounting the console The Security Console is designed to be installed free-standing on a table top or shelf. A wall mounting bracket is also available. PANIC PANIC ARM HOME DISARM ARM AWAY DISARM Fitting the backup battery SECURITY LIGHT Slide off the battery compartment cover and clip a 9V battery onto the battery contacts. Slide the battery into the battery compartment and replace the cover.
Installation Installation Keychain Remote Door/Window Sensor BATTERY ARM DOOR/WINDOW SENSOR PANIC DELAY DISARM MAX MIN DOOR/WINDOW SENSOR Ideal location LIGHTS ON TEST Two windows (requires accessory magnetic switch pair) LIGHTS OFF DOOR/WINDOW SENSOR Sliding window Registering the Keychain Remote with the Security Console • Fit two AAA Alkaline batteries in the battery compartment in the back of the Keychain Remote.
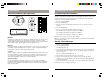
Installation Installation Testing the Motion Detector Motion Detector • Set the slide switch on the Motion Detector to position 1. • Press and hold the TEST button for about a second. The LED flashes twice when you release it. 90˚ • Wait 20 seconds for the sensor to settle. ION DET ECT OR MOT • Walk in front of the Motion Detector. The indicator LED lights each time it senses movement. Check the coverage area and reposition the sensor as required.
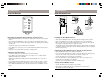
Installation Installation Power Horn™ Remote Siren (sold separately) 15 • Lamp Module 1 • 3 • 13 11 15 5 • • 9 • 7 7 9 UNIT A • O • C • • M E K • I • 3 5 11 UNIT • 1 13 • G O A C M • E K HOUSE G I HOUSE Power Horn Lamp Module Installing the Power Horn • Set the House Code dial to the same House Code as the Security System • Set the Unit Code dial to an unused code.
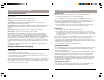
Installation Setting up the Dialer Other X10 products (sold separately) Programming Phone Numbers ON O • M • K 15 • 13 • 11 •A • • I • • 1 • C G • E • 1 3 13 • 5 • • 9 • OFF 9 7 A 5 M E Note: you should program the console to call a friend, relative or neighbor who can then listen-in to your home to determine if there is a real problem. The person can then call the Police if necessary, or call you back to see if everything is fine.
Using the Security System Using the Security System INSTANT Mode Console Zone Indicators Note: The Key Chain Remote always arms the system in the INSTANT mode. The console displays the status of the first eight zones. These indicators can display four states, as follows: 1. If using the Handheld Remote, set its Delay switch to MIN. Steady on - means that particular door or window is open. 2. Press ARM. The Console emits two tones and the ARMED indicator turns on.
Battery Information Battery Information General Door/Window Sensors and Motion Detectors X10 Door/Window Sensors, Motion Detectors and Security and Keychain remotes are designed to operate for approximately two years when fitted with alkaline batteries. Since operating conditions vary from installation to installation however, it is recommended that all batteries are replaced once a year.
Troubleshooting Troubleshooting PROBLEM SOLUTION If the system does not arm. • Check that the Console's slide switch is set to RUN1 or RUN2. • Check that the battery indicator on the Remote turns on when you press ARM. Replace the battery and reinstall the Remote if necessary. If a zone indicator flashes slowly. PROBLEM SOLUTION If you hear a repetitive trouble alarm when you try to arm the system, and it does not arm. Check the zone indicators.
Troubleshooting Troubleshooting PROBLEM SOLUTION You open a door or window and the alarm does not trip. • Check that the system is armed. • Check that the console's slide switch is set to RUN1 or RUN2. PROBLEM SOLUTION If you do not hear a beep from the Console when you press TEST to install a Door/Window Sensor or Motion Detector. With the Console in the RUN 2 mode, check that it chimes when you press TEST on the sensor/motion detector.
Troubleshooting Troubleshooting PROBLEM SOLUTION If the armed indicator is flashing. This indicates that there has been an intrusion. Also, if a zone indicator is on, this indicates which zone was violated. To turn the zone indicator off, and stop the armed indicator from flashing press ARM then DISARM on the Console or remote control. If a zone indicator is not lit, the violated zone may have been one of the second eight zones. Press BYPASS to see which zone was tripped.
Warranty Notes ONE YEAR LIMITED WARRANTY X10 (USA) INC. (X10) WARRANTS ITS PRODUCTS TO BE FREE FROM DEFECTIVE MATERIAL AND WORKMANSHIP FOR A PERIOD OF ONE (1) YEAR FROM THE ORIGINAL DATE OF PURCHASE AT RETAIL. X10 AGREES TO REPAIR OR REPLACE, AT ITS SOLE DISCRETION, A DEFECTIVE X10 PRODUCT IF RETURNED TO X10 WITHIN THE WARRANTY PERIOD AND WITH PROOF OF PURCHASE. IF SERVICE IS REQUIRED UNDER THIS WARRANTY: 1. RETURN THE DEFECTIVE UNIT POSTAGE PREPAID TO: X10 (USA) INC., 91 RUCKMAN RD.
X10 (USA) INC., 91 RUCKMAN RD., CLOSTER, NJ 07624 WWW.X10.