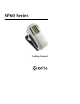
SP60 Series S P H E R E S P E C T R O P H O T O M E T E R Getting Started
SP60 SERIES SPHERE SPECTROPHOTOMETER The Manufacturer: Der Hersteller: El fabricante: Le fabricant: Il fabbricante: X-Rite, Incorporated 4300 44th Street, S.E. Grand Rapids, Michigan 49512 Declares that: gibt bekannt daß: advierte que: avertit que: avverte che: Spectrophotometer SP60 Series is not intended to be connected to a public telecommunications network. nicht an ein öffentliches Telekommunikations-Netzwerk angeschlossen werden soll. no debe ser conectado a redes de telecomunicaciones públicas.
SP60 SERIES SPHERE SPECTROPHOTOMETER Proprietary Notice The information contained in this manual is derived from patent and proprietary data of X-Rite, Incorporated. The contents of this manual are the property of X-Rite, Incorporated and are copyrighted. Any reproduction in whole or part is strictly prohibited. Publication of this information does not imply any rights to reproduce or use this manual for any purpose other than installing, operating, or maintaining this instrument.
GETTING STARTED Getting Started This document is designed to get you familiarized with your X-Rite SP60 Series Spectrophotometer. If you need any further instructions or information, you can find a complete Operator's Manual in a Portable Document Format (PDF) file on the CD that is shipped with your instrument.
SP60 SERIES SPHERE SPECTROPHOTOMETER What to do first… Unpack and Inspect • Remove the instrument from the shipping carton. Be sure to keep the original carton. If shipment is necessary, the instrument should be packaged in the original carton. Contact X-Rite if you need a new shipping carton. • Inspect the instrument for any damage. If any damage occurred during shipment, immediately contact the transportation company.
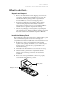
GETTING STARTED Charge the Battery NOTE: The battery pack must be installed before plugging in the AC Adapter. Only use the AC Adapter supplied. The battery pack must remain in the instrument at all times to operate. Before initial “remote” use of the instrument, charge the battery pack for approximately four hours. However, if immediate use is required, the instrument can be operated “tethered” to the AC adapter during battery charging. To attach the AC adapter: 1.
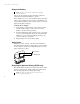
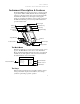
SP60 SERIES SPHERE SPECTROPHOTOMETER To change the Aperture Setting and Target Window: 1. Turn the instrument over and rotate the knob to the left for 8mm (large circle indication) setting and to the right for 4mm (small circle indication) setting. The instrument’s display informs you of the aperture change. Press the Enter key # to accept the change. Target Window Top side of shoe 8mm position 4mm position Aperture Knob shown in 8mm position. Rotate to the right for 4mm position. 2.
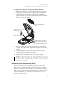
GETTING STARTED The shoe must also be open to gain access to the battery compartment when the battery requires replacement. To Unlatch the Instrument Shoe: 1. Hold the shoe next to the instrument housing and lift upward on the spring-loaded latch. 2. Slowly allow the shoe to pivot toward the back of the instrument and release the latch. Shoe Latch Lift Upwards To latch the Instrument Shoe: 1. Simply close the shoe to the instrument.
SP60 SERIES SPHERE SPECTROPHOTOMETER Instrument Description & Features The X-Rite SP60 Series Spectrophotometer’s compact spectral engine utilizes X-Rite’s DRS (Dynamic Rotational Sampling) technology, allowing accurate and precise measurements. This instrument has intuitive keys and a high-contrast graphic display. To determine the influence of the specular component, the SP62 automatically provides both specular-included and specular-excluded data.
GETTING STARTED @ Tab Down key – advances the highlighted bar (reverse image) to the next available “tab stop.” A “tab stop” indicates an item that can be acted on further, such as a measurement or a setting option. Tab stops generally follow a left-to-right or top-to-bottom sequence. When the last tab stop is reached, the next key press returns to the first tab stop in that menu's list. The key is also used to select alpha/numeric characters in the edit mode.
SP60 SERIES SPHERE SPECTROPHOTOMETER Analyze Mode The Analyze mode allows you to take measurements and display the resulting color data (actual and difference) without storing the data in the instrument. Measured data can be transmitted from the RS-232 port. Compare Mode The Compare mode is a quick method for comparing measurements without storing the data. After entering the mode, the first measurement is set as the standard and each measurement thereafter is compared to it.
GETTING STARTED • • pressing the Enter key # with the sample number highlighted pages through samples associated with the current standard and project (or hold down the Enter key # to access a specific number from the editor dialog). When in Analyze mode this area displays the standard’s name. Pressing the Enter # key when Std ## is highlighted pages through the available standards stored in the instrument. When in Compare mode this area displays measurement instructions.
SP60 SERIES SPHERE SPECTROPHOTOMETER • Std Lock – this menu item is used to change the lock status of the current standard. Locked standards cannot be changed. Downloaded standards cannot be unlocked. • Delete THIS Std – this menu item only appears when the standard is unlocked, and is used to delete the current standard from the instrument. Projects Screen The View Projects screen is used to view stored projects with standard links.
GETTING STARTED Run Job Screen (SP64 only) The Run Job function is used to select a job sequence downloaded from an X-Rite software program, such as X-RiteColor® Master. A typical job prompts you on the instrument screen with a measurement sequence. Measurement data is then uploaded to the computer for analysis. 1: 2: 3: 4: 5: • 12 Pick Job # Job 1 Job 2 Job 3 Job 4 Job 5 #: (Job Name) – this menu is used to pick the downloaded job. The instrument can store a total of 10 jobs at one time.
SP60 SERIES SPHERE SPECTROPHOTOMETER Using the Instrument Opening a Mode or Menu Opening a mode or menu allows you access to additional items related to the menu or specific information for a mode. Below are examples of typical mode and menu screens. Configuration Menu QA Mode Proj 1: Cartons Std 1: Red Sample Sample: #10 11:23 L*a*b* D65/10 L* 88.25 SPIN a* —4.71 ... ... b*+36.64 .... ∆L* +0.05 ∆a* —0.03 ∆b* —0.14 ∆E* 0.16 CONFIGURATION Language :English Measure Options... Color Options...
GETTING STARTED Opening a Pop-Up List Box Opening a pop-up list box allows you to select items and/or change settings for a selection or function. Below is an example of a list box. CONFIGURATION L a nSgeuta gLea n g u a:gEen g l i s h M e aEsnugrlei sOhp t i o n s . . . C o lDoeru tOspcthi o n s . . . D a tFarbaansçea iTso o l s . . . Hardware Setup... ↓ Pop-Up Editor To open an pop-up list box: 1. Use the Tab keys $@ to highlight the desired selection or function. 2.
SP60 SERIES SPHERE SPECTROPHOTOMETER Selecting Single or Multiple Items Many settings and modes allow you to select single or multiple items from a list or from a menu. Lists can be found in every type of screen: menus, editors, or mode screens. To select a single item from a list: 1. Use the Tab keys $@ to highlight the desired item in the list. 2. Press the Enter key # to save your selection (and return to the previous screen). To select multiple items from a list: 1.
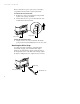
GETTING STARTED Taking a Measurement When taking a measurement, be sure to use the previously discussed proper measurement techniques. To take a measurement: 1. Center the instrument target window over a sample to measure. 2. Lower and hold the instrument down to take a reading. (If the Switch and Key option is activated in the Instrument Configuration, you must also press the Read key to initiate a measurement.) 3. Release the instrument, and the measurement data appears.
SP60 SERIES SPHERE SPECTROPHOTOMETER Calibrating the Instrument Under normal circumstances, the instrument should be calibrated at least once a day. The calibration procedure consists of a white cal reading and a black trap reading. The instrument features a built in calibration timer that can be set from 1-96 hours. Refer to Instrument Configuration for procedure. Make sure the calibration reference is clean before use. Carefully clean the ceramic disk with a dry, lint-free cloth.
GETTING STARTED Configuring the Instrument You may set up your instrument according to your specific needs. This is done through the Configuration menu. The top level configuration menu has five main option categories that access several sub menus. Configuration Options Language :English Measure Options... Color Options... Database Tools... Hardware Setup... Configuration Settings Use the Operational Steps described in Using the Instrument to access and set your configuration options.
SP60 SERIES SPHERE SPECTROPHOTOMETER When auto standard is disabled (off), a standard must be manually selected before a difference measurement. • Averaging – Sets the averaging option. Selects the number of readings averaged into a single measurement (0-99). • Diff Disp – Selecting “Numbers” causes delta values to display during difference measurements. This option is automatically enabled when standards are entered or downloaded from a software program.
GETTING STARTED • Metamerism Index – Determines the metamerism mode and Illuminant/Observer pairs used in calculating the metamerism index. Mode – Select MI or DIN6172 as the metamerism mode. IllObs1and IllObs2 – Select the illuminant observer combinations (D65/2, D65/10, etc.). • ∆Ecmc Factors – Used to edit the Lightness and Chromaticity values for the selected calculation. • ∆E94 Factors – Used to edit the Lightness and Chromaticity values for the selected calculation.
SP60 SERIES SPHERE SPECTROPHOTOMETER Hardware Setup The Hardware Setup configuration allows you to determine the following settings: • Serial Port – Allows you to edit the following settings which affect data transmitted from the RS-232 port. Baud Rate – Choose the correct baud rate. Hand Shake – Set the method of handshaking between the instrument and your computer. There are four handshake methods: Off, CTS, BUSY, or XON. Auto XMT – Enable (on) or disable (off) automatic transmission of measured data.
GETTING STARTED Switch Only – The instrument read switch initiates a measurement. Key Only – The Read key on the instrument must be pressed to initiate a measurement. Switch and Key – Both the instrument’s read switch and read key are required to initiate a measurement. • Cal Timeout – Determines the “cal interval time” desired between calibrations. Time is set in hour increments and can also be set to Off.
SP60 SERIES SPHERE SPECTROPHOTOMETER Error Messages Errors encountered during a measurement are displayed on the instrument screen. All errors are accompanied by a long beep and flashing yellow light. The error message is cleared from the instrument screen by pressing the Enter key # .
GETTING 24 STARTED
Corporate Headquarters - USA 4300 44th Street SE Grand Rapids, Michigan 49512 Phone 1 800 248 9748 or 1 616 803 2100 Fax 1 800 292 4437 or 1 616 803 2705 Corporate Headquarters - Europe Althardstrasse 70 8105 Regensdorf Switzerland Phone (+41) 44 842 24 00 Fax (+41) 44 842 22 22 Corporate Headquarters - Asia Room 808-810 Kornhill Metro Tower, 1 Kornhill Road Quarry Bay, Hong Kong Phone (+852) 2 568 6283 Fax (+852) 2 885 8610 Please visit www.xrite.com for a local office near you. P/N SP62-601 Rev.