
User guide


PLATESCOPE
25
NOTE: The settings cannot be changed once the measurement sequence has started. All
patches must be deleted before settings can once again be changed. See below for patch
deletion information.
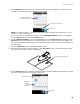
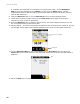
6. Locate the instrument’s target window on the 2% patch of the target strip using the reticule
icon in the screen for positioning.
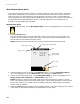
For easier targeting, the exposure can be adjusted to high (4), medium high (3), medium low
(2), and low (1). Simply use the Navigation Ring to move the highlight focus to the
Illumination icon, and then press down on the bottom of the Navigation Ring to page
through the various exposure settings.
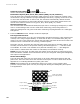
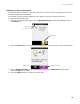
7. Press the Measure button to take the measurement. The screen displays a filled in box over
the 2% patch and the measurement data appears. Like spot measurement mode, dot angle,
dot size, and pitch (lpi) data may take some extra time to calculate (approx. 3-5 seconds).
Values that are in the process of being calculated appear as “---” until the results are
available. If a value is not available for a particular attribute, the “---” will disappear.
NOTE: Dot size, Dot angle, and Dot pitch only appear if the instrument is configured to have
these calculations enabled. These calculations can only be configured utilizing the PlateQuality
and Capture Tool applications.
NOTE: Dot percentage can be configured to either one (X.X%) or two (X.XX%) place
precision. The precision option can only be configured utilizing the PlateQuality and Capture
Tool applications.
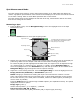
Positioning reticule
Dot screen
Illumination
Measurement area
Delete measurement(s)
Filled in box indicates
which patch is displaying
the measurement results
Location indicator
Image
Dot percentage
Next arrow
Substrate
Exposure setting