
User Guide
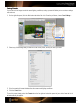


7. Use the white balance selection tool in your Raw processing software to select the gray balance in the
Creative Enhancement target. This can be a neutral patch, or one that provides the warmer or cooler look you
want.
See the “How to Set White Balance in [your software]” and “Warming and
Cooling with White Balance“ sections for more information.
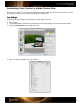
8. In the photo editing software, edit the image of ColorChecker Passport using physical targets as visual guides.
See the “The ColorChecker Classic”, “Correcting Images with Spectrum
Patches”, and “Exposure Verification and Correction” sections to learn more.
9. Copy and apply these edits to other images that were shot in the same lighting conditions.
See the “Automating Color Control in Raw” section for specific instructions.
JPEG Workflow
When working in a JPEG workflow, simply doing an in-camera white balance will go a long way to improve your
JPEG captures. Better accuracy in the camera’s histograms will guide you to make better decisions on exposure.
Plus, you can trust the camera’s highlight warnings, reducing the risk of overexposing highlight areas. Overall, you’ll
experience better image quality and faster editing.
Using ColorChecker Passport to prepare before shooting can help you reduce editing time even more.
1. Set the in-camera white balance.
See the “How to Set In-Camera White Balance” section for specific instructions.
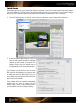
2. Capture the ColorChecker Classic and Creative Enhancement targets in one image.
See the “Tips for Capturing the ColorChecker Classic Target” and “Positioning
Options” sections for more information.
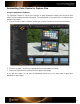
3. Check the exposure in-camera using the camera’s histograms and the Passport clipping patches with the
camera’s highlight warning tool.
4.
Capture your images under the same lighting conditions.