
User Guide
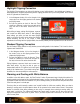


5. Launch the ColorChecker Passport Desktop Application.
• On a Mac, it is located in Applications/ColorChecker Passport
• On a PC, it is located in c:\Program Files\X-Rite\ColorChecker Passport
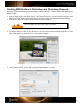
6. Select the DNG tab and drag and drop the DNG file into the window.
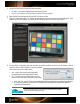
7. Click the Create Profile button. The software will automatically search for the patches and build the profile. If the
software cannot find the patches, you will be asked to manually identify the corners of the patches.
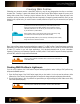
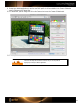
8. Give the profile a meaningful name that describes the lighting conditions and click Save. By default, it will be
saved to a directory that Photoshop, Photoshop Elements
and Lightroom use to store DNG profiles.
• Mac: /Users/<user name>/Library/Application
Support/Adobe/Camera Raw/Camera Profiles/
• PC: You must set up your folder options to View
Hidden Folders to be able to navigate to these paths.
•
Vista: [root drive, typically C:]\Users\[username]\AppData\Roaming\Adobe\CameraRaw\CameraProfiles
•
XP: [root drive, typically C:]\Documents and Settings\[username]\Application Data\Roaming\Adobe\
CameraRaw\CameraProfiles
Only manually delete profiles if you are sure they aren’t being used for existing
images and won’t be needed in the future.