
User Guide


Creating DNG Profiles in Photoshop and Photoshop Elements
Photoshop and Photoshop Elements both use Adobe’s Camera Raw Plug-in. To make a DNG profile based on your
camera’s output:
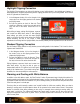
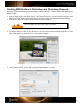
1. Open an image of the ColorChecker Classic in the Camera Raw plug-in. You do not need to perform a white
balance; the ColorChecker Passport application will analyze the image and make adjustment automatically.
2. Don’t edit the image, but make sure to verify that it was exposed properly.
See the “Automating Color Control in Raw” section for more details.
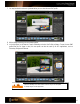
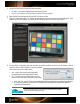
3. To save the image as a DNG so you can open it in the ColorChecker Passport Desktop Application, click the
Save Image button in the lower left corner. A new window will appear.
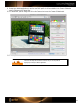
4. In the Format drop-down, specify DNG by selecting Digital Negative. Click Save.