
User Guide
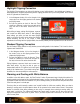


Creating DNG Profiles
Calibrating your camera to produce custom DNG profiles is a must for any photographer who relies on consistent,
accurate color. Creating a custom white balance with the ColorChecker White Balance target will ensure you’re
starting with accurate color. Shooting a physical reference like the ColorChecker Classic target will make color
corrections quicker, plus allow you to assign them to a large batch of images for greater productivity. But if you are
looking for true, optimal color, you need to create a custom profile that is specific to your camera and your lighting
conditions.
Just because ColorChecker Passport helps you build a DNG profile doesn’t
mean you need to convert to a DNG workflow. This is just Adobe’s camera
calibration profile format. You can still use your Canon, Nikon, etc. Raw image
in your standard ICC profile workflow.
When creating a profile, correct exposure in the camera is necessary. Using
your software to correct bad exposure will not make it usable.
Only manually delete profiles if you are sure they aren’t being used for existing
images and won’t be needed in the future.
Many high-end Raw image processing applications support ICC or DNG profiles. Some Raw image processing
applications, like PhaseOne’s Capture One software or Bibble Lab’s Bibble, use ICC profiles. X-Rite has other tools
to make ICC profiles for use with these applications. Visit http://www.xritephoto.com for more information.
Lightroom, Photoshop, and Photoshop Elements use DNG profiles. ColorChecker Passport’s Desktop Application
can build DNG profiles for single and dual-illuminants.
See the “Camera Calibration and DNG Profiles” section for more information on
custom DNG profiles.
Creating DNG Profiles in Lightroom
If you are using Lightroom, the ColorChecker Passport Desktop Application makes building a DNG profile a very
simple and automated process.
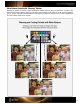
1. Open the Raw image of the ColorChecker target that you shot earlier. You do not need to perform a white
balance; the ColorChecker Passport application will analyze the image and make adjustments automatically.
2. Do not edit the image. In fact, any edits will be ignored when you begin building the profile. Make sure to verify
that it was exposed properly.
See the “Exposure Verification and Correction” section for more information.