
User Guide

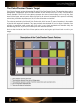

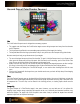

How to Use the ColorChecker Classic Target
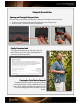
Photographing a ColorChecker Classic is the first step in attaining consistent, predictable color. Photograph it in the
same lighting as your images; then open it in your photo processing software for a built-in point of color reference to
help with color correction. With the included ColorChecker Passport application, you can also build DNG profiles for
Lightroom, Photoshop and Photoshop Elements.
See the “Creating Profiles” section for more information about using the
ColorChecker Classic.
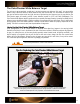
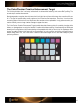
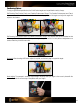
Tips for Capturing the ColorChecker Classic Target
When capturing the ColorChecker Classic, there are a few things you need to keep in mind.
• Size. For highest profile quality the ColorChecker Classic should comprise at least 10% of a 10 megapixel
image. If it is too small within the image, the color patches may not contain enough pixels to sample accurately
and profile quality may suffer.
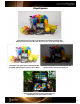
• Rotation. The ColorChecker Classic may be rotated within the image, but as far as possible it should be placed
parallel to the plane of the lens. Try not to tilt the target towards or away from the camera.
• Distortion. Avoid placing the ColorChecker Classic in images where its shape will be distorted. If it is necessary
to place it in an image containing distortion, such as a shot taken with a fisheye lens, place the ColorChecker
Classic in the least distorted part of the image. Do not cover or shade patches, and make sure the chart doesn’t
fill the frame. Some lenses may vignette around the edges, so it may be helpful to bracket the target.
• Focus. The ColorChecker Classic should be in focus. If the focus is too soft the auto-location feature may have
difficulty recognizing the edges of the target.
• Exposure. The ColorChecker Classic should be properly exposed in the image. If color channels are clipped
you will not be able to make a profile with the image.
When creating a profile, correct exposure in the camera is necessary. Using
your software to correct bad exposure will not make it usable.
• Lighting. The lighting of the ColorChecker Classic should match the lighting of the subject of the image. This is
especially useful for unusual and mixed light sources. Even lighting is important. When you set up the target,
make sure there are not any strong shadows or reflections on it. In daylight conditions, it can sometimes be
helpful to use a reflector to fill the shadows.
Then, focus and shoot!
See the “Creating Profiles” and “Creating a Dual-Illuminant DNG Profile in the
ColorChecker Passport Desktop Application” sections for more information.