
User Guide


White Balance in a RAW Workflow
Setting a consistent white point in a set of images also reduces editing time in a RAW workflow because there’s no
need to individually adapt white points for each image. But the real power of RAW format is the selection of in-
camera custom white balance or in-software white balance, and the flexibility to alter images without destroying
original image data.
While some users wait to adjust the white balance sliders or click on various near-neutral objects to get the balance
they like in the software, the results are not consistent. This becomes even worse when shooting an event like a
wedding where the lighting changes from one location to the next, yet the entire event should have a consistent
feel. ColorChecker Passport makes color consistency a breeze. Simply use the target to set the white balance in
your software; then apply the same white balance to all of the images that were shot under those same lighting
conditions.
Keep in mind, even if you are using custom DNG profiles, you will still need to
do a custom white balance each time you change to a different lighting
condition. This custom white balance can be performed in-camera before
shooting, or afterwards in the ColorChecker Desktop Application.
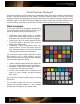
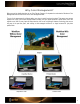
When shooting RAW with the ColorChecker Passport, you have the ability to set the white point in your RAW
processing software for added creativity. The ColorChecker Creative Enhancement target includes the White
Balance patch as well as patches for warming portraits and warming or cooling landscape images. Simply shoot the
Creative Enhancement target in each new lighting condition and use the patches to warm up flesh tones in portraits
or add richer blues and greens in landscapes.
See “The Creative Enhancement Target” and “Setting White Balance” sections
for more information.
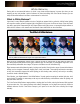
White Balance in a JPG Workflow
ColorChecker Passport adds high value to JPEG workflows, too. Many wedding, sports and event photographers
choose JPEG when shooting high volumes of images, and an inaccurate white balance can render these images
essentially unusable. Simply shooting the included ColorChecker White Balance target in each unique lighting
environment can provide accurate starting color and save hours of color editing work later. Consult your camera
manual for specific workflow information.