
Technical data


5
Settings
............................
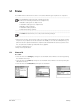
5.7.4 Header printout
If the D190 protocol is selected and the function ‘Print header’ is activated, the function Print
header is shown in the main menu. By pressing the <Measurement key> a header which is helpful
for a perfect documentation of your measuring results will be printed.
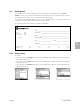
The header can be individually defined and can show information about your customer, your job, your
company, the operator, date and time and the reference values.
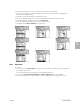
The following header is an example of a header configuration:
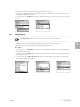
5.7.4.1 Header settings
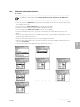
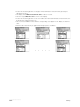
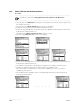
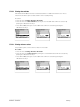
Procedure:
• Select the menu line Settings by turning the <Control ball> and confirm the selection by pressing
the <Measurement key>.
• Select the menu line Printer by turning the <Control ball> and confirm the selection by pressing the
<Measurement key>.
• Select the menu line Header by turning the <Control ball> and confirm the selection by pressing the
<Measurement key>.
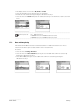
5.7.4 – 5.7.4.1
Job: ____________________________________________________
Customer:_______________________________________________
Article: _________________________________________________
„Firm“ Measured by:______________________________________________
Date: _______________________ Time: ____________________
Signature:________________________________________________
Reference Value: S 1.8 C 1.7 M 1.6 Y 1.4 Rot 2.3
Tolerance: ±0.1 ±0.1 ±0.1 ±0.2 ±0.2
Type: D19C
Density std: 47B/P
Serial number: 10123