
User's Manual


ADVANCED FUNCTIONS: PROXY DNS
Page 69 of 77
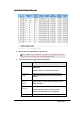
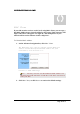
2. Select Enable next to Proxy DNS.
3. Type a name for one PC in your network that you want to use as a
Proxy DNS server in the Domain Name box.
4. Type the IP address for the PC in the
Virtual IP Address
box.
5. Optional. If you want to delete all the existing Proxy DNS servers first,
click Clear All and do Step 3 and Step 4.
6. When you have completed editing all the settings, click Apply, or click
Cancel to undo your changes.
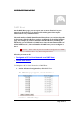
To Delete a Specific or All Proxy DNS Servers:
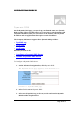
1. On the Proxy DNS page, for any Proxy DNS server you want to delete,
type 0.0.0.0 in the Virtual IP Address box.
2. If you want to delete all the existing Proxy DNS servers, click Clear All.
3. Click Apply.
To Disable the Proxy DNS on Your Router:
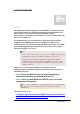
1. On the Proxy DNS page, for any Proxy DNS server you want to delete,
type 0.0.0.0 in the Virtual IP Address box.
2. If you want to delete all the existing Proxy DNS servers, click Clear All.
3. Click Apply.