
XFCK030 X-6 Cubed Conversion Kit Manual V1.0

K 030 X – 6 Cubed
Instruction Manual v1.0
Bag D
Transmission Installation
Page 29
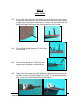
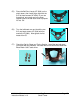
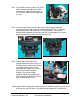
D12) Put a washer over the other 4-40 X 3/8”
bolt and secure the right front of the
transmission. Make sure the shim is
still in there! Make this bolt finger tight
for now.
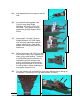
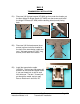
D13) One last check now to be sure the correct shims stayed under the
transmission at the rear, then put #4 flat washers over the 1” bolts (left
photo) and secure with the #4 mini nuts (right photo). Once all four
transmission fasteners are snug and the unit is comfortable in its cradle,
put final torque on the two bolts and two mini nuts.
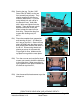
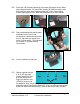
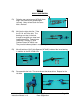
D14) Secure the motor plate to the
support bracket with the 4-40 X 1/2”
flat head screw, washer, and #4 lock
nut, finger tight for now. If your
transmission is higher than 0.030”,
add shims under the support
bracket. Once it’s all happy
together, tighten the bracket bolts
from under the chassis (D4) and the
plate-to-bracket bolt (D14).
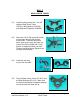
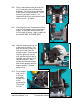
Many drivers think installing the transmission is the hardest single thing to do on an
X Factory car, and it’s done! Let’s put the rear suspension on and finish.