
XFCK030 X-6 Cubed Conversion Kit Manual V1.0

K 030 X – 6 Cubed
Instruction Manual v1.0
Bag A
Transmission Assembly
Page 14
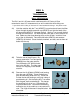
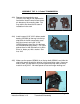
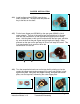
A10) Now slide the male outdrive from step
A7 into the female outdrive assembly
from step A9. Slide the diff bolt
through the male outdrive and screw it
into the T-nut. Do not tighten very
much yet. See A11 below.
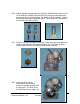
A11) As the bolt begins to tighten, stop every revolution or two, remove the
wrench, and rotate the two outdrives at the same time in opposite
directions while pushing them together (left photo). This helps seat the
balls, rings, and thrust bearing while it distributes the grease. Keep
tightening and rotating until there is a bit of tension on the bolt. Now put
an Allen wrench through the slots of each outdrive, hold the wrenches still,
and rotate the diff gear, Continue tightening the diff bolt, twisting the
outdrives and checking with the wrenches, until the gear will no longer
rotate at all between the outdrives. (right photo). As soon as the gear is
driving the outdrives, stop right there. Be sure the outdrives will still rotate
against each other. This will be a starting point for diff break-in and final
adjustment.
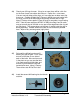
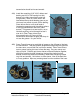
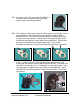
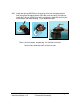
CLEAN & INSPECT
A12) We suggest you clean and inspect the rest
of the B 4.2 transmission parts at this time.
If you re-lube the bearings, make sure the
outside is clean and dry so they do not
attract dirt. You need the following items
from your B 4.2: the assembled diff, the
idler gear (AE9360) with its shaft (AE9361)
& two 3/16” X 3/8” bearings (XF6202), and
the top shaft (AE9601) with its spacer
(AE9602) & two 3/16 X 3/8 bearings
(XF6200). Replace worn parts as necessary.