MobIR® M8 Thermal Camera User Manual Wuhan Guide Infrared Co., Ltd. No. 26 Shucheng Rd, Hongshan District, Wuhan 430070 P. R. China Telephone: +86-27-8767 1991 Facsimile: +86-27-8767 1927 Email: overseas@guide-infrared.com Internet: www.guide-infared.com © Wuhan Guide Infrared Co., Ltd.
User Manual The Quality Management System of Wuhan Guide Infrared Co., Ltd. is approved to ISO9001:2000 for the design and manufacturig, stockholding, in-house repair and site servicing of non-contact temperature measuring instrumentation. Wuhan Guide Infrared Co., Ltd. reserves the right to make changes and improvements on any of the products described in this manual without prior notice.
User Manual Table of the Contents Table of the Contents .................................................................................................................................................. 3 Introduction ................................................................................................................................................................. 4 Precautions ....................................................................................................................
User Manual Introduction This publication provides the necessary information required to safely operate the MOBIR® M8 Thermal Camera. It is important to fully check all equipment with which you have been supplied. The equipment should be used, maintained and serviced by suitably trained personnel, capable of carefully following the procedures and guidelines given in this User Manual. All User Manuals and leaflets should be read thoroughly before proceeding with operation of the equipment.
User Manual Optical surfaces The optical surfaces of the camera lens should only be cleaned when visibly dirty. Care should be taken to avoid touching the exposed lens surface, as skin acid left behind from fingerprints can be damaging to coatings and lens substrates. Use only a proprietary lens cleaning tissue. Calibration and Repair Philosophy To ensure the accuracy and reliability of the MOBIR® M8 Thermal Camera, it is highly recommended that the instrument be calibrated at 12 monthly intervals.
User Manual USB extension cable RS232 communication & TV video cable USB driver Guide IrAnalyser Software User manual Carry case & strap ® Options 30mm Tele lens 7mm Wide angle lens Target Illuminator Infrared Remote Controller Sun Shield Leather Sheath Silicon Rubber Protecting Jacket Technical Specification Imaging Performance THERMAL Detector type: Uncooled FPA microbolometer (160× 120 pixels, 25μm) Spectral Range: 8-14μm Thermal Sensitivity: ≤10
User Manual Accuracy: ±2℃ or ±2% of reading Measurement Modes: Auto hot & cold spot, auto alarm live/zoomed image & video;4 movable spots, 4 movable and changeable areas displaying either max, min or average, 2 lines profile, histogram & isotherm band in live/frozen/saved image Emissivity Correction: Variable from 0.01 to 1.00 (in 0.
User Manual Physical Characteristics Housing: Magnalium Weight: 0.35KG(including battery) Size: 154mmx69mmx45mm 0.274KG(excluding battery) System Features Unique Features IR Fusion technology allows you overlay the thermal image directly to the corresponding visual image 2.0 Megapixels CMOS delivers extremely crisp visual image, assistance of crisper and better fusion image. Easily switchable PAL/ NTSC video output simplifies video viewing.
User Manual Image & Video Storage Live images can be frozen to be static images to do multiple-spot analysis, multiple-area analysis, discretional area analysis, line analysis and isotherm analysis. Frozen images, comprising radiometric data, infrared image, visual image, voice annotation and text annotation, can be saved into 2GB Mini SD card or the built-in flash memory in standard JPG format. Up to 60-second digital clip of voice can be recorded and saved for each image.
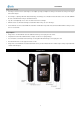
User Manual IR Lens Visual camera Laser Power interface Touch pen slot USB interface & RS232 and TV Video cable RS232 and TV Video cable: Interfaces from the left to right are respectively: TV Video/RS232 interface to the TV Video /RS232 interface on camera, TV Video interface to a TV Video display device, and RS232 interface to PC, USB extension cable: Interfaces from the left to right are respectively: Interface to the camera USB2.0 interface to a USB interface on PC.
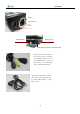
User Manual AC adapter and battery charger Note: AC adapter is valid for both battery charger and camera itself. Camera with cables: from the top down and from left to right, the camera is connected with USB extension cable, AC adapter cable and RS232/ TV video cable. If connecting the RS232 interface of RS232/ TV video cable to a PC with RS232 communication port, you can view the live video on the video display device and meanwhile control the camera on PC via RS232 communication protocol.
User Manual Battery Charging Two methods are available to charge the battery.
User Manual Introduction to Buttons BUTTON On/ Off FUNCTION Power on/off To bring out / hide main menu To enter menus and its sub menus To select one sub menu or option under menu To confirm parameter setup/ option selected To bring out temperature setup menu to adjust Tmax, palette, Tmin if necessary (Up) Button Up-direction To bring out / retract information bar (Left) Button Left-direction To bring out analysis bar in live thermal image (Right) Button Right-direction To zoom in/out (Down) Butt
User Manual Quick Start Guide Ensure that the battery is fully charged and the SD memory card is inserted in the camera Keep button “On/ Off” depressed for 3 seconds to switch on the camera. Wait till the boot screen image disappears and uncover lens cap. Non Uniformity Calibration (NUC) is performed automatically. Aim the camera at the target.
Icon Significance Function Guide logo Bring up the information bar upon clicking by the touch pen Power Display battery power capability Memory Display the number of saved image Emissivity Display the set target emissivity Ambient temperature Display the ambient temperature Time Display the time Display the temperature unit, Tmax, Tmin and palette for Temperature setup menu the current image.
User Manual Setting the temperature range There are 2 methods available to set the temperature range: Auto and Manual. To switch between the 2 modes, when there is no icon chosen in live thermal image, keep button “PIC Mode”depressed for 3 seconds and then release it to switch between the 2 modes. The prompt “Auto” or “Manual” will appear in the up left corner of the screen.
User Manual Adjusting temperature range of frozen/ saved image Temperature range of a frozen or saved image can be changed as well to adjust the image quality. When there is no menu displayed in the frozen or saved thermal image, click the palette with touch pen first, then you can change option values of Tmax , Tmin , and the palette with touch pen, changing the respective values of the options.
User Manual Press button OK again to save the frozen image directly into the memory media (built-in flash memory or mini SD memory card). Then name of the saved image “IR******” will be displayed at the up left corner of the screen for 2 seconds.
User Manual Isotherm analysis Do isotherm analysis Discretional Do discretional area analysis. Use the touch pen to outline certain area analysis Delete target in any shape. analysis object Delete selected analysis object or delete analysis object in the opposite order of the object is added. Spot analysis, line analysis, area analysis, isotherm analysis, and discretional area analysis will be introduced in following separate sections.
User Manual Press button C to save and exit the voice annotation and text annotation mode. Press button Ok to save the frozen image with voice annotation and text annotation into the memory media if any, with file name “IR******” displayed on up left corner of screen. Frozen images are saved as JPEG files in the memory media. After saving an image, the camera will switch to live thermal image status. Press button C to exit the frozen image and return to the live thermal image status.
User Manual · To toggle between the 6 images within one screen, click them with the touch pen or press buttons Up, Down, Left and Right to select a certain image, choose the icon by clicking it with the touch pen. Or you can press button OK to highlight the icon first and then press the button M to select the icon. To toggle between each icons of the file toolbar, click them with the touch pen or press button OK.
User Manual To delete all the saved images, choose the icon . Then a dialog box “Delete all images?” will appear on the screen. Choose button Ok to confirm or button C to cancel deletion. The two buttons can be chosen either by clicking with the touch pen or by pressing button M to select, or button C to cancel. To open a selected image, choose the icon Multiple kinds of analysis can be performed on saved image, such as static temperature measurement, spot analysis, area analysis, line .
User Manual Area analysis Do area analysis on the replayed image Isotherm analysis Do isotherm analysis on the replayed image Discretional area Do Discretional area analysis on the replayed image analysis Delete analysis object Delete selected analysis object or delete analysis object in the opposite order of the object is added. Spot, line, area, isotherm and discretional area analysis are the same as that in live thermal image.
User Manual Note: The icon Start voice replaying is not available when the replayed image does not include voice annotation The icon Replay text annotation is not available when the replayed image does not include text annotation Visual image The camera offers visual imaging function. Visual image can be switched from its corresponding thermal image either in dynamic live status/frozen/ replay status, vice versa. This can be done easily by pressing button PIC Mode directly.
User Manual Parameter “Distance” can be set to achieve the best IR fusion image. Bring out the Menu, then enter menu “Setup”, select sub-menu “Target”, press button “OK” to switch to option “Distance”, set its value (meters), then the program will adjust the IR fusion image to the best. Or click the “e” icon in the information bar, set the value in the pop-up window. Main Menu Introduction The camera offers a user-friendly Windows-style main menu.
User Manual File Saved images can be replayed on or deleted from the camera. Bring up the main menu and the select option File list under submenu File with the touch pen. Or press the button M when there is no menu displayed in live image to bring up the main menu, with option File list highlighted. Press button Up and Down to select the option File list. Two options Image List and Video List are present on the screen.
User Manual Icon Significance Function Open file Open a selected video Up direction Press it to turn to the previous screen Down direction Press it to turn to the next screen Delete file Delete a selected video Delete all Delete all the saved videos from the current memory media Exit command Exit the replay status and back to live thermal image If more than 6 videos are saved, the videos will be displayed in next page.
User Manual Menu Setup Camera setup can be set for the camera. Click the icon up arrow at the below center of the screen with the touch pen to bring up the main menu and then click the submenu Setup. Or press the M button to bring up the main menu and move the button left or right to select the submenu Setup. Five options Analysis, Target, System, Function and Setting are present in the screen.
User Manual keyboard. IsoColor: To choose a certain color for isotherm, black, white or green. AreaFunc: To set the temperature type of areas in area analysis, maximum, minimum or average. AudioAlarm: To activate or inactivate the audio alarm for live thermal images. AlarmTemp: To set the scene temperature threshold above which the audio alarm will sound. Temp Text: To display or hide temperature value of center point and hottest point.
User Manual Clicking each option box with the touch pen or pressing button OK can toggle between the options. Clicking each value respectively with the touch pen or moving the button up or down can alter values of the option. Moving the button left or right can toggle between each digit of the option values if the values contain several digits. TempUnit: To set the temperature unit for measurement, degrees Celsius or Fahrenheit.
User Manual Clicking each option box with the touch pen or pressing button OK can toggle between the options. Clicking each value respectively with the touch pen or moving the button up or down can alter values of the option. Laser: To turn on or off the laser locator. Image Interval: To set the value of Image Interval to be 15sec, 30sec, 60sec, 5min. Then the camera will start capturing image every 10 seconds or 5 minutes as per the value you set.
User Manual The tool bar at the bottom of the screen is to adjust the transparency of the fusion part. Press button Left or Right to adjust its value and to change the transparency from 0 to 100%. The area size won’t change. To turn off this function, bring up the main menu, select option Pic Mode under submenu Function either by the touch pen or by pressing OK, and then set its value to be OFF. Save the setup and exit the menu. Now this function is inactive.
User Manual Menu Tools Click the icon “ ” at the bottom the screen with the touch pen to bring up the main menu and then click the submenu Tools. Or press the “Menu” button to bring up the main menu and press “Left” or “Right” button to select the submenu Tools. Four options Calibration, Video, Audio, Palette and Analysis are present in the screen. Clicking them respectively with the touch pen or press “Up” or “Down” button can toggle between them.
User Manual If adjustment fails, mainly under the case that the touch pen did not click on the cursor centers, a dialog box will appear to indicate failure. Then repeat the operation above till adjustment succeeds. To save the ultimate coordinates of the pen after adjustment, select button “Save”. To test the adjustment result, select button Test, draw anything with the touch pen on the screen and observe whether the cursor moves accordingly with the pen. If so, adjustment has done well.
User Manual Press icon , the live video recording will start, a time bar will appear on the top-left corner of the screen. The left one is the current recording time, the right one is the max recording time. Press icon to stop recording. Such screen will appear. And the video will be saved into the mini SD card automatically, with name “IRV*****”, but no hint will be displayed on the screen. Press icon will start recording again, press icon will replay the saved video as shown below.
User Manual Icon Significance Function Play voice annotation To replay the recorded voice annotation Stop recording To stop voice annotation Start recording To start voice annotation Add text annotation To add or review text annotation Voice annotation time To display the voice annotation time Exit command To exit this toolbar If voice annotation is required with the image, select the icon Start recording with the touch pen.
User Manual Select the icon Save command, then the frozen image with voice annotation and text annotation (if any) will be saved into the memory media, with file name “IR******” displayed in the status bar on image screen. Frozen images (with or without annotation) are saved as JPEG files in the memory media. After saving an image, the camera will switch to live thermal image status. To exit the annotation toolbar at any time, select the icon Exit command or press button M.
User Manual Option Analysis Click “Analysis” under “Tool” menu by touch pen or press buttons to select it can enter into Analysis menu.
User Manual Delete analysis object Delete selected analysis object or delete analysis object in the opposite order of the object is added. Spot Analysis Spot Analysis can be performed on live or zoomed or frozen or saved images. In live or zoomed images, bring up the main menu, press “Tools” and then select option “Spot” under submenu “Analysis” either by the touch pen or by pressing the buttons. In frozen images, bring up the frozen toolbar with the touch pen or buttons.
User Manual In saved images, line analysis can be done when the images are replayed. Bring up the replay toolbar with the touch pen or buttons. Click the icon “Line analysis” with the touch pen to select it; or press the buttons “OK” to highlight the icon “Line analysis” first and then press “Menu” to select it. Then the cursor representing the starting point of the line is displayed in the image. At this moment, two methods are available to draw a line.
User Manual 4 areas can be displayed on the screen. Clicking with the touch pen or pressing “Pic Mode” can toggle between them. Temperature of the selected area as well as the temperature measurement type, Minimum, Average or Maximum will be displayed in the status bar under the image screen.
User Manual the screen with the maximum number limitation as 4. Press button C to exit and return to the live or frozen or save image. Isotherm Analysis Isotherm Analysis can be performed on live or zoomed or frozen or saved images. In live or zoomed images, bring up the main menu, press “Tools” and then select option “Isotherm” under submenu “Analysis” either by the touch pen or by pressing the buttons. In frozen images, bring up the frozen toolbar with the touch pen or buttons.
User Manual either by touch pen or by pressing the buttons. User can draw the required analysis area by the touch pen. Discretional area can be set to display the Maximum, Average or Minimum temperature. This is done by setting the value of Area Func in option Analysis under submenu Setup and then choosing button OK to confirm the setup. Press button C to exit and return to the live or frozen or save image. Save Save can be performed on live or zoomed or frozen or saved images.
User Manual Menu About Click the icon “ ” at the bottom the screen with the touch pen to bring up the main menu and then click the submenu About. Or press the “Menu” button to bring up the main menu and press “Left” or “Right” button to select the submenu About. Three options Default. Help and Version are present in the screen. Clicking them respectively with the touch pen or press “Up” or “Down” button can toggle between them.
User Manual the filter range become the factory configured ones. Clicking button No or pressing button C can give up the command. To toggle between the buttons Yes and No, press button Ok or press button Left or Right. To select them respectively, click them with the touch pen or press button M. Help Click option Help under submenu “About” with the touch pen or press “Up” and “Down” to highlight it and press “Menu” to select.
User Manual Infrared Video General Information The infrared video with temperature information taken by MobIR ® M8 can be transferred to PC via 2GB mini SD card or through USB2.0 for further analysis by Guide IR software. The Infrared video function is displayed in the computer and controlled by the Guide IR Analyser. Before the communication please install the USB driver and IR Analyser into your computer. PC System Requirements Operating system: Window 2000 or higher (IE5.
User Manual Setup Command Use this command to set a directory on the hard disks to store the infrared video, capture image and set other relevant information. Film: set the directory path to save the video recording Capture Saved: set the directory path to save the captured image Frame Rate: set the frame of thermal image per second. The default value is 25/ second Kinescope Rate: set the frame of thermal video. The default value is 1 frame.
User Manual Close Close an opening image file or infrared video Setup Set the directory where to store infrared video and relevant information Exit ® Exit the Guide IrAnalyser program Video Menu Palette command Select a palette for the current infrared video. Nine palettes as follows are available. Auto adjustment command Use this command to choose adjust image color automatically or manually.
User Manual The following command is available if the camera connected with PC via USB 2.0 is M8. Calibration (F2) Send calibration command to the camera Near Focus (F3) Press F3 continously to adjust near focus, stop adjusting by releasing the bottom Far Focus (F4) Press F4 continously to adjust far focus, stop adjusting by releasing the bottom Video capture command When playing infrared video, use this command under Video Menu or Press Ctrl + T to capture the current image.
User Manual Power on the monitor. Power on the camera. Enter the submenu System under menu Setup, choose option VideoOut and set its value to be “PAL” or “NTSC”. Press button Ok to save the setup and return to the live image. When viewing the live image, you can still use the bottons to control the camera. After viewing the live image, power off the camera, monitor (or recording device) and disconnect the cable.
User Manual Choose “Install from a list or specific location (advanced)” and include the folder where you save the driver program. Then Click button Next to go further. Installation starts. When getting to the step as shown below, choose “Continue anyway” to proceed further.
User Manual Installation continues and finishes quickly. Click button Finish. Go to Device Manager to check and confirm whether the driver has been successfully installed. If there is “GUIDE M8 After Renumeration (guideusbd0.sys)” listed under Universal Serial Bus Controller, it indicates the driver has been properly installed and you can transfer data from the camera to PC now.
User Manual Controlling the Camera through RS232 Communication Protocol RS232 communication protocol is offered with the MobIR ® M8 camera. Through the protocol the camera can be conveniently controlled on PC at a remote monitoring place. Using the protocol Before using the protocol, please ensure the camera and your PC have been properly connected by the RS232/ video cable offered together with the camera. Click on the file “M8RS232.exe” to run the protocol.
User Manual Parts described: There are 9 COM interfaces available for RS232 communication.
User Manual Buttons for operating the camera.
User Manual LEFT_L Idle RIGHT_L Idle DIAL_UP Far focus DIAL_DOWN Near focus DIAL_MID Auto focus LEFT_SIDE Switch between thermal/visual/IR fusion modes RIGHT_SIDE Bring out Option Target dialog box L_SIDE_L Switch between Auto/Manual modes R_SIDE_L Switch on laser locator C+LEFT_SIDE Calibration without shutter Button Function In frozen mode: Move the cursor upwards Move the cursor downwards Move the cursor leftwards Move the cursor rightwards Bring out the main menu OK Save the
User Manual Idle Idle Idle Enter into different analysis mode OK Switch between different analysis modes OK_L Freeze or save image C Exit analysis dialog box C_L Exit the frozen mode/make compensation UP_L Idle DOWN_L Idle LEFT_L Idle RIGHT_L Idle DIAL_UP Far focus DIAL_DOWN Near focus DIAL_MID Auto focus LEFT_SIDE Idle RIGHT_SIDE Idle L_SIDE_L Idle R_SIDE_L Idle C+LEFT_SIDE Idle Button Function In spot analysis mode: Move the cursor upwards Move the cursor downwards
User Manual RIGHT_L Move the cursor rightwards(Accelerated) DIAL_UP Far focus DIAL_DOWN Near focus DIAL_MID Auto focus LEFT_SIDE Switch between different spots RIGHT_SIDE Bring out Option Target dialog box L_SIDE_L Switch between Auto/Manual modes R_SIDE_L Switch on laser locator C+LEFT_SIDE Idle Button Function In line analysis mode: Move the cursor upwards Move the cursor downwards Move the cursor leftwards Move the cursor rightwards Bring out the main menu OK Confirm the locati
User Manual Move the area downwards/enlarge or reduce the area Move the area leftwards/enlarge or reduce the area Move the area rightwards/enlarge or reduce the area Bring out the main menu OK Confirm the location of the area OK_L Freeze/save the thermal image C Return back to analysis selection bar C_L Exit the frozen mode/make compensation UP_L Move the area upwards/enlarge or reduce the area (Accelerated) DOWN_L Move the area downwards/enlarge or reduce the area (Accelerated) LEFT_L Move th
User Manual UP_L Idle DOWN_L Idle LEFT_L Idle RIGHT_L Idle DIAL_UP Far focus DIAL_DOWN Near focus DIAL_MID Auto focus LEFT_SIDE Idle RIGHT_SIDE Bring out Option Target dialog box L_SIDE_L Switch between Auto/Manual modes R_SIDE_L Switch on laser locator C+LEFT_SIDE Idle Button Function In isotherm area analysis mode: Move the threshold of high temperature threshold of high temperature threshold of low temperature upwards Move the downwards Move the downwards Move
User Manual C+LEFT_SIDE Idle Button Function In image/video list mode: Select image upwards Move image downwards Move image leftwards Move image rightwards Confirm the selection OK Toggle between different selection buttons OK_L Idle C Return back to image list mode C_L Idle UP_L Idle DOWN_L Idle LEFT_L Idle RIGHT_L Idle DIAL_UP Idle DIAL_DOWN Idle DIAL_MID Idle LEFT_SIDE Idle RIGHT_SIDE Idle L_SIDE_L Idle R_SIDE_L Idle C+LEFT_SIDE Idle Button Function In image/vi
User Manual C Return back to image/video list mode C_L Idle UP_L Move the central cursor upwards (Accelerated) DOWN_L Move the central cursor downwards (Accelerated) LEFT_L Move the central cursor leftwards (Accelerated) RIGHT_L Move the central cursor rightwards (Accelerated) DIAL_UP Idle DIAL_DOWN Idle DIAL_MID Idle LEFT_SIDE Switch between thermal/visual/IR fusion modes RIGHT_SIDE Idle L_SIDE_L Adjust Tmin/Tmax value R_SIDE_L Idle C+LEFT_SIDE Idle Button Function In
User Manual C+LEFT_SIDE Idle Button Function In voice recording mode: Idle Idle Idle Idle Confirm OK Toggle between different buttons OK_L Idle C Exit voice recording mode C_L Idle UP_L Idle DOWN_L Idle LEFT_L Idle RIGHT_L Idle DIAL_UP Idle DIAL_DOWN Idle DIAL_MID Idle LEFT_SIDE Idle RIGHT_SIDE Idle L_SIDE_L Idle R_SIDE_L Idle C+LEFT_SIDE Idle In parameter value adjusting mode: Button Function Increase the selected value Decrease the selected value Select current
User Manual C Exit parameter value adjusting dialog box C_L Idle UP_L Idle DOWN_L Idle LEFT_L Idle RIGHT_L Idle DIAL_UP Idle DIAL_DOWN Idle DIAL_MID Idle LEFT_SIDE Idle RIGHT_SIDE Idle L_SIDE_L Idle R_SIDE_L Idle C+LEFT_SIDE Idle Troubleshooting The camera does not turn on Battery improperly installed (i..e battery is not locked in place). Remove battery and install correctly. Battery contacts are dirty. Clean battery contacts. Battery charge is low.
User Manual Emissivity What Is Emissivity? The standard of radiation is "blackbody" radiation which exists in any enclosure whose walls are at a uniform temperature. The shape of the enclosure and the wall material have no effect on this radiation, it being a function of temperature alone. A small hole in such an enclosure only affects this radiation level very slightly.
User Manual following tables. It must be remembered that these are only guideline figures. They can be substantially increased if the surface is rough or even slightly oxidised. The values quoted for oxidised metals assume that the metal is heavily oxidised. Thin oxide layers will give an emissivity value between this and the value for an unoxidised surface.