
Installation Guide


1of2
Warnings and Cautions
Turn off electricity at circuit breaker or main fuse box before installation. Consult a licensed electrician if in doubt.
These instructions are provided for your safety. It is very important you read them completely before installing the fixture. We strongly
recommend that a licensed, professional electrician perform the installation.
Disconnect fixture from power source before replacing bulbs. Make sure bulbs are given sufficient time to cool before removal.
(4)A19MediumBase100WbulbMaximum,bulbnotincluded.
MinimumHangingHeightis29.5”,MaximumHangingHeightis65.5”.
30-45minutes
Identifyandinspectallpartsbeforebeginninginstallation.Checkpackagecontentlistanddiagramsbelowtoensureallpartsare
present.Ifanypartsaremissingordamaged,donotattempttoassemble,install,oroperatethefixture.MissingParts?Contactyouroriginalplaceof
purchase.
LightSource:
FixtureHangingHeight:
EstimatedAssembly Time:
Preparation:
ToolsRequired:Flatheadscrewdriver,Phillipsscrewdriver,pliers,wirecutters,wirestrippers,electricaltape,safetyglasses.
Installation Guide
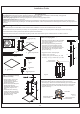
Package Contents
A
Crossbar Assembly
x1
Socket assembly
x1
D
Ceiling Canopy
x1
E
B
6” Rod
x2
C
12” Rod
x2
STEP 3 - Installing the Crossbar Assembly
A. Pass the supply wires from outlet box through the Crossbar
Assembly (A). Attach the Crossbar Assembly (A) to the Outlet Box
with the head of the Green Ground Screw facing you. Secure the
Crossbar Assembly (A) with Outlet Box Screws (not included).
Tighten until snug.
Supply Wires with
Ground Wire
Outlet Box Screws
(not included)
Outlet Box
A
Figure 2
Square Ring with Tab
x1
Stem
x4
Mounting Screw
x4
K
Lock
x8
Screw
J
F
Square Ring
x1
G
H
Shade
x4
I
K
J
G
H
F
J
E
STEP 1 Install
to
-
Square Rings
Socket assembly
A. Unfold support arms of the
Socket assembly (E) to
proper locations. (Refer to
Socket Orientation)
B. Secure the
(B) to the Socket
assembly (E) with Mounting
screws (K). Tighten until
snug.
C. Thread the Lock (J),
the (F),
theStem(H)andthe
(G) as shown. Hand
tighten until snug.
Square Ring with
Tab
Screw
Square Ring with Tab
Square
Ring
STEP 2 - Install Ceiling Canopy, Rods and
togetherSocket assembly
a. Determine the Rods (B/C) to be assembled
to the Socket assembly (E) according to
your hanging height.
b. Pass the supply wires and ground wire
through the chosen rods (B/C) and the
Ceiling Canopy (D). Thread the Socket
assembly (E), the chosen Rods (B/C) and
the Ceiling Canopy (D) together. Hand
tighten until snug.
Suggested rods for Ceiling height :
8’ ceiling : use (1) 6” rods
9’ ceiling : use (1) 6” rods and (1) 12” rods
10’ ceiling : use (1) 6” rods and (1) 12” rods
B
Supply Wires
and Ground Wire
E
C
Figure 2
B
D
C
Pleasegoto our website for product cleaning tips.Go to the
Care + Maintenance
selection.