
Assembly Instructions
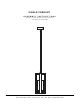

SINGLE PENDANT
A
A
F
C
D
B
G
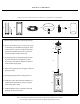
REMOVE ALL PARTS FROM PACKAGE, BE CAREFUL NOT TO DAMAGE ANY COMPONENTS
E
Measure area and determine desired hanging height.
1.
3.
2.
P
roduct comes with three [3] 12”, one [1] 8” and one [1]
4” hard stems [A] for adjustable hanging height. Deter-
mine the stems you will use to achieve desired height.
(Threads are removable from the stems, and thread
removal may make it easier to thread wire.)
Thread wire [E] from socket part [B] through first stem
[A]. Continue to add stems, threading the wire and
screwing each stem together. Repeat as necessary to
achieve desired hanging height.
Detach mounting plate [C] from canopy [D]. Thread wire
[E] through canopy.
4.
Mounting plate [C] will attach to ceiling junction box.
5.
6.
7.
Note: Turn off switch before replacing the bulb. Make sure the bulb has sufficient time to cool down.
Do not subject the lamp to any shock while lit as shattering of glass shade may result.
G
C
F
x2
DB E
Install light to ceiling. We recommend installation by a
qualified electrical professional. Canopy nuts [F] are
used to tighten light to ceiling.
Install bulb 60W max (bulb not included). Place glass
shade [G] over bulb and onto base.