
Assembly & Installation Instructions
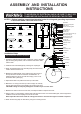

Mounting Strap (A)
Mounting Screw (B)
Green Grounding
Screw (C)
Hex Nut (D)
Wire Nut (E)
Threaded Pipe (F)
Canopy (G)
Coupling Kit (H)
Collar (I)
Washer (K)
Strain Relief (J)
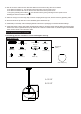
10. Pull out the source wires from the outlet box. Make wire connections using wire nuts as follows:
a. The black wire marked "L" from the fixture to the black wire from the power source.
b. The white wire marked "N" from the fixture to the white wire from the power source.
c. The green grounding wire marked " " from the fixture to the green grounding wire from power source.
Carefully put wires back into the outlet box.
11. Attach the canopy to the mounting strap, insert the coupling kit through hole, and then secure by tightening collar.
12. Unscrew ferrule nut cap and hex nut from threaded pipe to release the cap.
13. Install bulb (not included). Check relamping label at socket area or packaging for maximum allowed wattage.
14. Install glass shade: Tilt the glass shade and slide glass holder into the glass shade carefully, Make sure that the glass
holder in the center of glass shade. Drop cap and secure it with hex nut and ferrule nut, and then tighten the headless
screw onto the ferrule nut to secure the cable.
The following parts are available for re-order if damaged or missing.
Spare Parts List:
A: 12-1/4"
B: 12-1/2"
Turn on the power at fuse or circuit box.
A
B
Assembly Kit
(1 SET)
Glass Shade (1PC)