
Assembly Instruction

Installation
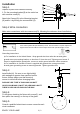
Step 1
Step 2 Wire connection
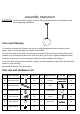
Make wire connections, with wire connectors(D), following the reference chart listed below.
*Note: When parallel wire(SPTI&SPTII)is used. The neutral wire is square shaped and
ridged and the hot wire will be round in shape and smooth.(See illustration on left)
Grounding Instructions:
a) For installation in the United States: Wrap ground wire from outlet box around green
ground screw on mounting bracket, no less than 2" from wire end. Tighten ground screw. If
fixture is supplied with a ground wire, connect to outlet ground wire with a wire connector.
b) For installation in Canada: If fixture is supplied with ground wire, wrap ground wire
around green grounding screw on mounting bracket. Tighten ground screw.
Step 3
PLEASUE USE TYPE"A" BULB MAX 40-WATT
OR CFL BULB MAX 13-WATT OR LED MAX 9-WATT
THERE IS 1PC 9W LED BULB IN THE BOX.
Step 4
Step 5
Consult a qualified electrician to ensure correct branch
circuit conductor
ENJOY YOUR LAMP
Clear,Brwn,Gold or Black without Tracer(colored stripes)
Insulated Wire(not green)with copper metal conductor
Insulated Wire(not green)with Silver metal conductor
Fix the glass shade to the fixture with screw(J), and
then place the cover(K) on the top of the glass.
Unpack all parts from cartons carefully.
1. Fix the mounting bracket(B) to the outlet box
with machine screw(C).
Attach the Canopy(G) to the Mounting bracket
(B) and fix it by turning the screwed ball (E).
Connect,Hot,Black or Red outlet Supply Wire to:
Connect,Neutral,White Outlet Supply Wire to:
Black
White
Install bulbs(H). Be sure to use light bulb(s)
with wattage no greater than specified on this
fixture. Always make sure that electrical
current is turned off before changing bulbs.
*Parallel Cord(round&smooth)
*Parallel Cord(square&ridged)
Clear,Brown,Gold or Black without Tracer(colored stripes)
2 / 2