ACCU-DART User Manual A guide to installing and operating the ACCU-DART system f or Windows Mobile Devices ACCU-DART for Sage Accpac Updated: July 2010
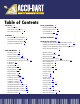
Table of Contents Introduction 3 About ACCU-DART 3 About Executive Concepts Inc 3 ACCU-DART Components 3 Installation Setting up ACCU-DART 9 RF Options Maintenance 9 Warehouse Maintenance 10 User Maintenance 11 Bar Code Maintenance 13 4 Operating ACCU-DART 15 ACCU-DART Software Installation 4 IIS or Web Server Installation 4 Handheld CAB Files Installation 6 Setting the CONFIG.
Introduction About ACCU-DART: ACCU-DART is a real-time radio-frequency inventory management solution designed to integrate directly with AccountMate, Sage Accpac ERP, and Sage Pro ERP. Using radio-frequency scanners, it allows the warehouse/shop floor staff to instantly update the accounting system, ensuring that all users throughout the organization have the most upto-the-minute information. About Executive Concepts Inc: Executive Concepts Inc.
Installation ACCU-DART Software Installation Your copy of ACCU-DART should include the setup program (setup.exe) and at least one authorization file (RF.ECI for the RF version, and/or RFNO.ECI for the Desktop version, and RFX.ECI for Sage Accpac v5.6+ users). Sage Accpac users will also require an activation key to activate their software. 1. Send a print-screen capture of the registered company information (including Database ID for Sage Accpac users) to info@accu-dart.
4. Configure ASP.NET 4.1. With the folder selected in the left-hand pane… 4.2. Bring up the properties page for the by a) Right-clicking on the web site folder and selecting b) Select the button from the tool bar 4.3. The Properties Sheet for the web site should open 4.4. Click on the tab 4.5. From the drop-down list for ASP.NET version, select <2.0> 4.6. Click 5. Set-Up Directory for ACCU-DART 6. Copy
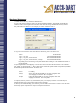
7. Copy the WMOBILE.INI file to both the IIS start-up directory and the RF5xA directory [TERMINALID=2] DIRECTORY=C:\ACCUDART\SERVER678\2\ SERVER=SERVER678 ARRAY=2 [TERMINALID=4] DIRECTORY=C:\ACCUDART\SERVER678\4\ SERVER=SERVER678 ARRAY=4 [TERMINALID=ACCUDART9] DIRECTORY=C:\ACCUDART\SERVER678\5\ SERVER=SERVER678 ARRAY=5 [TERMINALID=ACCU9] DIRECTORY=C:\ACCUDART\SERVER678\6\ SERVER=SERVER678 ARRAY=6 7.1. The TERMALID is the terminal ID on the device 7.2.
3.4. Click and hold down the stylus in this window 3.5. When the context menu appears, choose 4. Create a shortcut to the application 4.1. Use File Explorer to go to \Program Files\AccuDart 4.2. Click and hold down the stylus on the ACCU-DART application 4.3. When the context menu appears, choose 4.4. Use File Explorer to go to \Windows\Start Menu 4.5. Click and hold down the stylus in this window 4.6. When the context menu appears, choose 4.7.
Information on each of the settings appears below: TERMID POLLINTERVAL BGCOLOR FGCOLOR FSIZE FSMALL FMEDIUM FLARGE WEBSERVER SPLASHTIME CLIENTLOG SOFTKEYBOARD This needs to be a unique value within the client’s installation. This can be an 8 character name or numeric value.
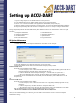
Setting up ACCU-DART 1. Sign in to Sage Accpac as user ADMIN with the correct password. 2. In the Administrative Services folder, double click on the icon “Data Activation”. 3. Answer “Yes” to Proceed and click on the application “ACCU-DART (V53B, V54A, etc). 4. Click the “Activate” button and then the “Proceed” button. You will see the ACCU-DART folder added to the Sage Accpac desktop after the activation is completed. You are now ready to configure ACCU-DART.
Warehouse Maintenance 1. Double click on the icon, “Warehouse Maintenance”. 2. Type in the desired warehouse code(s) for this ACCU-DART installation. ACCU-DART will validate the warehouse codes entered against the IC location codes entered in Sage ACCPAC ERP Inventory Control. Only valid codes are allowed. In our example, we will use warehouse code 1: 3. Log Level: Press the down arrow and select the desired Log Level.
User Maintenance 1. Double-click on the icon “User Maintenance”. 2. Type the desired User ID for the first ACCU-DART user. We recommend using a numerical user ID as it is easier to enter on the RF devices. The following detailed screen will appear: 3. Type the desired Password. The password is required by the user to operate ACCU-DART in either Desk top or Radio Frequency mode. Again, we recommend using a numerical password. 4. Type the user name.
Here is an example of user 1, Joe Blough.
Bar Code Maintenance 1. Double click on the icon, “Bar Code Maintenance”. There are five Bar Code databases: Customer Bar Code, Internal Bar Code,Vendor Bar Code, MISys Internal Bar Code, and MISys Supplier Bar Code. 2. Internal Bar Code Maintenance: This is the first database that you need to set up. a. Enter YOUR UNIQUE BAR CODE for each desired Item/Unit of Measure combination as shown in the examples below. ACCU-DART will use these bar codes for all transactions and inquiries. 3.
4. Vendor Bar Code Maintenance: This is the database to set up if you intend to use Vendor Bar Codes. a. Enter each vendor’s UNIQUE BAR CODE for each desired Item / Unit of Measure combination as shown in the examples below. ACCU-DART will use these bar codes for all PO Receipts transactions and inquiries. 5. MISys Internal Bar Code Maintenance: This is the database to set up if you intend to use MISys Internal Bar Codes. You must have MISys activated on your computer to access this feature a.
Operating ACCU-DART 1. In Sage Accpac ERP, Click on the ACCU-DART folder, then double click on the icon “Program”. Select the version program you purchased and wish to use: Desktop ACCU-DART – This is the desktop emulator Radio-Frequency ACCU-DART – This is the 900 MHz R/F version of ACCU-DART for the LT700 series handheld devices Radio-Frequency ACCU-DART 802 – This is the 802.
ACCU-DART Modules Ship Sales Orders Description: This function allows the user to scan items (& quantity) to be shipped, review the total shipment, and, when complete, ship the sales order.
Receive Purchase Orders Description: This function allows the user to scan the items (& quantity) being received; review the total delivery, and, when complete, post the receipt of goods Instructions: Menu Option #2 Enter/Scan the Purchase Order # Confirm that this is the correct vendor/purchase order Begin Scanning/Entering items – Scan the item, then enter the quantity for that item; repeat When you have scanned all the items to be received, press ‘enter’ on a blank screen – this will take
Physical Inventory Count Description: This function allows the user to scan the items & quantities for physical counts. Uniquely, ACCUDART is configured to allow multiple users to perform a physical count at once. It also makes this process easy when using lot control or serialized inventory Instructions: In Sage Accpac, Run the “IC Generate Inventory Worksheet” function to create the IC Inventory Worksheet * Turn OFF the check box – Default Quantity On Hand.
IC Warehouse Transfers (one-step) Description: This function allows the user to transfer items from one warehouse to another in one-step. When an item is transferred using this module, it is removed from the inventory in one warehouse, and added to the inventory of the other warehouse.
In-Transit Warehouse Transfers (two-step) Description: This function includes two modules that allow the user to transfer items from one warehouse to another in two-steps. First an item is transferred out of a warehouse; then, upon receipt, the items are added in to the second location.
IC Shipments Description: This function allows the user to indicate what items have been shipped and generate an IC Shipment in real-time. Instructions: Menu Option #62 Ask for Quantity “Yes” – ACCU-DART will ask for quantity “No” – Scan each item individually Enter/Scan the Price List OR Leave Blank.
IC Receipts Description: This function allows the user to indicate what items have been received and generate an IC Receipt in real-time. Instructions: Menu Option #63 Ask for Quantity “Yes” – ACCU-DART will ask for quantity “No” – Scan each item individually Enter/Scan the PO # OR Leave Blank.
Vendor Receipts Description: This function allows the user to indicate what items have been received and generate a Vendor Receipt in Accounts Payable in real-time, without requiring a PO#. Instructions: Menu Option #63 Ask for Quantity “Yes” – ACCU-DART will ask for quantity “No” – Scan each item individually Enter/Scan the Vendor # OR Leave Blank.
Commit Sales Order Description: This function allows the user to enter item & quantity for a Sales Order; ACCU-DART will commit those values. This function can be used in conjunction with SO Ship Commit.
SO Ship Commit Description: This function allows the user to ship committed items. This function can be used in conjunction with the Commit Sales Order function.
Split/Combine Lots Description: This function allows the user to take items from part of an old lot # and move it to another lot #. This function is often used as a substitute for bin tracking. Using the lot #s in lieu of bin #s, this function will allow you to move items from one “bin” to another.
Orchid Bin Tracking - Bin Transfers Description: This function allows the user to transfer items from on particular bin to another with Orchid’s Bin Tracking system.
Orchid Bin Tracking - Pick by SO Description: This function allows the user to pick items that need to be shipped for a specific sales order and transfer them into the shipping bin with Orchid’s Bin Tracking system. In order to have this function they must have a ship bin setup in the RFWHSE table.
AutoSimply Integration - Issuance Description: This function allows the user to issue items to a specific Manufacturing Order with AutoSimply’s Manufacturing system.
Enter the quantity of items that have been manufactured When you have entered the quantity, ACCU-DART will then ask if you want to “Update Y/N” – Select “Yes” to update, or “No” to cancel AutoSimply Integration - Close MO Description: This function allows the user to close the manufacturing order with AutoSimply’s Manufacturing system.
MISys Item to Sales Description: This function allows the user to transfer MISys finished goods to Accpac Sales inventory. ‘ You must have MISys activated to use this module.
MISys PO Receipt Description: This function allows the user to receive MISys POs from suppliers.
MISys Complete MO Description: This function allows the user to assemble MISys finished goods and/or WIP from Bills of Material.
Inquiry Modules Item/Location Inquiry Description: This function allows the user to enter an item # and view the locations and quantities Instructions: Menu Option #51 Enter/Scan the item Screen will display the location(s) & quantities for this item When finished reviewing, press “enter” to return to the main menu.
Customer Inquiry Description: This function allows the user to enter a customer # and view the current sales order information Instructions: Menu Option #56 Enter/Scan the Customer # Screen will display the current sales orders for this customer When finished reviewing, press “enter” to return to the main menu.
Bin Inquiry Description: This function allows the user to enter the bin # and view which items, along with the quantities, that this bin contains. *This module requires Orchid’s Bin Tracking system. Instructions: Menu Option #71 Enter/Scan the bin # Screen will display the itemss) & quantities for this bin When finished reviewing, press any key to enter a new bin, or press “enter” to return to the main menu.
Advanced User Instructions Installing the latest software from ACCU-DART’s website 1. Download the latest setup file from the ACCU-DART Reseller-only section (www.accu-dart.com/resellers). There may be multiple version of ACCU-DART available for download. Be certain to download the correct version (for Sage Accpac 5.3, 5.4, etc.) 2. STOP! – Make a backup a. Rename your existing ACCU-DART program folder (eg. \Sage Accpac\RF54A) with a new name (eg… \Sage Accpac\54Abackup) 3.
Installing ACCU-DART on a separate Workstation When ACCU-DART is installed on a server, and the user is setting up a new ACCU-DART Workstation, the following steps should be followed: 1. Ensure that ACCU-DART is installed on the server as per the instructions on Page 6. 2. Download the “Register RF DLLs” Macro from the Reseller-only section of the website (www.accu-dart.com/resellers) 3. In the Accpac “Macro” menu, run the “Register RF DLLs” Macro a.
Setting up an OE Miscellaneous Charge to Post Freight Charges Directly Through ACCU-DART **The steps below are to be used to configure ONE miscellaneous charge code to post the freight charge to the ACCPAC shipment transactions through ACCU-DART** Note: This feature is only available if all of the following conditions are met: a. the ACCU-DART advance update module “1 – Ship a Sales Order” is installed, b. the Sage ACCPAC ERP Optional Fields module is installed and activated, and c.